


How to Setup DNS Server on a Dedicated Server (Right Way)

 7m
7m
 0 comments
 Print
Print
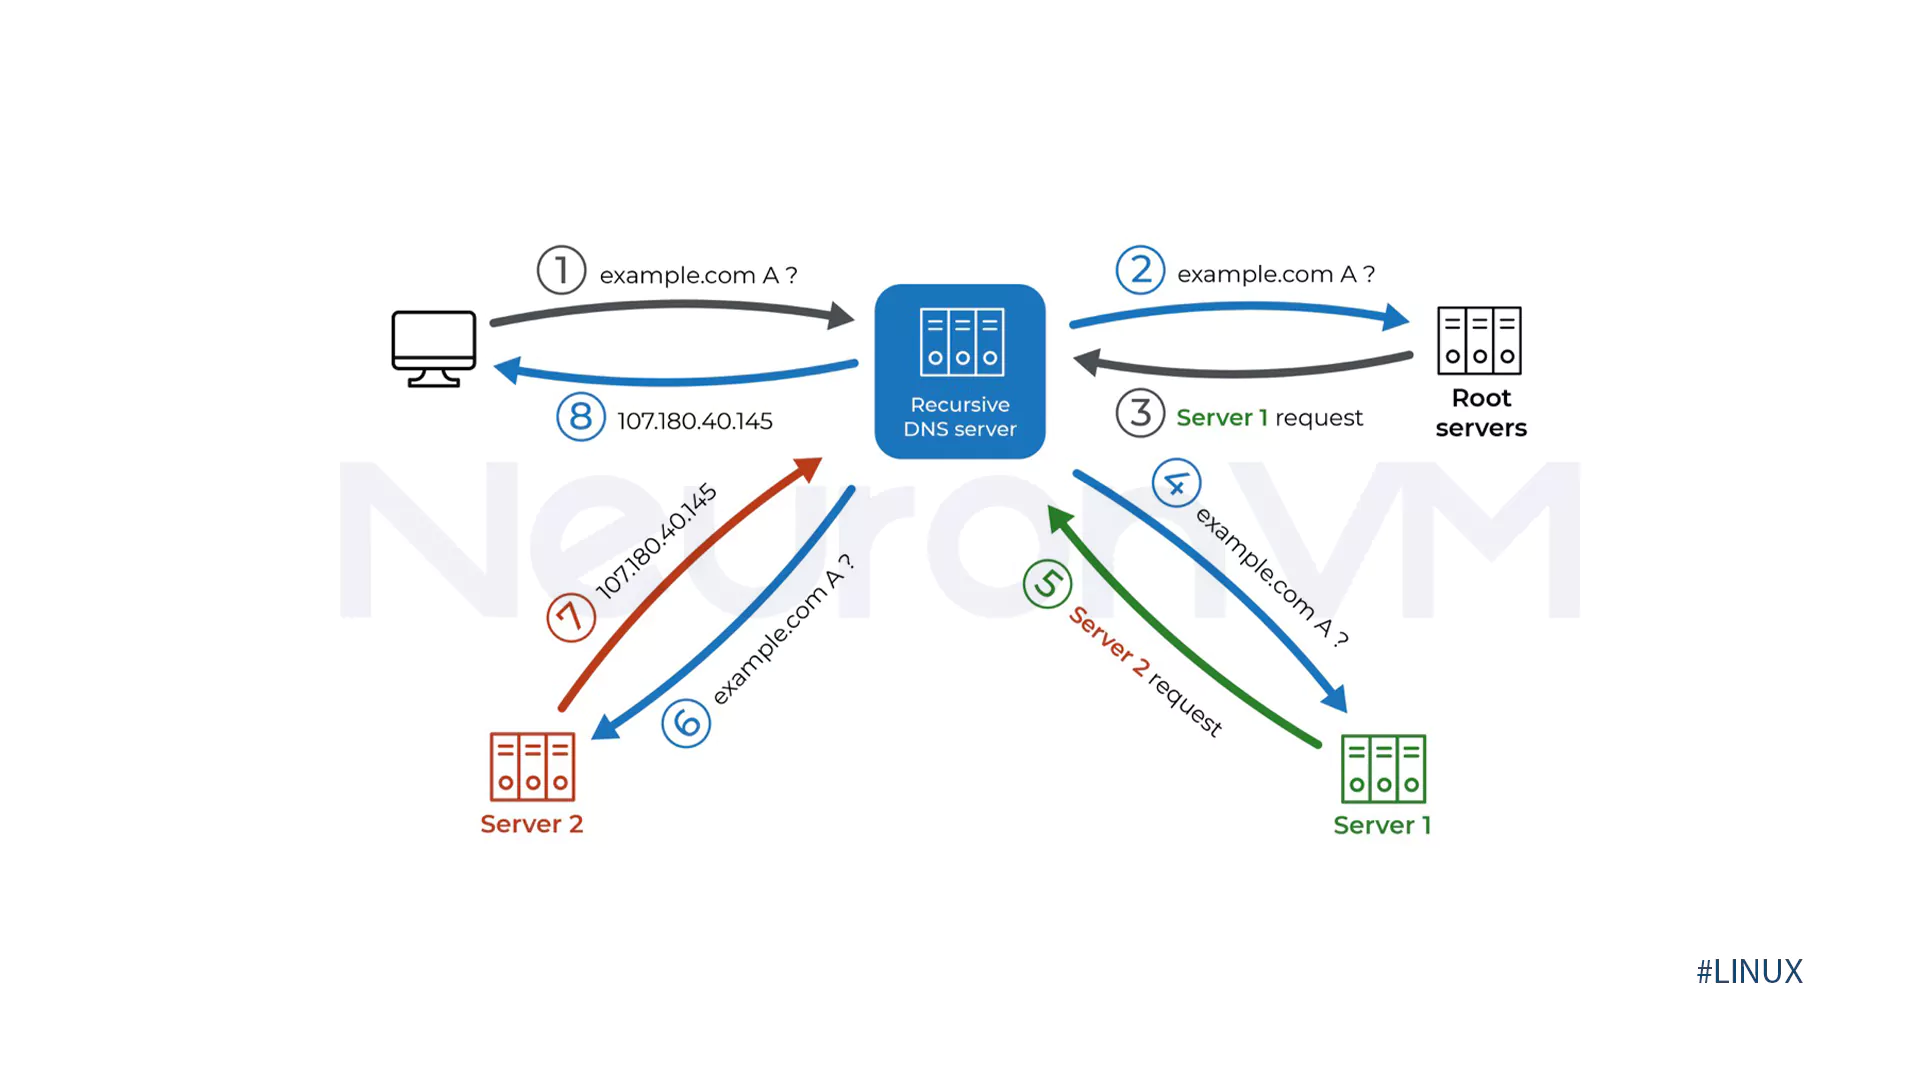
If you just got a Dedicated Server and want to put your site or application on it, the first thing that probably comes to mind is DNS. I remember when I first got a dedicated server, I thought that everything would be over with installing the operating system. But when I saw that users had to enter long IPs to access the site, I realized that practically nothing works properly without DNS! DNS is exactly like the Internet’s phone book; it converts domain names to IPs so that the user can easily reach their destination. Now, if you want to setup dns server on Dedicated Server yourself, you need to go through a series of important steps that I will explain in this complete article.

Why Proper DNS Setup on a Dedicated Server Really Matters
When I first worked with DNS, I honestly thought it was just about pointing a domain to an IP. But the deeper I got into server management, the more I realized Setup DNS is directly tied to performance, uptime, and even security. A misconfigured DNS can slow down your site, leave users stuck with errors like SERVFAIL, or worse, open the door to cache-poisoning attacks. On a dedicated server where you’re fully responsible, these small mistakes hit harder because there’s no hosting provider fixing them for you in the background. That’s why a clean, well-planned Setup DNS isn’t just a technical detail; it’s the foundation of stability for every application or business that runs on your server.
Step 1: Install BIND to Setup DNS Server
When it comes to setting up DNS on Linux, BIND is usually the first choice. The installation is not very complicated:
sudo apt update
sudo apt install bind9 bind9utils bind9-doc -y
But the important thing is that after installation, you only have a raw service. I myself went ahead with this the first time and after testing, I encountered a SERVFAIL error! The reason was that I had not defined the Zone File correctly. So remember that installation is just the beginning.
Step 2: Setting the Zone File
The Zone File is where you actually tell DNS what IP each domain or subdomain should connect to. This part is the heart of the matter. A simple example:
TTL 604800
IN SOA ns1.example.com. admin.example.com. (
2 ; Serial
604800 ; Refresh
86400 ; Retry
2419200 ; Expire
604800 ) ; Negative Cache TTL
;
IN NS ns1.example.com.
IN NS ns2.example.com.
IN A 192.168.1.100
www IN A 192.168.1.100
Always try to define at least two Name Servers for each domain. That way, if one of them goes down, your site will still be up.
Step 3: Set up a Secondary DNS for stability
Many people ignore this step. I remember once when the entire main server went down due to a hardware problem, and because I didn’t have a Secondary DNS, all my sites went down! The solution is simple: set up another server as a Secondary so that if there’s a problem with the main one, it can take over quickly.
Step 4: Test and Troubleshoot DNS
After setup, always test:
dig yourdomain.com
or
nslookup yourdomain.com
These tests will show you whether the records are set up correctly or not. From experience, I can tell you that not testing can waste hours of your time a day!
Conclusion
Setting up DNS on a Dedicated Server may seem like a technical and dry task at first glance, but in practice it is like building the backbone of the entire service. Without it, none of your projects will work properly. By properly installing BIND, configuring Zone Files, and setting up Secondary DNS, you can have a stable, fast, and secure system. Especially if you are working on large projects, these steps are like insurance for the future. I myself always follow these steps carefully after the first time I misconfigured DNS and the site was down for a few hours. So I suggest you take DNS seriously right now, because the entire user experience for your site depends on it.
To set up a DNS Server on a dedicated server, you first need to install DNS software such as BIND. Then create and configure zone files, define DNS records (such as A, NS, MX), and finally enable the service and set up secondary DNS for stable and secure operation. Don't forget to check and test the settings with tools such as dig and nslookup.
Having a basic understanding of the server operating system (usually Linux or Windows) and DNS concepts will help you a lot, but by following the step-by-step guide and using detailed tutorials, even beginners can successfully set up their DNS Server on a dedicated server.
After setting up the DNS Server, you can test your DNS records and accessibility using tools such as dig, nslookup, and MX Toolbox. Also, enabling secondary DNS and allowing zone transfers will increase stability and ensure trouble-free DNS performance.
You might like it

cPanel Tutorials
1+0 Ways to Change max_execution_time in CPanel
MikroTik Tutorials
How to Install Netinstall on MikroTik (Step-by-Step Guide)


How to Install and Secure PhpMyAdmin on Fedora Step by Step