How to Install Siege on CentOS 7 for Server Load Testing


 Study duration :
9 Minutes
Study duration :
9 Minutes
 0 Comment
If you run a website or a web application, it’s important to know how it works when many people use it at the same time, that is where a tool like Siege can help, Siege is a small program you run from the command line, it let’s you test your website by pretending lots of people are visiting it at once, this heps you see if your server can handle a lot of traffic without slowing down or crashing, in this guide we will walk you through the steps of “How to Install Siege on CentOS 7” whether you’re a developer, website owner, or just learning about servers, Siege is a useful tool to test your site’s strength, it can help you fix problems and make your site faster.

Prerequisites:
– A Linux VPS with a CentOS 7 operating system server with root access
– A minimum of 1 GB RAM, but 2 GB is recommended with a 1.1 GHz processor.
❗Important Note: Only use Siege on websites or servers that you own or have clear permission to test; running Siege on someone else’s website without permission can be illegal in many countries, always make sure you’re allowed to test the site, just to stay safe and follow the law.
Setup Guide for Siege on CentOS
Step 1: Add the Required Reposity
First, you have to install and enable the repository because Siege is not available in the default repository, run the following command in your Terminal:
yum install epel-release
Step 2: Install Siege
Once open, the EPEL is enabled, you can install Siege by running this command:
yum install siege
Step 3: Install Development Tools
You’ll need to install some necessary development tools, so your system can build Siege from the source code:
yum groupinstall 'Development Tools'
Step 4: Download the Siege Source File
Now that the development tools are installed, you can download the latest version of Siege:
wget http://download.joedog.org/siege/siege-latest.tar.gz
tar -zxvf siege-latest.tar.gz
Step 5: Extract and Compile Siege
After downloading the Siege, you will need to extract the files, move into the folder, and compile the source code, run the following commands one by one:
cd siege-*/
sudo ./configure --prefix=/usr/local --with-ssl=/usr/bin/openssl
sudo make && make install

How to Configure Siege HTTP Load Testing Utility on CentOS 7
Run the Initial Configuration Command
At first, you should execute the following command to build a package from the source, the file contains the basic settings that Siege will use during testing:
sudo siege.config
The above command will generate siege.conf file located in your user’s home ~/.siege/siege.conf.
Here are the contents of the file:
cat siegerc |egrep -v "^$|#"
Also, you will notice that the log file path and timing settings are already enabled, meaning Siege will start logging activity and follow the time settings by default.
Output:
logfile = $(HOME)/var/log/siege.log
verbose = false
color = on
quiet = false
show-logfile = true
logging = false
gmethod = HEAD
parser = true
nofollow = ###
nofollow = ###
nofollow = ###
nofollow = ###
limit = 255
protocol = HTTP/1.1
chunked = true
cache = false
connection = close
concurrent = 25
time = 1M
delay = 0.0
internet = false
benchmark = false
accept-encoding = gzip, deflate
url-escaping = true
unique = true
How to Test Website Load with Siege on CentOS 7
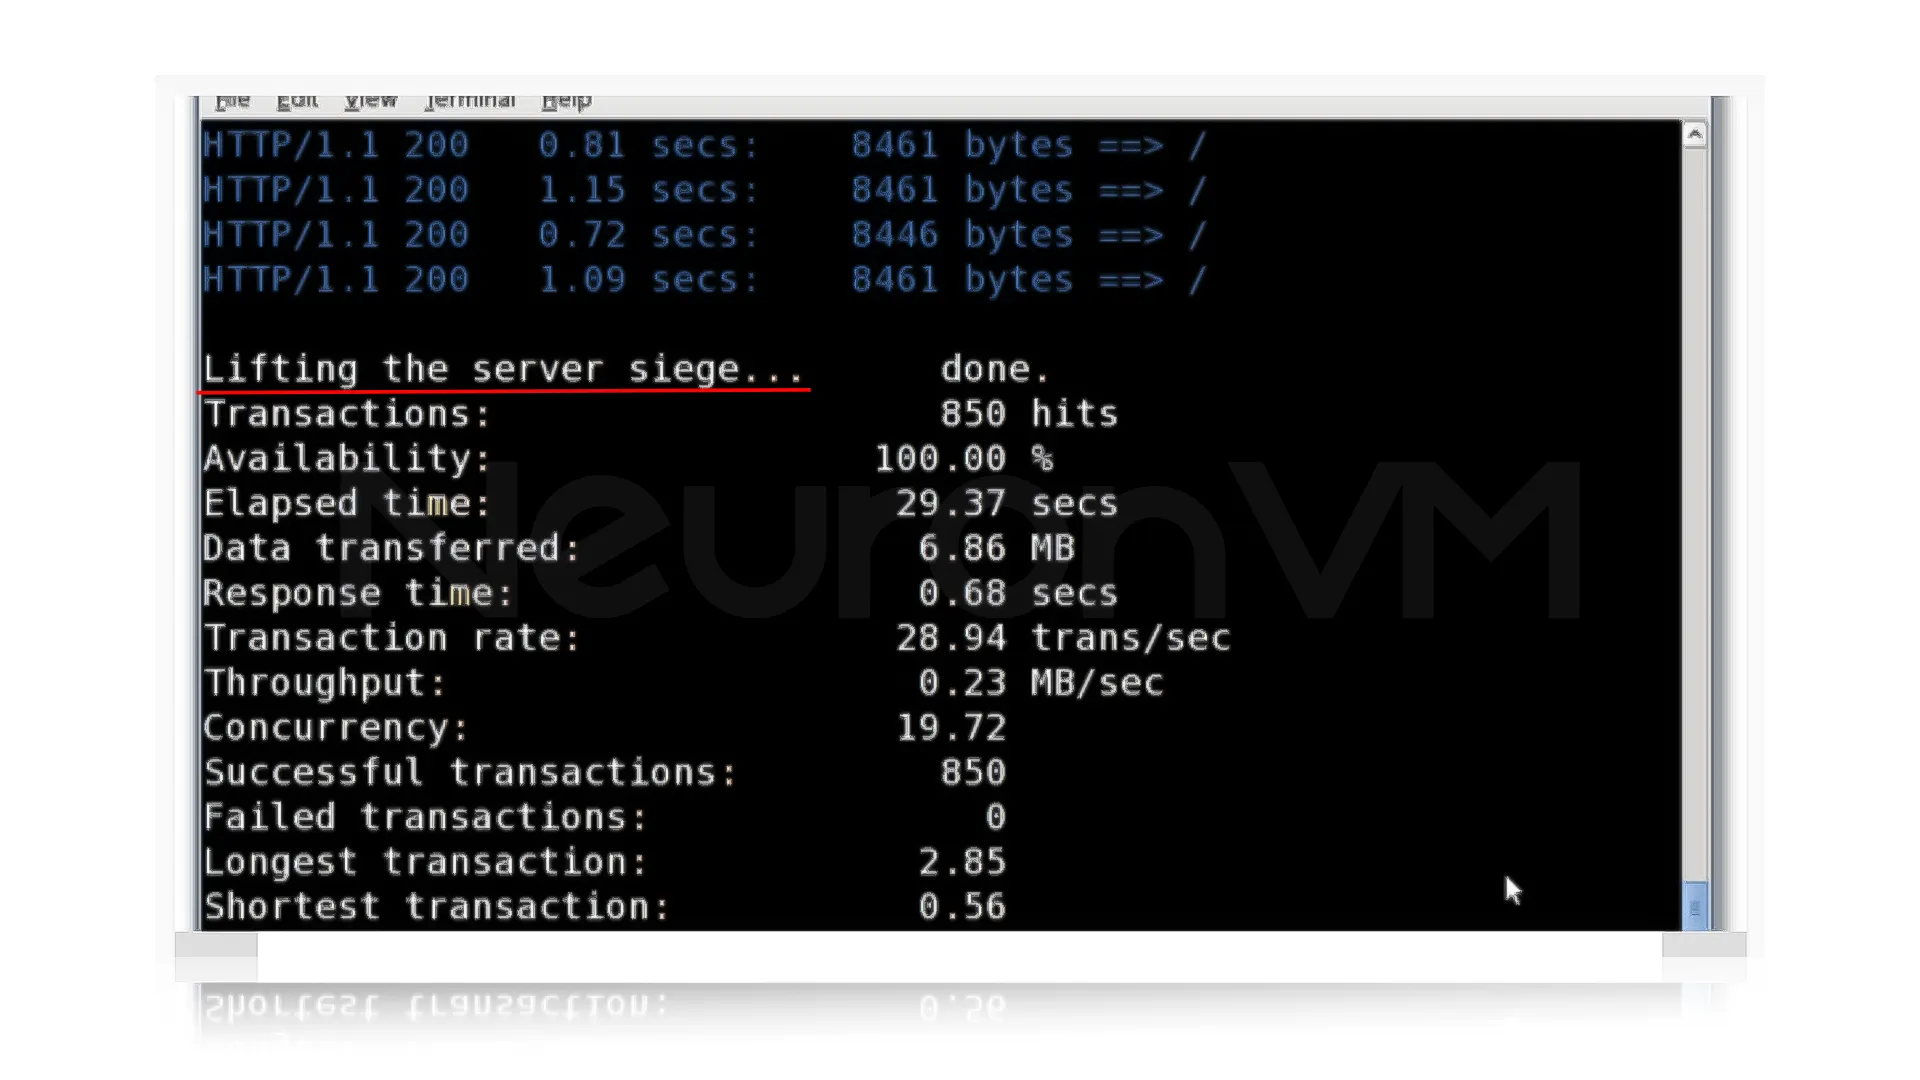
To check how your website handles traffic, you can run a basic Siege test with this command:
siege example.com
Make sure to replace ” Example.com” with your actual website address, if there is no failed connection, your system will work fine, and there will be no issues.
How to Run Siege Against Multiple Websites on CentOS 7
If you want to test several websites at once, you can make Siege read a list of URLs from a file, which you can do by creating a text file and listing all the URLs you want to test, for example:
sudo nano /usr/local/etc/urls.txt
In this step, Siege should test the URLs from the file, so run the following command to test all the URLs in that file:
siege -f /usr/local/etc/urls.txt
⚙️ Helpful Siege Options:
Also, you can use command-line options to try different settings.
-C: Specify your own configuration file
-q: Suppresses Siege’s output
-g: GET, pull down HTTP headers, and display the transaction
-c: The number of concurrent users is 10 by default
-t: How much time to run the test
-d: Random delay before each request
-b: No delays between requests
-i: User simulation
-f: Test URLs from the specified file
-l: logfile
-H: Add a header to the request
-A: Specify a user agent
-T: Sets Content-Type in the request
–no-follow: do not follow HTTP redirects
Conclusion
Using Siege is a smart way to find out how your website behaves when a lot of people visit it at the same time, it helps you check your server’s performance and spot problems before they affect real users, in this guide you learned how to install Siege on CentOS 7, set it up, and run tests on one or multiple websites, you can also explore helpful command options to customize your test the way you need, just keep in mind to only run Siege on the websites you own or have the permission.
External Source: Official Siege Website

