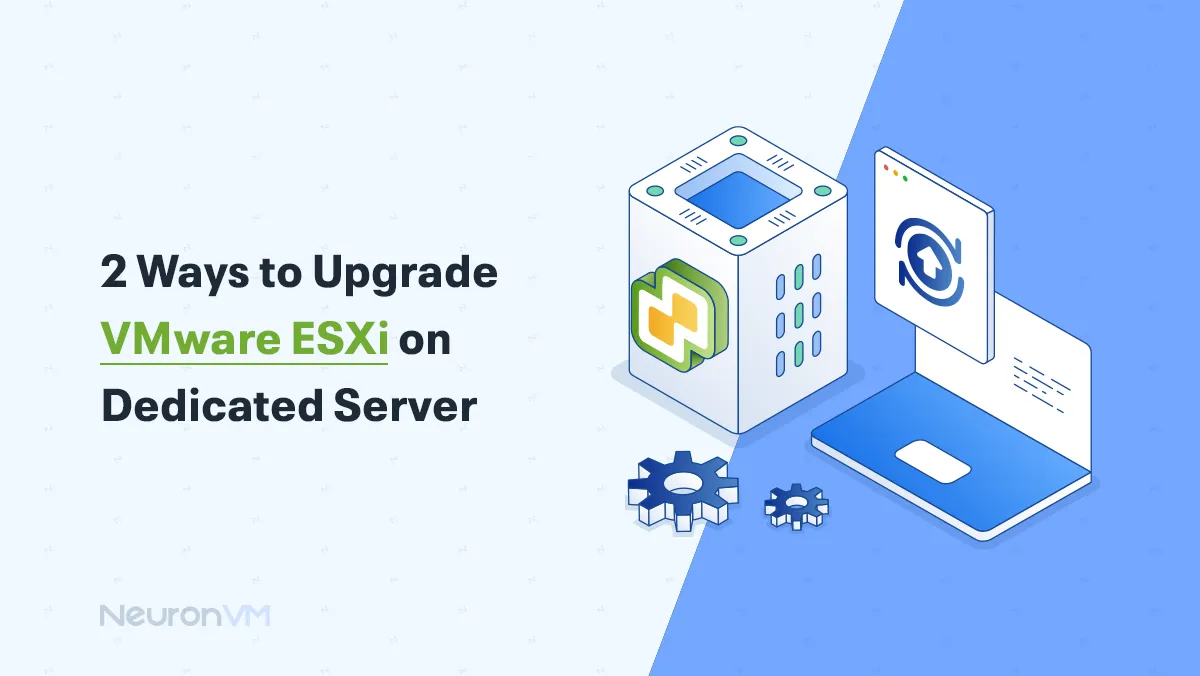
How to Upgrade VMware ESXi on a Dedicated Server

 20m
20m
 0 comments
 Print
Print
Keeping your server running smoothly means staying up to date, and that includes upgrading VMware ESXi, an upgrade not only improves performance and adds new features but also protects your system from security risks, If you’ve been running an older version of ESXi, upgrading is more than just a routine task, it’s about keeping your business safe, and efficient, don’t worry if this sounds complicated to you, because in this guide, we’ll walk you through two simple methods to upgrade VMware ESXi on your dedicated server.
Why Updating Your VMware Hypervisor Improves Security and Performance
Upgrading ESXi isn’t just about having the newest version; it’s about keeping your systems secure, here’s why it matters in simple terms:
Security Fixes: New updates patch holes like Spectre and Meltdown that hackers couldn’t mess with your systems.
Hardware: Got the latest Intel/AMD CPUs? Older ESXi versions might not work with them, and upgrading makes sure your new gear runs smoothly.
Meeting Industry Rules: If you’re in finance, healthcare, or e-commerce, keeping your hypervisor up to date is often required.
Better Performance: VMware keeps improving how virtual machines handle scheduling, storage, and networking, which means faster systems and lower costs for you.
Example: A team moved from ESXi 6.5 to 7.0 on a NeuronVM dedicated server and saw their virtual machines start 20% faster, with better storage performance thanks to NVMe support.
VMware ESXi Upgrade on Dedicated Server
Ready to boost your server’s performance? Let’s go through two simple ways to upgrade VMware ESXi on your dedicated server
🔎 Prerequisites
A Dedicated Server: We recommend a cheap dedicated server from NeuronVM.
Updated System Components: Ensure your server hardware is compatible by checking the VMware Hardware Compatibility Guide.
At least 8 GB of RAM: This is the minimum required to run ESXi smoothly.
Note: If you are managing an ESXi host through vCenter, make sure that your vCenter version matches the version of ESXi you’re upgrading to, also if you are new to VMware or need a refresher on setup, we recommend checking articles on NeuronVM.
Tip: Always take a full backup of your ESXi host and VMs before upgrading, as this ensures you can roll back safely if something goes wrong.
1. 🔹 Using ESXCLI to upgrade VMware
ESXCLI or command-line interface is a powerful way to update standalone ESXi hosts or those managed by vCenter, so here are two methods to upgrade ESXi by ESXCLI:
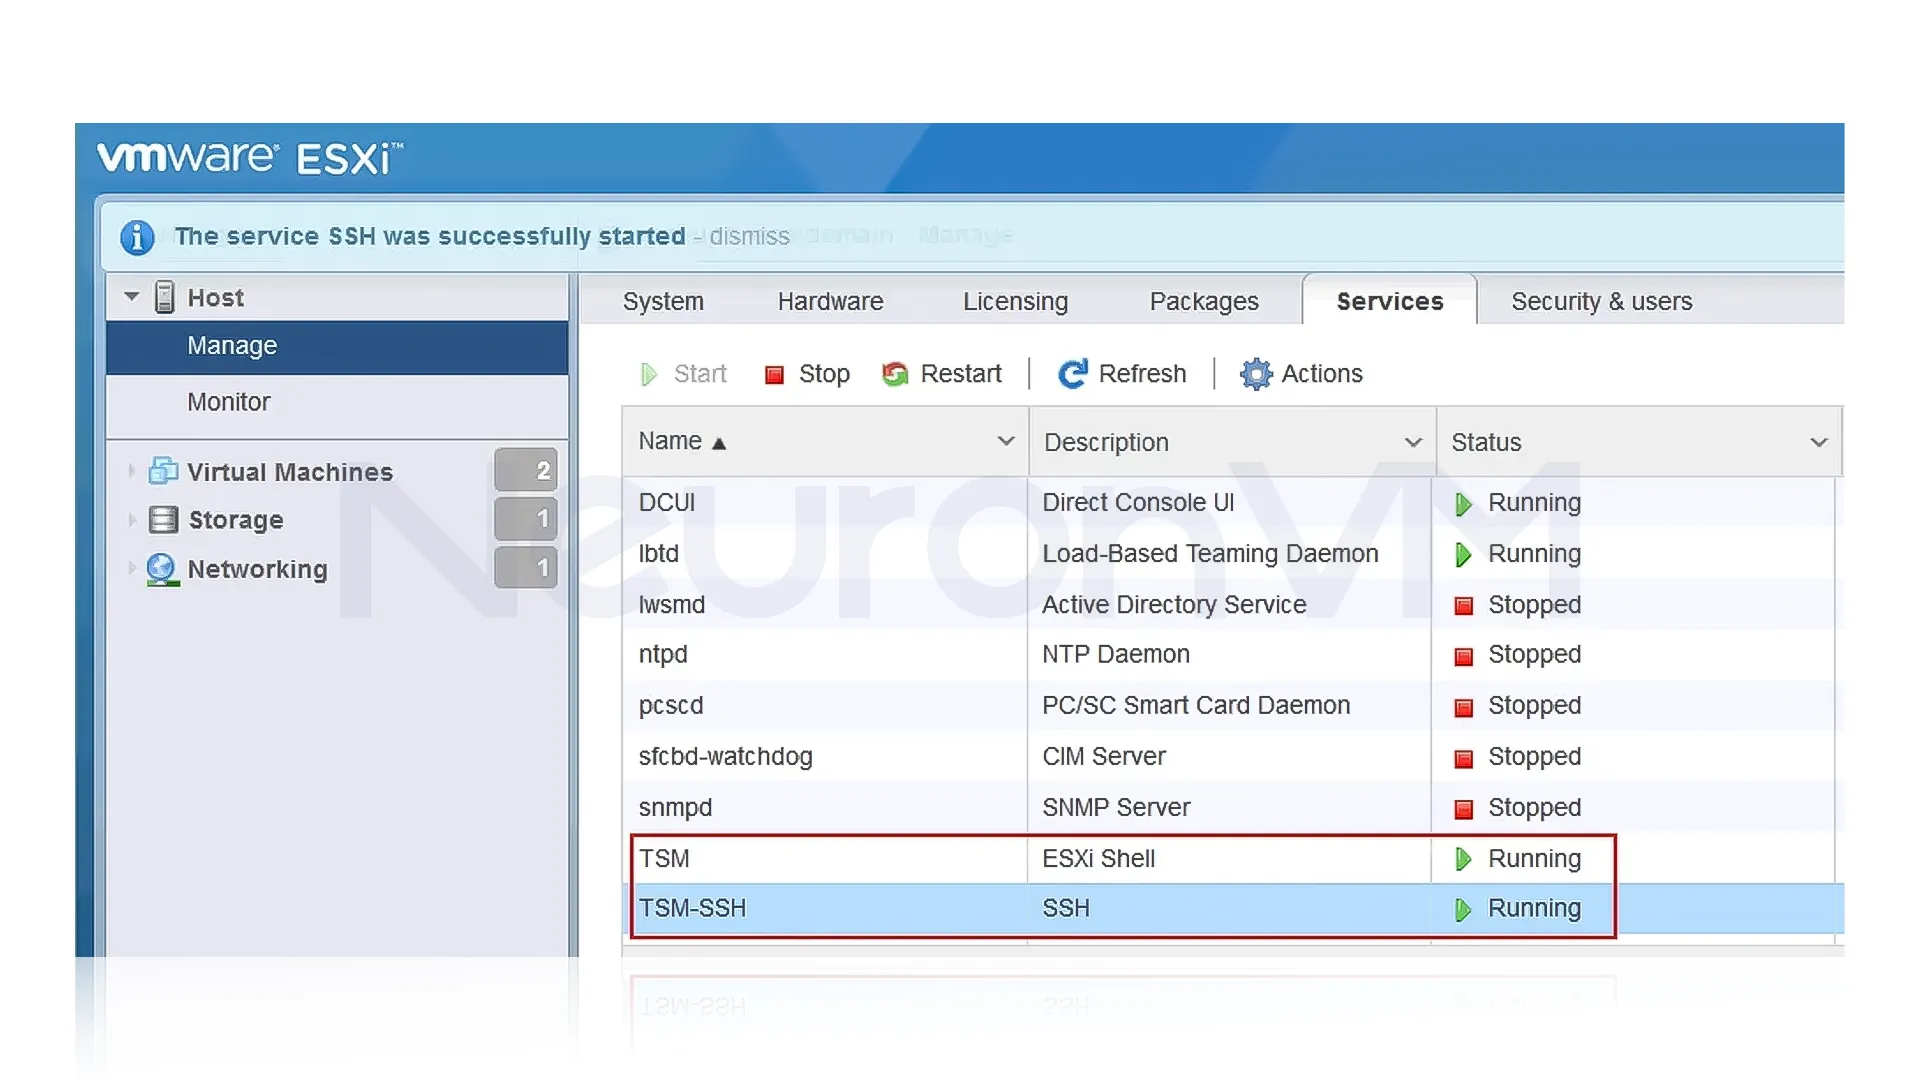
1- To enable system customization in ESXi, access the direct console and navigate to the troubleshooting options. Enable both the ESXi shell and SSH options. As you wish, you can disable them manually
2- The second method, is to enter your ESXi host IP address in a browser. Then use your ESXi root credentials to log in to the VMware Host Client and go to the manage -> services part.
Start the services this way:
⏺︎ TSM
⏺︎ TSM-SSH
As you started the services on the VMware host client, the services will be enabled until the system reboots:
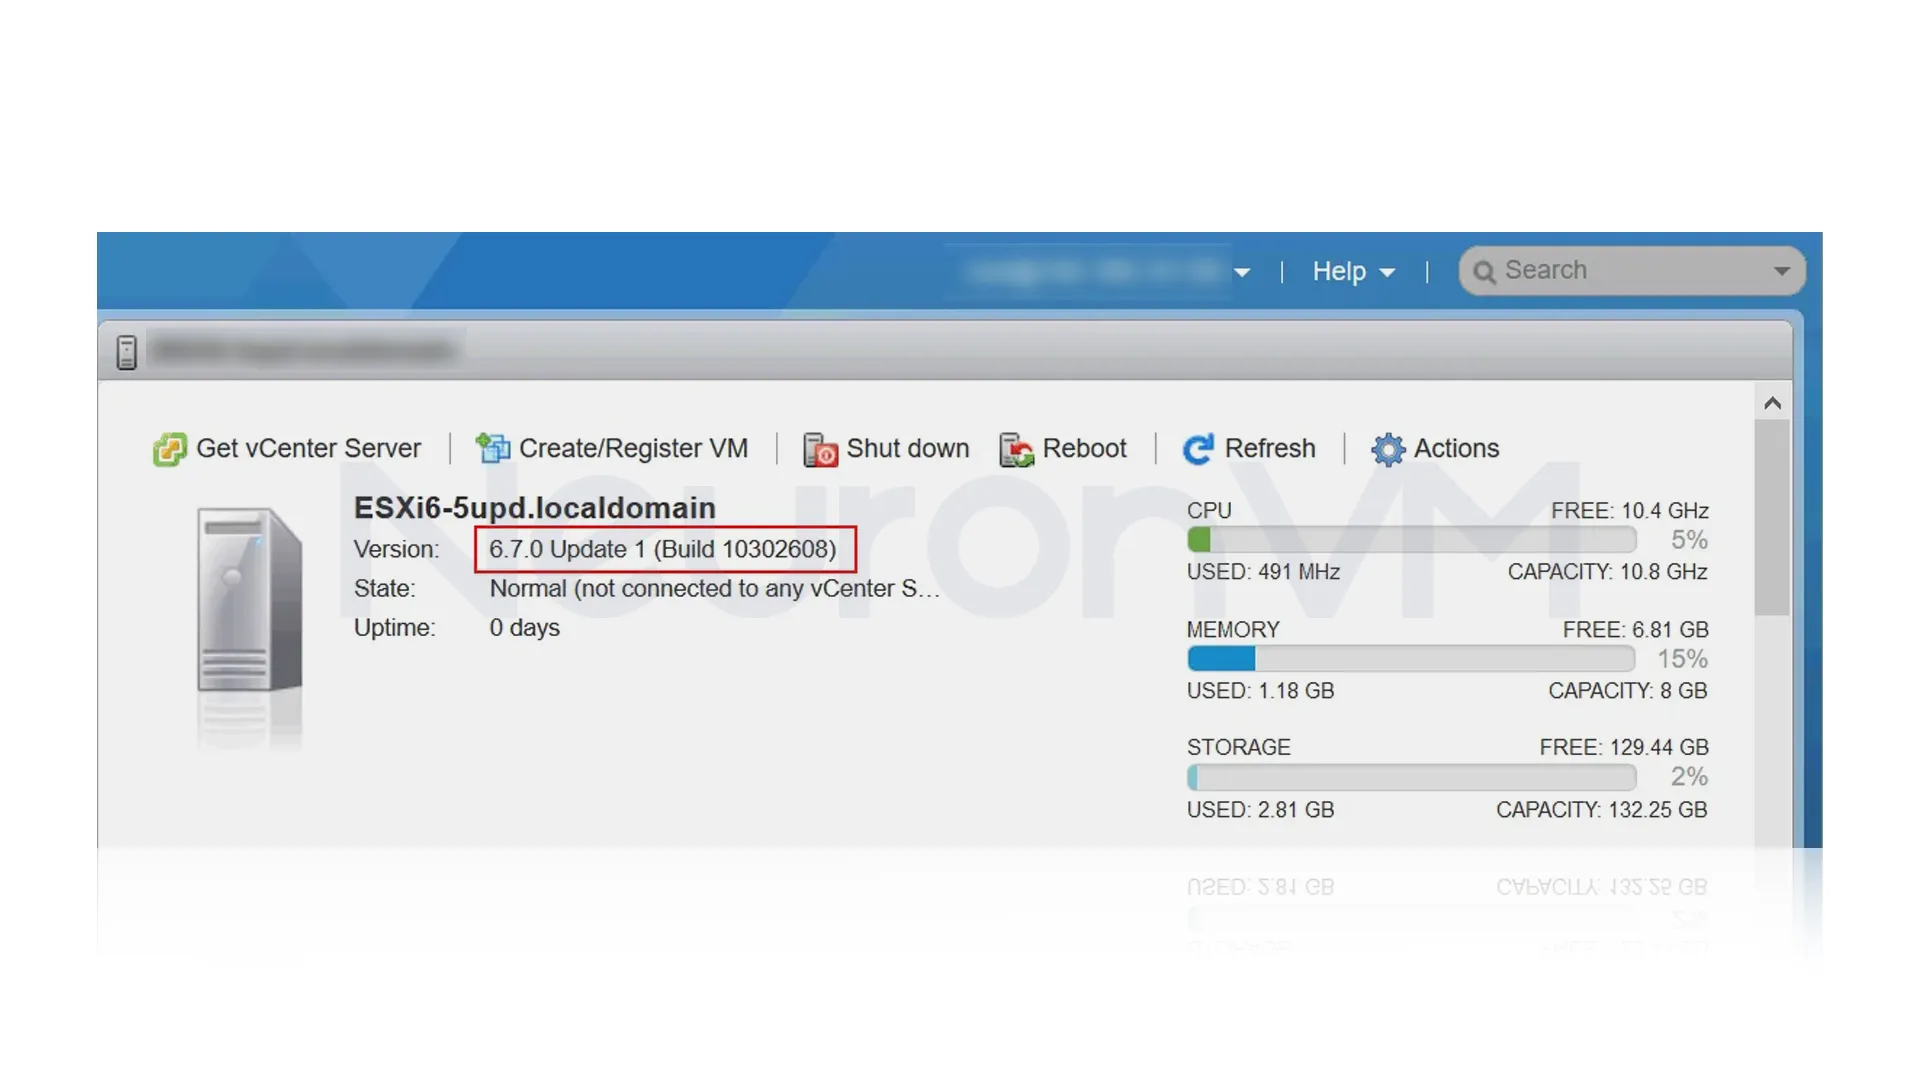
Use the VMware -v command or go through Help -> about on the VMware host client to check the current version:
Note that you should shut down all virtual machines running on the ESXi host.
If you want to use ESXCLI, you will have two types to choose from:
– Offline method: Downloading the offline bundle from the VMware website manually.
– Online method: Using VMware online repositories to download.
Use the Offline Method to apply the latest VMware ESXi
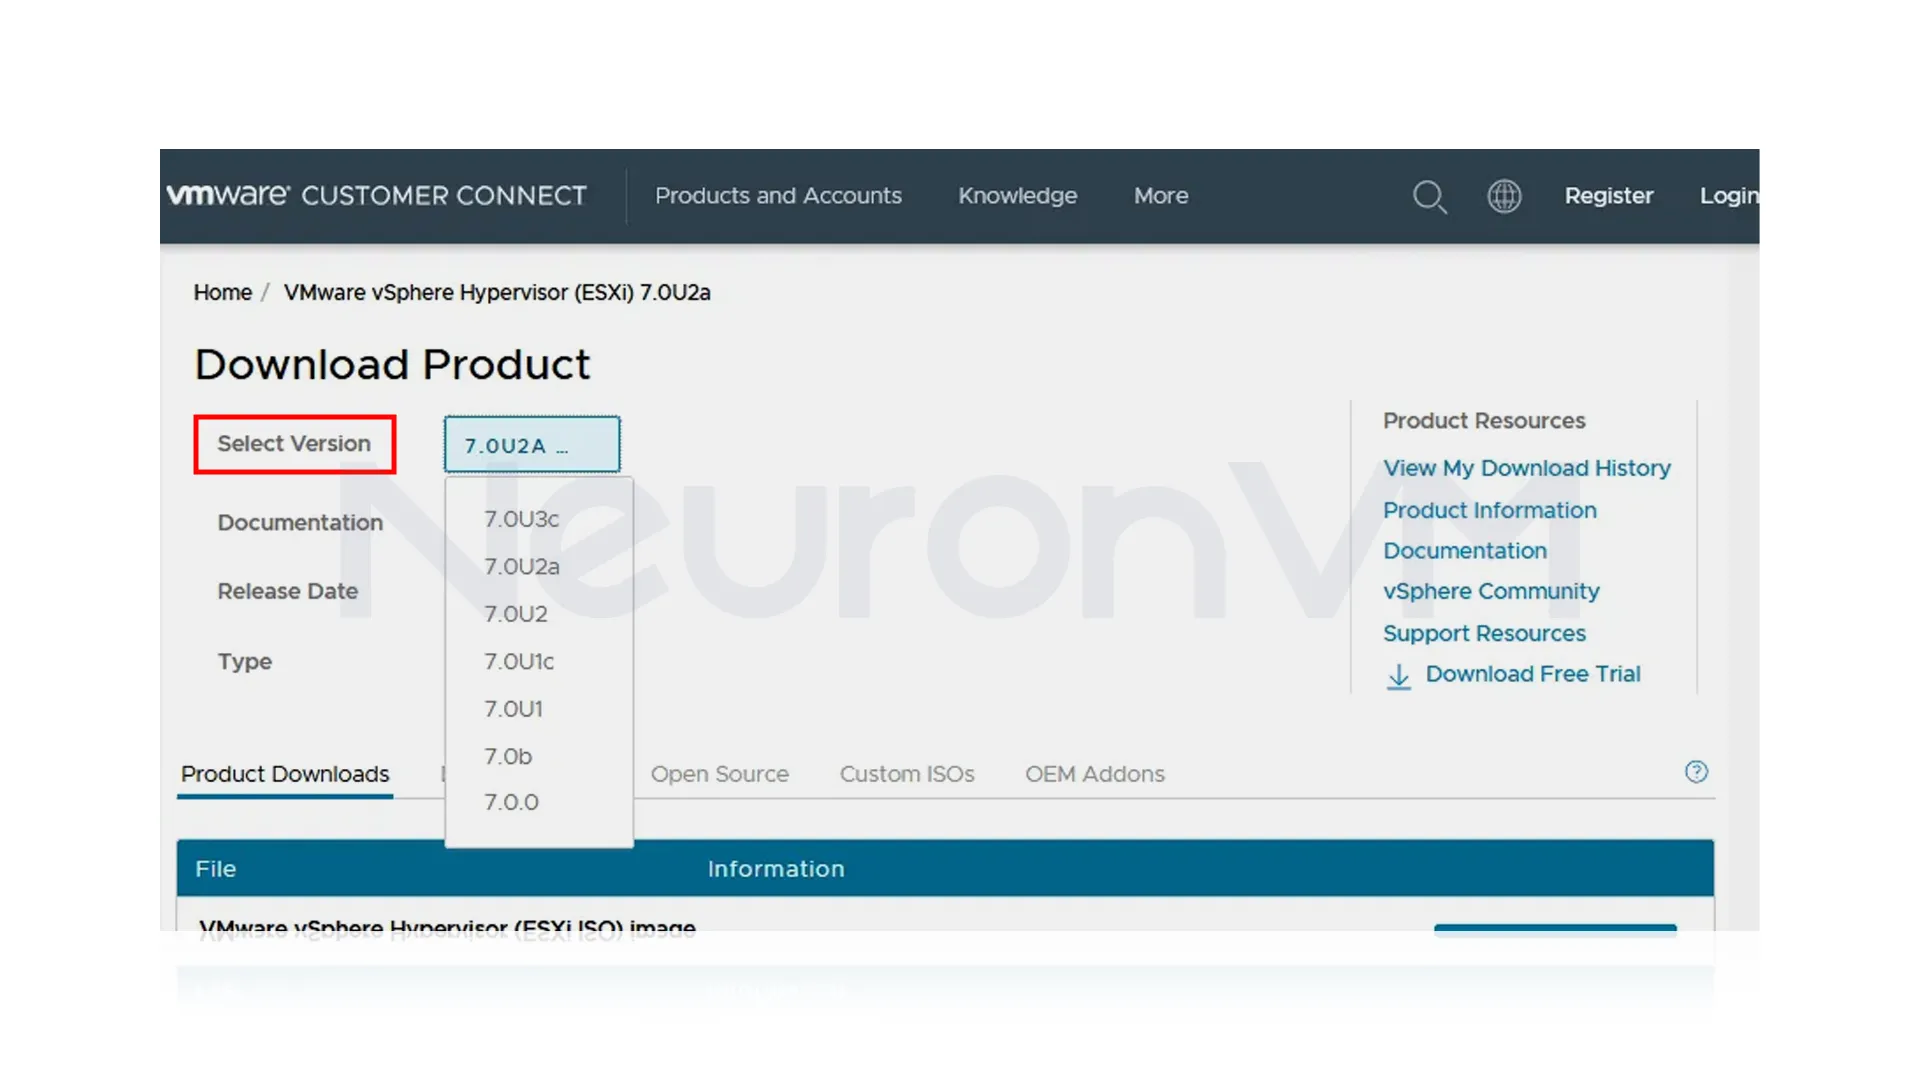
To start, make sure you download the offline bundle from the VMware website. You will find the zip file of the offline bundle along with the ESXi ISO installation image. Then select the suitable version from the drop-down list containing different versions. In our example, we used the name VMware-ESXi-7.0U2d-18538813-depot.zip:
Here, you can upload the downloaded file to the ESXi datastore using either the VMware host client or an SFTP client. We will utilize the VMware host client for this task.
Go to storage -> datastores. Choose the one you want and click on the datastore browser:
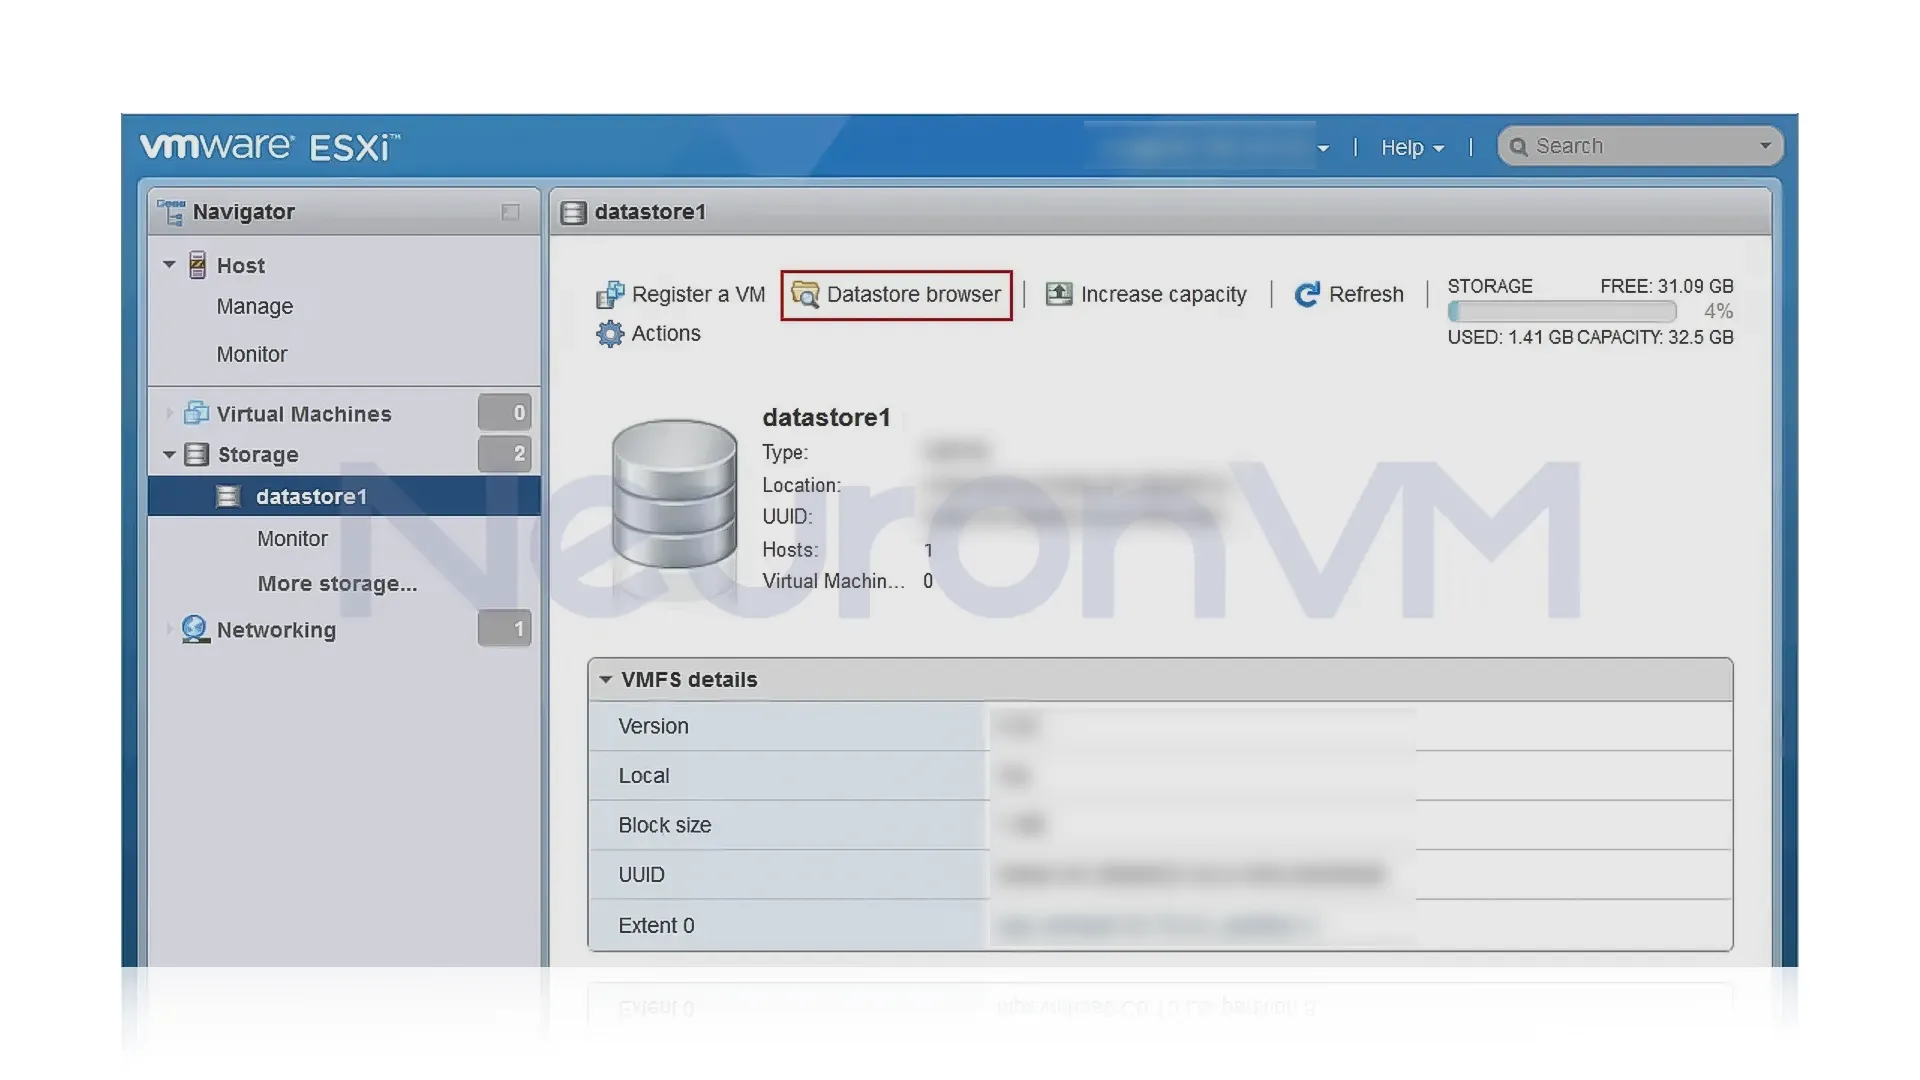
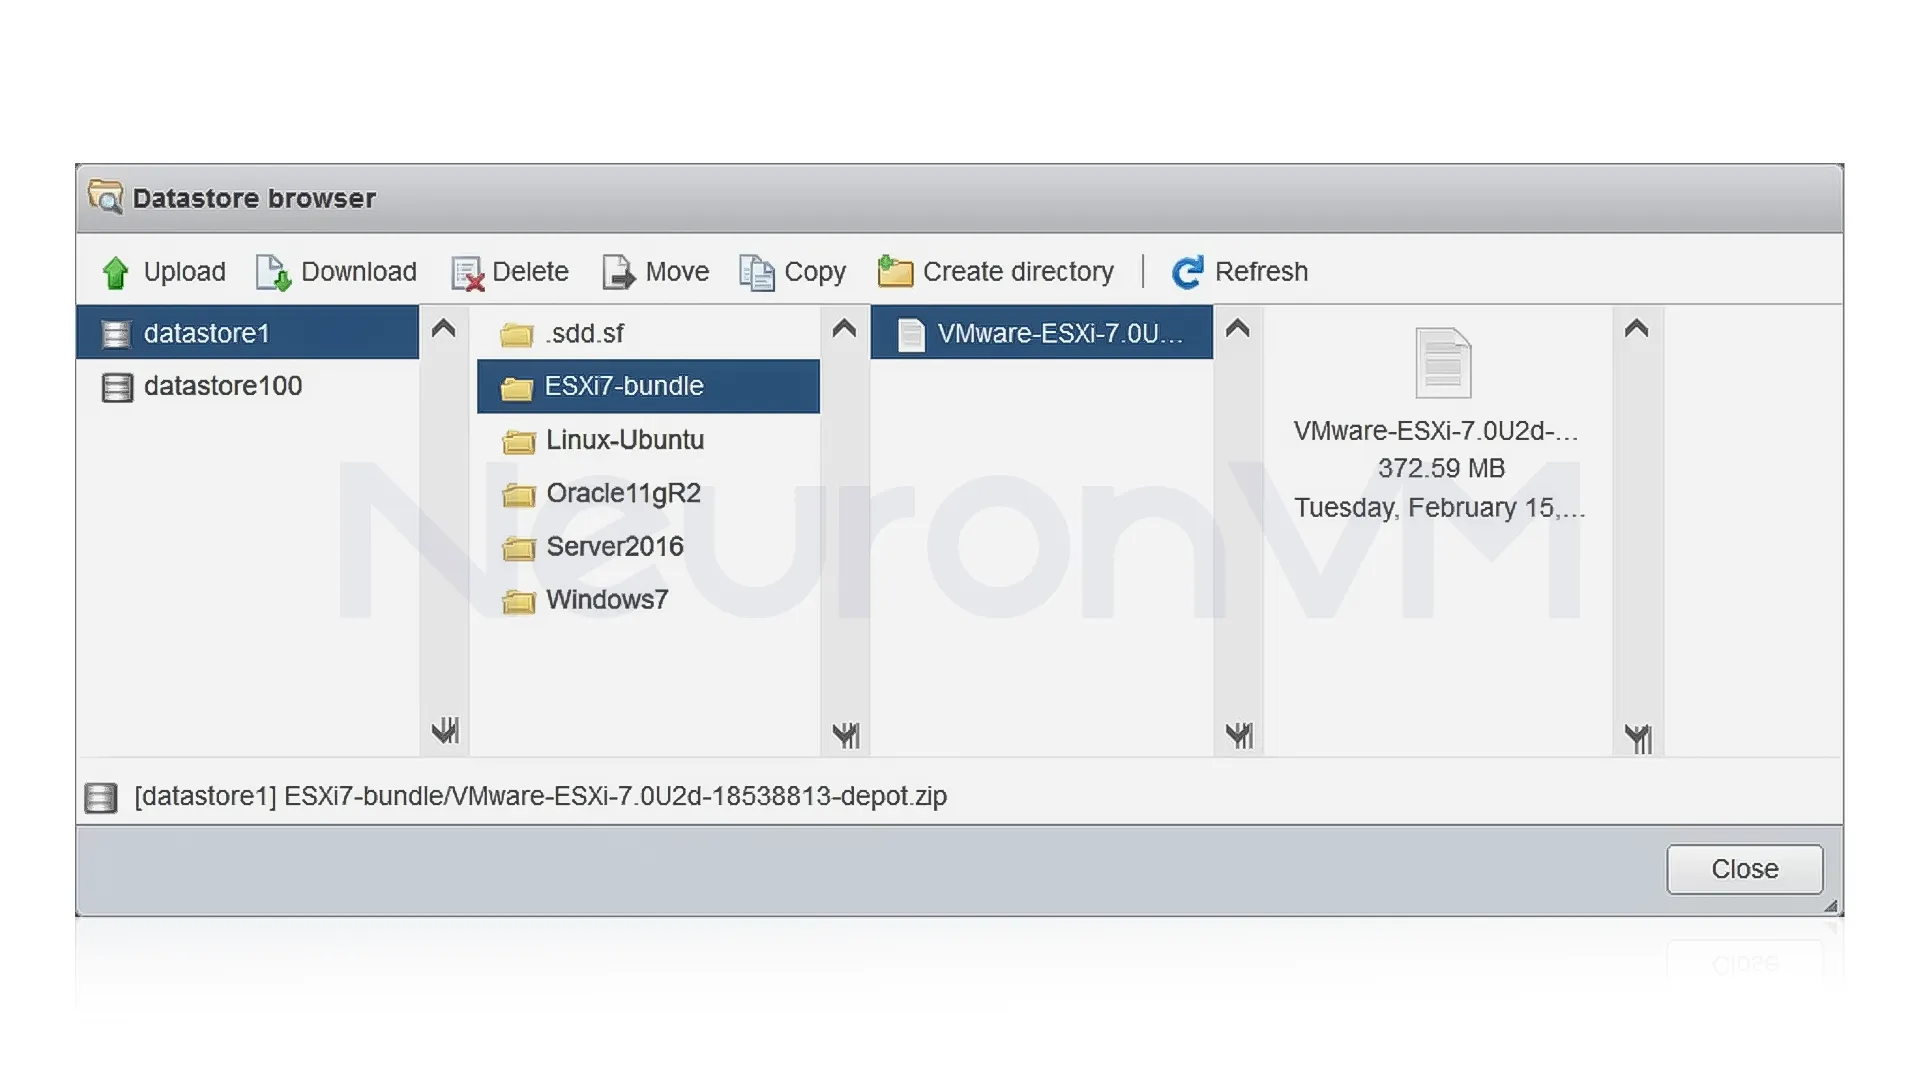
You should create a new file or select a directory to store bundle files, Here we created an ESXi7-bundle directory to keep our files, It is time to upload and search for a zip bundle file and upload the file to the chosen directory in the data store:
Ensure that there is no virtual machine in the running state, To allow checking the current version of the ESXi file on your server, use the vmware-v command.
Upgrade your ESXi version:
esxcli software profile update -p ESXi-7.0U2d-18538813-standard -d /vmfs/volumes/datastore1/ESXi7-bundle/VMware-ESXi-7.0U2d-18538813-depot.zip
You should wait to see the command output for the VMware -v command, After the successful execution of the command, you will see a list of updated packages in the console output.
Reboot the ESXi host:
reboot
You should assign a serial number to your upgraded ESXi file. After upgrading, the ESXi file will operate in full-featured evaluation mode for 60 days, During this time, you will need to input a valid serial number. Failure to do so within the 60-day window will result in limited performance.
Use the Online Method to upgrade VMware ESXi on a Dedicated server
In this method, first of all, you have to configure internet access to upgrade the ESXi host and place the host in maintenance mode manually, You should use the command to list all current image profiles and contained packages:
esxcli software profile get
Use the command below to enter ESXi into maintenance mode:
vim-cmd /hostsvc/maintenance_mode_enter
Or you can use:
esxcli system maintenanceMode set –enable true
In the built-in firewall on the ESXi host, allow HTTP traffic by editing the settings part:
esxcli network firewall ruleset set -e true -r httpClient
The list of profiles provided by VMware in the VMware repository is as follows:
esxcli software sources profile list -d https://hostupdate.vmware.com/software/VUM/PRODUCTION/main/vmw-depot-index.xml | grep ESXi-7.0U2
Here, use this profile:
ESXi-7.0U2d-18538813-standard
Using the following command, you can check which packages are going to be installed:
esxcli software profile update -d https://hostupdate.vmware.com/software/VUM/PRODUCTION/main/vmw-depot-index.xml -p ESXi-7.0U2d-18538813-standard –dry-run
By using the related command, run the updating process:
esxcli software profile update -d https://hostupdate.vmware.com/software/VUM/PRODUCTION/main/vmw-depot-index.xml -p ESXi-7.0U2d-18538813-standard
You should wait for a short time to finish the upgrade process, If you want to prevent overwriting existing packages, configurations, and drivers, you should choose ESXCLI software profile update instead of ESXCLI profile to install.
Tip: The following error may occur if there is a persistent scratch partition.
If there are no issues with any of the processes running, restart the ESXi host to implement the changes:
reboot
Use the command below, to exit maintenance:
vim-cmd /hostsvc/maintenance_mode_enter
Or use:
esxcli system maintenanceMode set –enable false
2. 🔹 Using vCenter to Upgrade VMware ESXi on Dedicated server
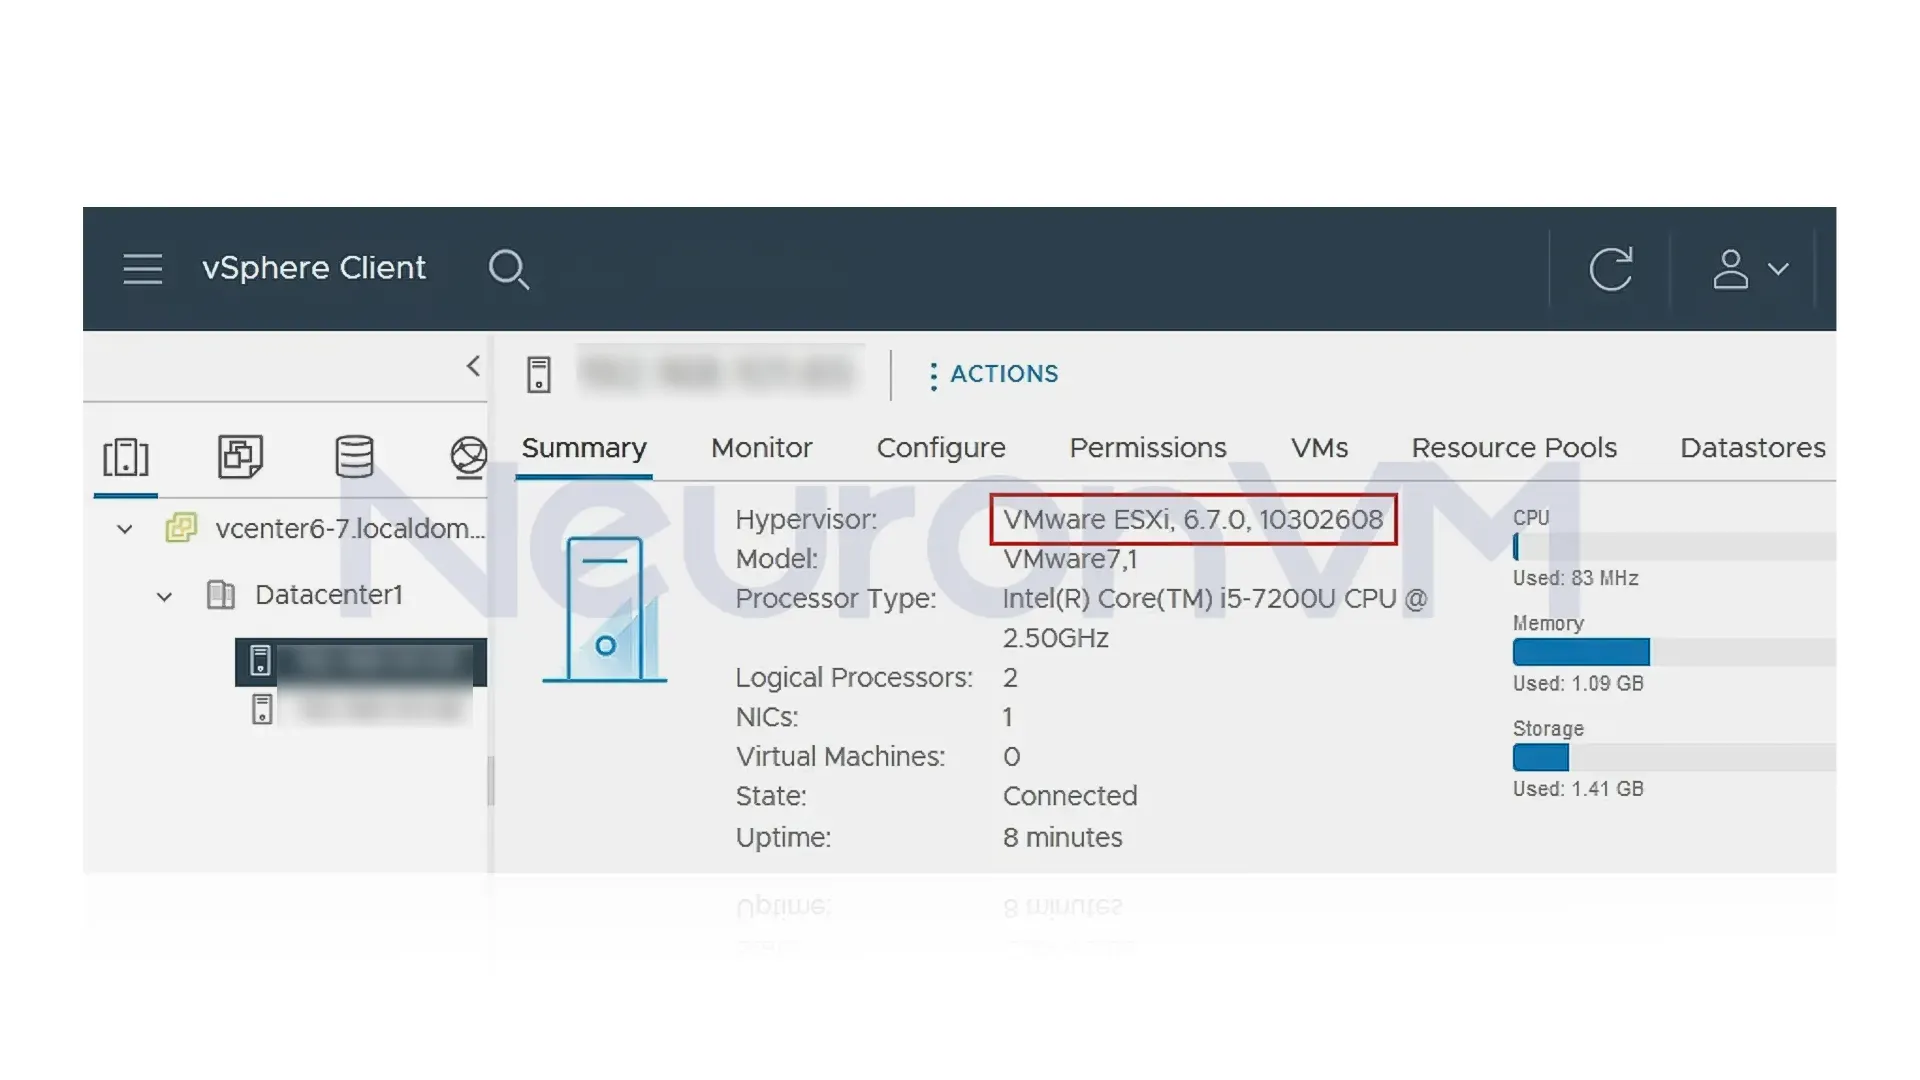
In this section, we want to teach you the second method to upgrade VMware ESXi on a Dedicated server. To access vCenter, open the VMware vSphere client in your browser. You can now upgrade your ESXi host by using the IP address 192.168.xxx.xx. Choose the host you need and check the current hypervisor version. Also, if you want to upgrade several ESXi hosts, you can use a cluster or data center:
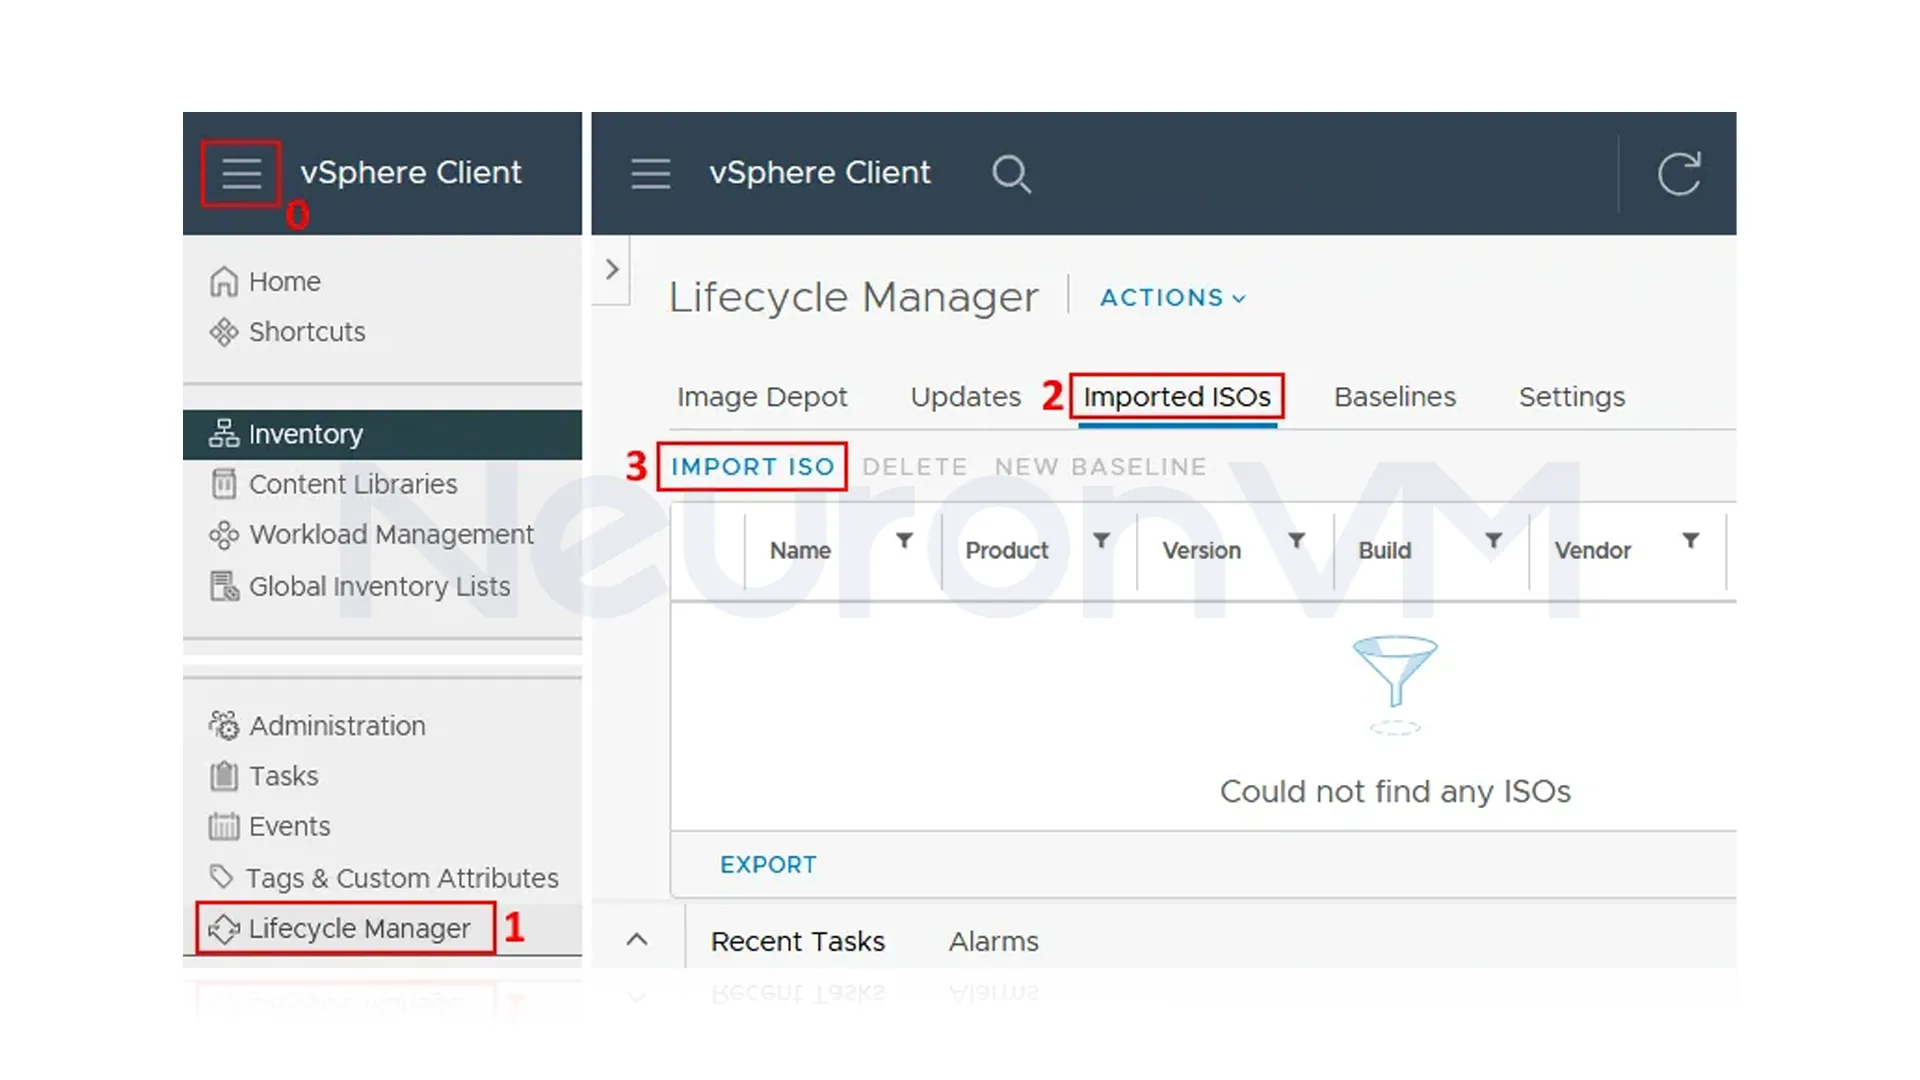
1- There are two methods to open a lifecycle manager.
a) The first method is to click Home and you see the left pane (navigation pane). Click Lifecycle Manager.
b) Second, you can click the menu at the top of the vSphere client window and press Lifecycle Manager.
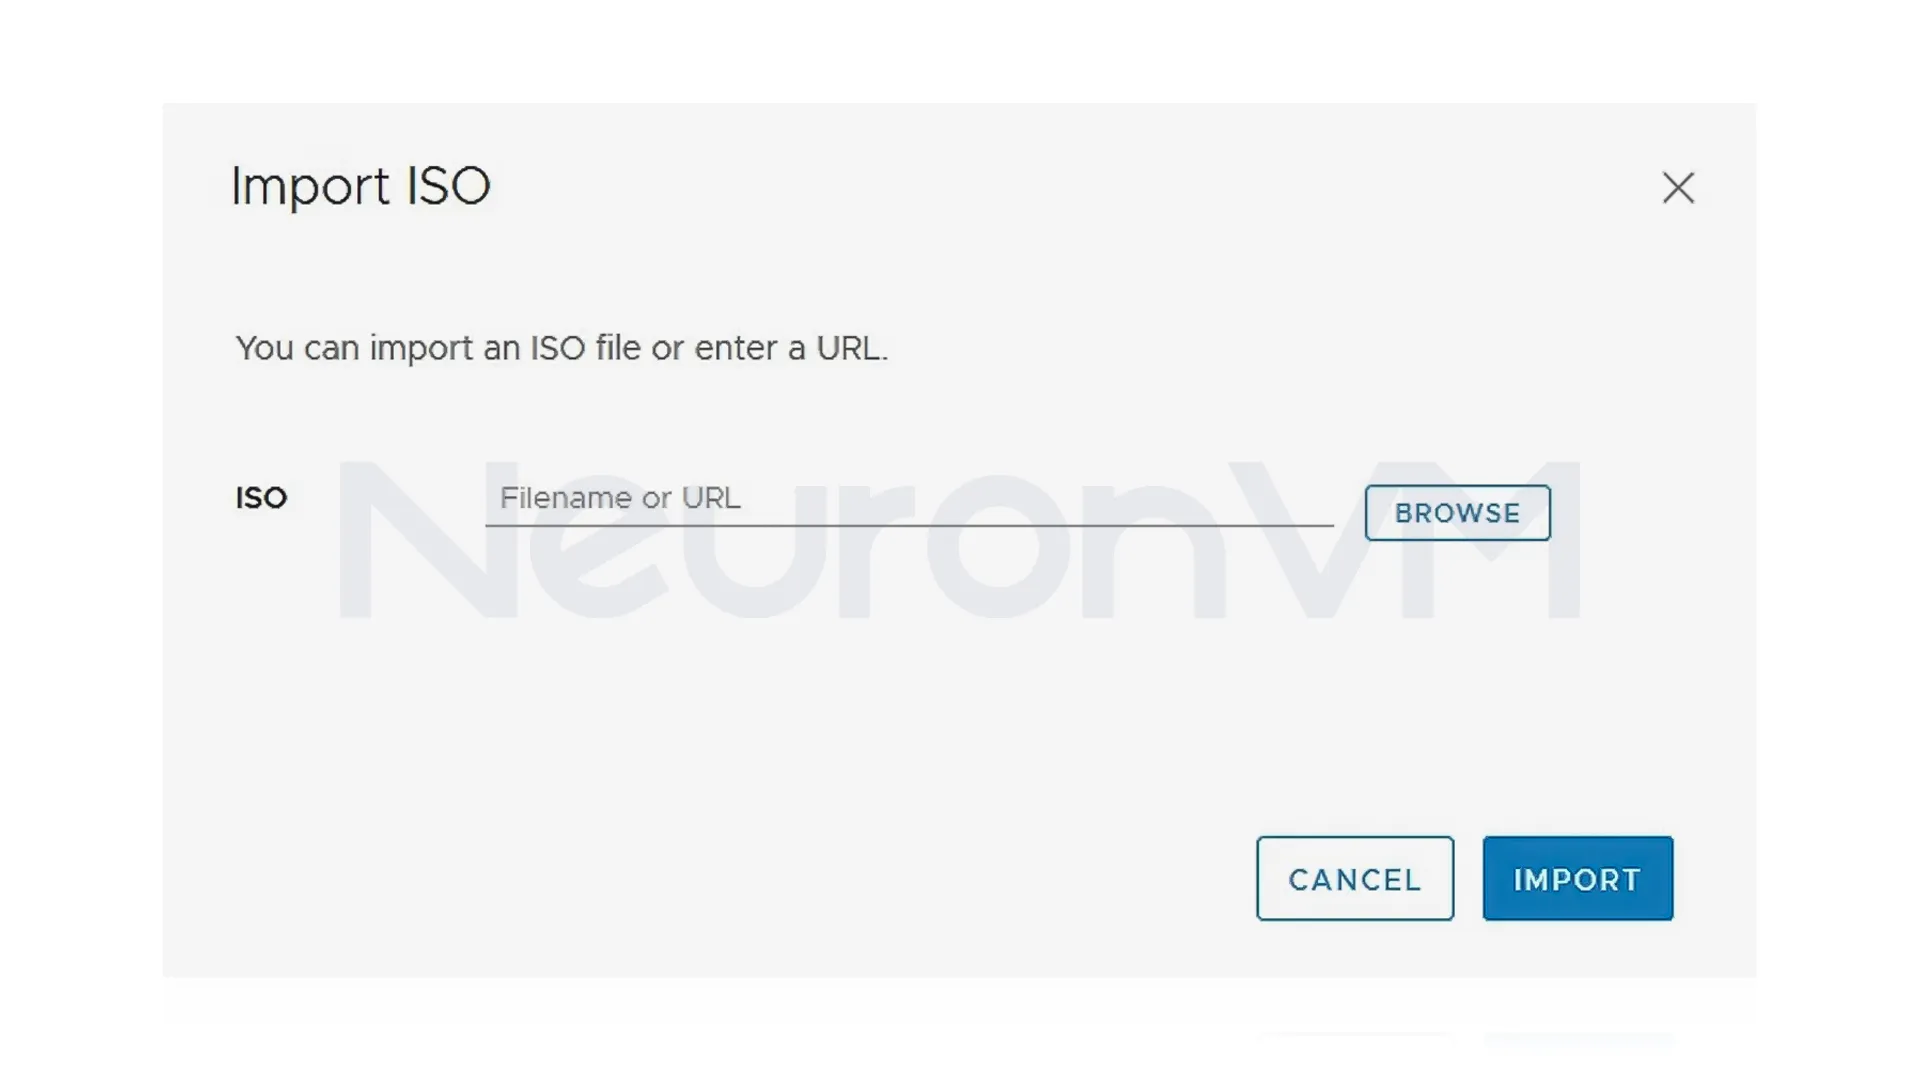
2- Now that you have opened the lifecycle manager in the vSphere client, you will see the Imported ISOs tab and click on Import ISO:
3- Press Browse and choose the ESXi 7 Update 2 installation ISO image file. As you registered, you can download the ESXi installation image from the VMware website.
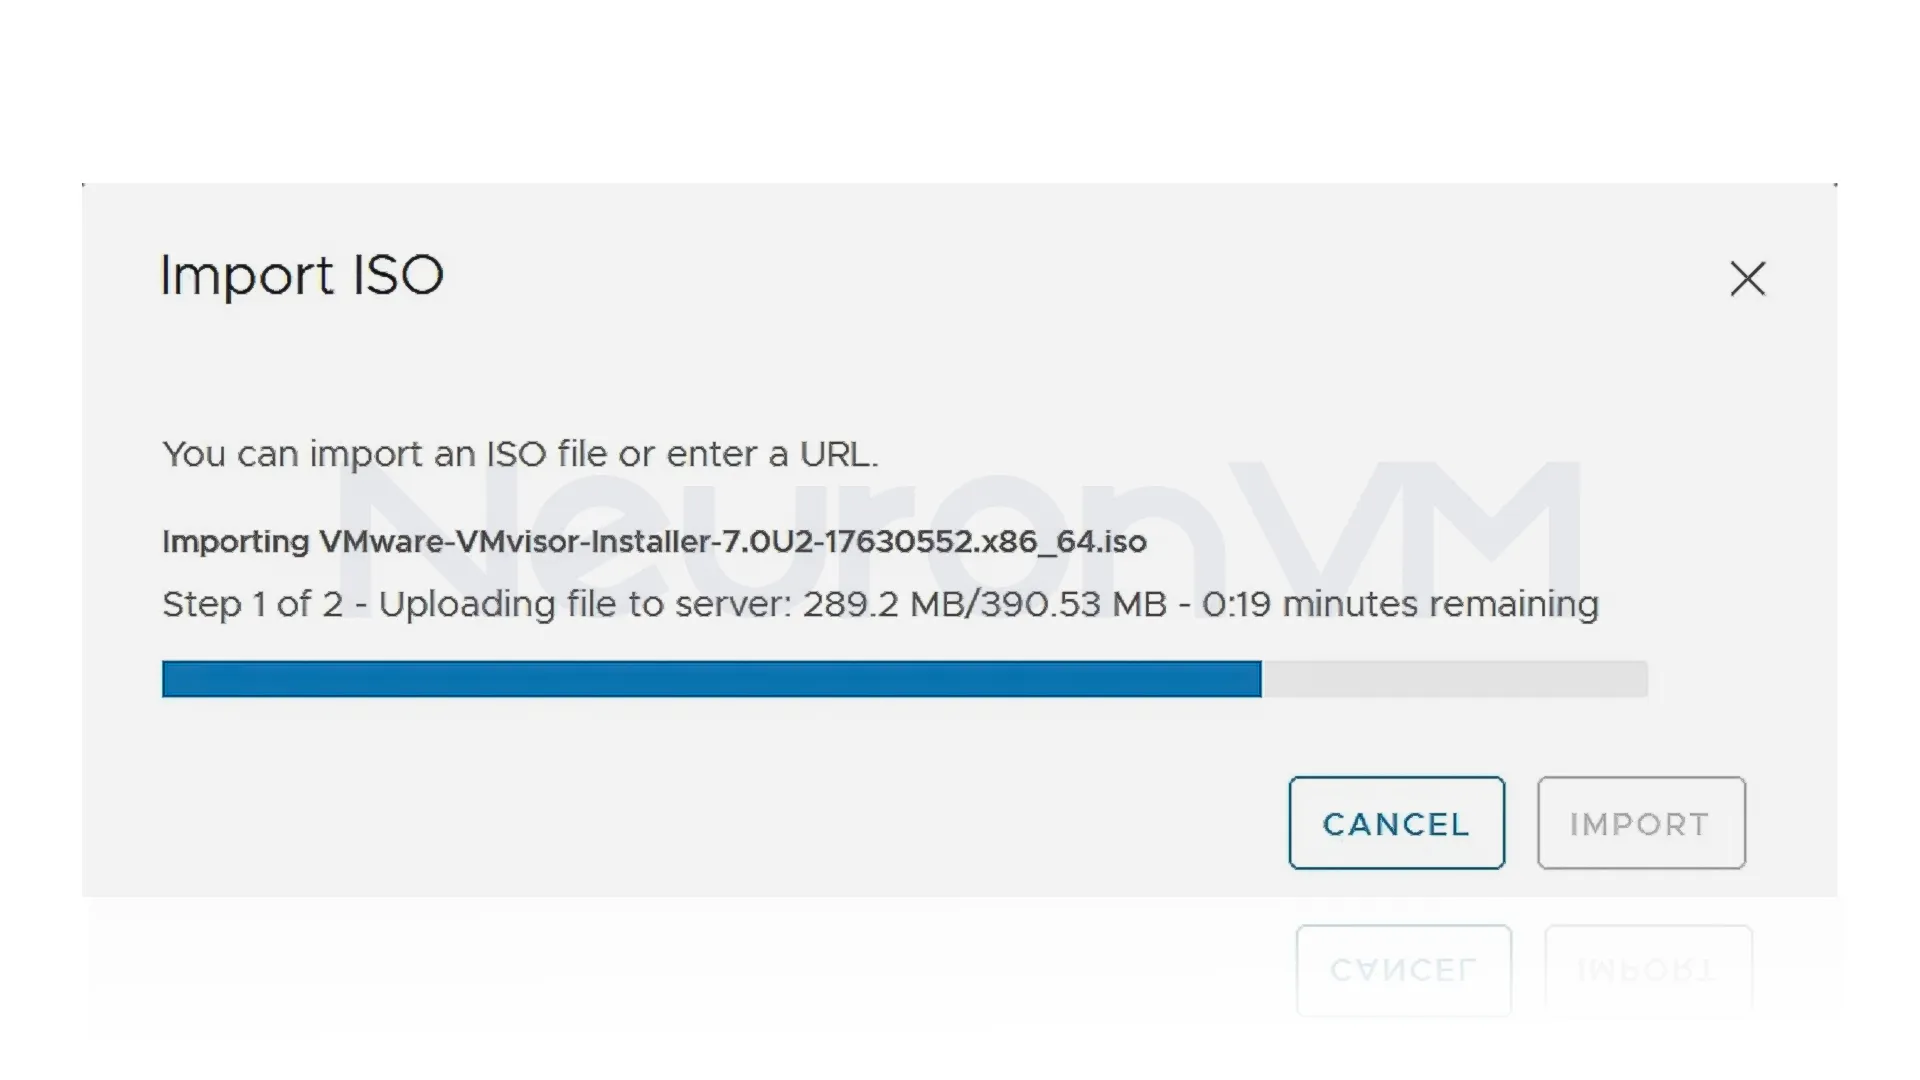
The importing process will start, as you have selected the ISO file:
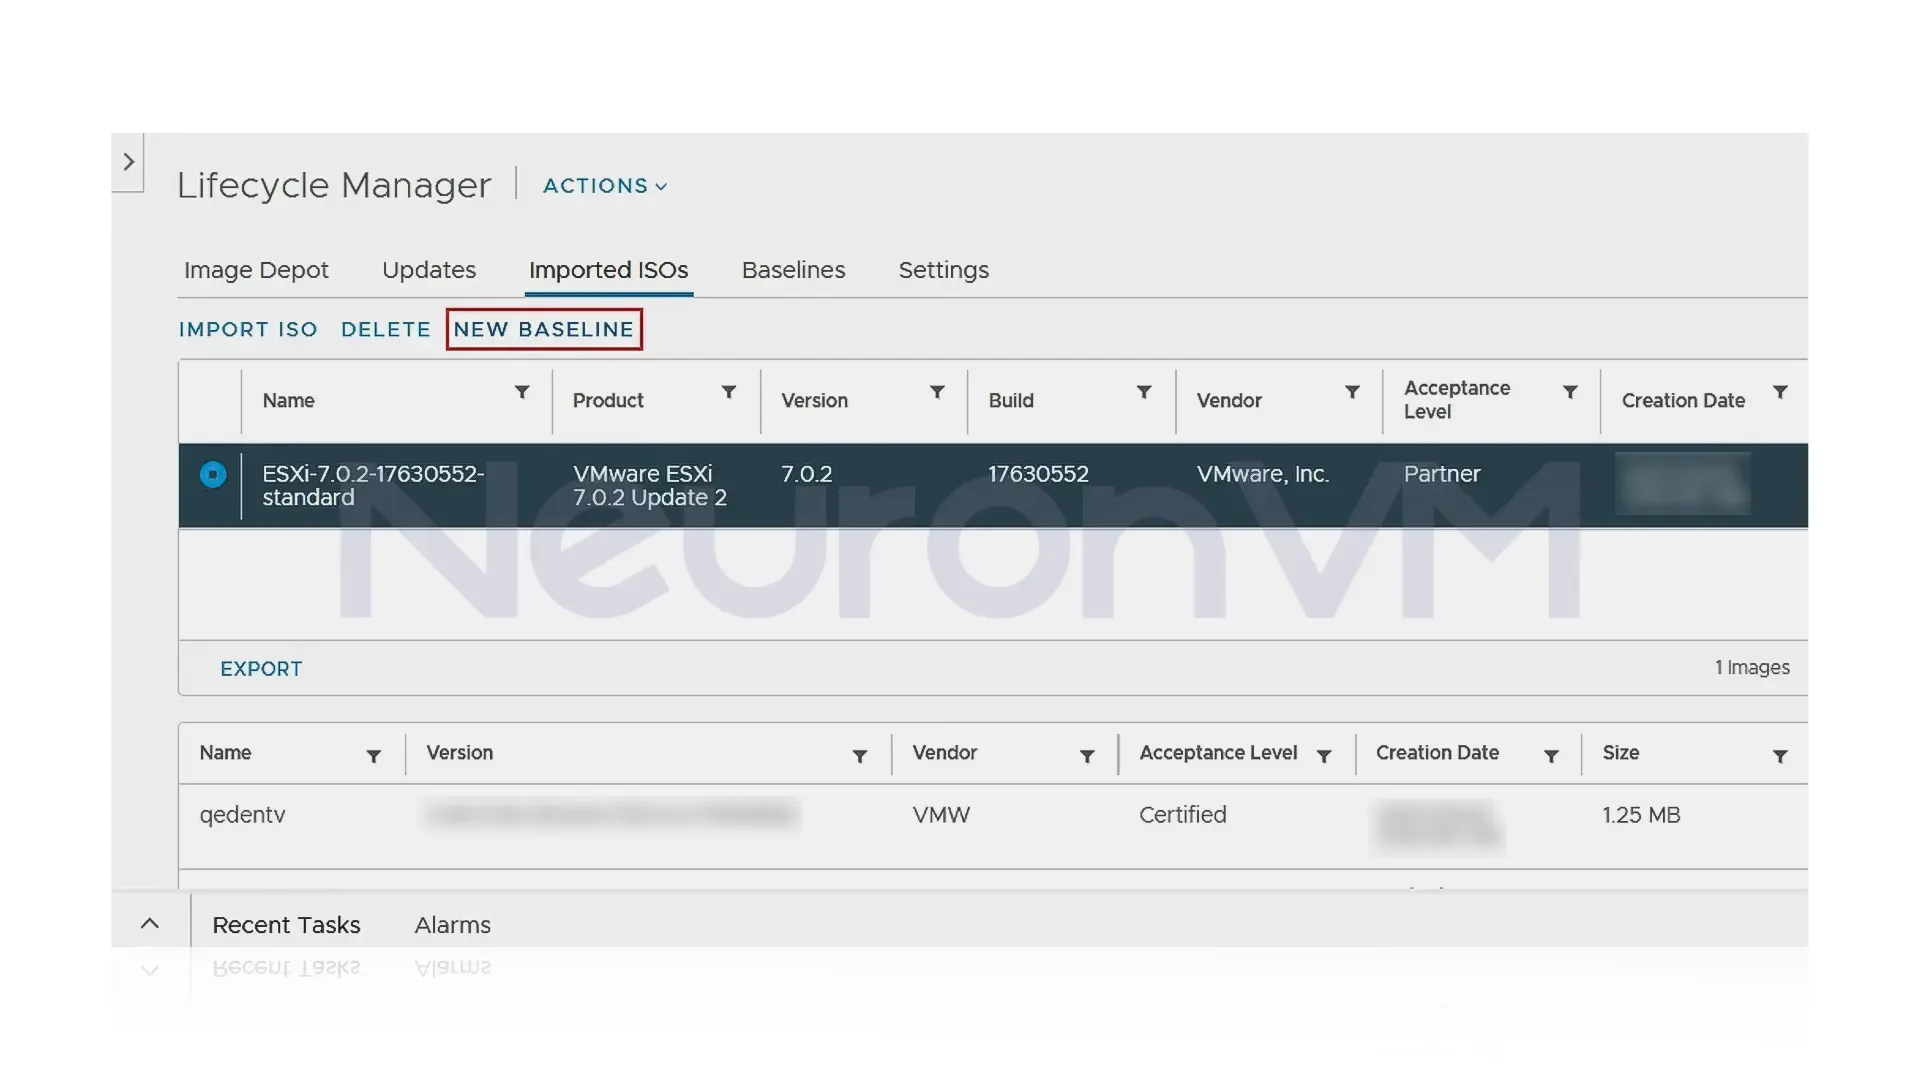
Then you will see the ESXi 7 Update 2 installation ISO image in the imported ISOs tab:
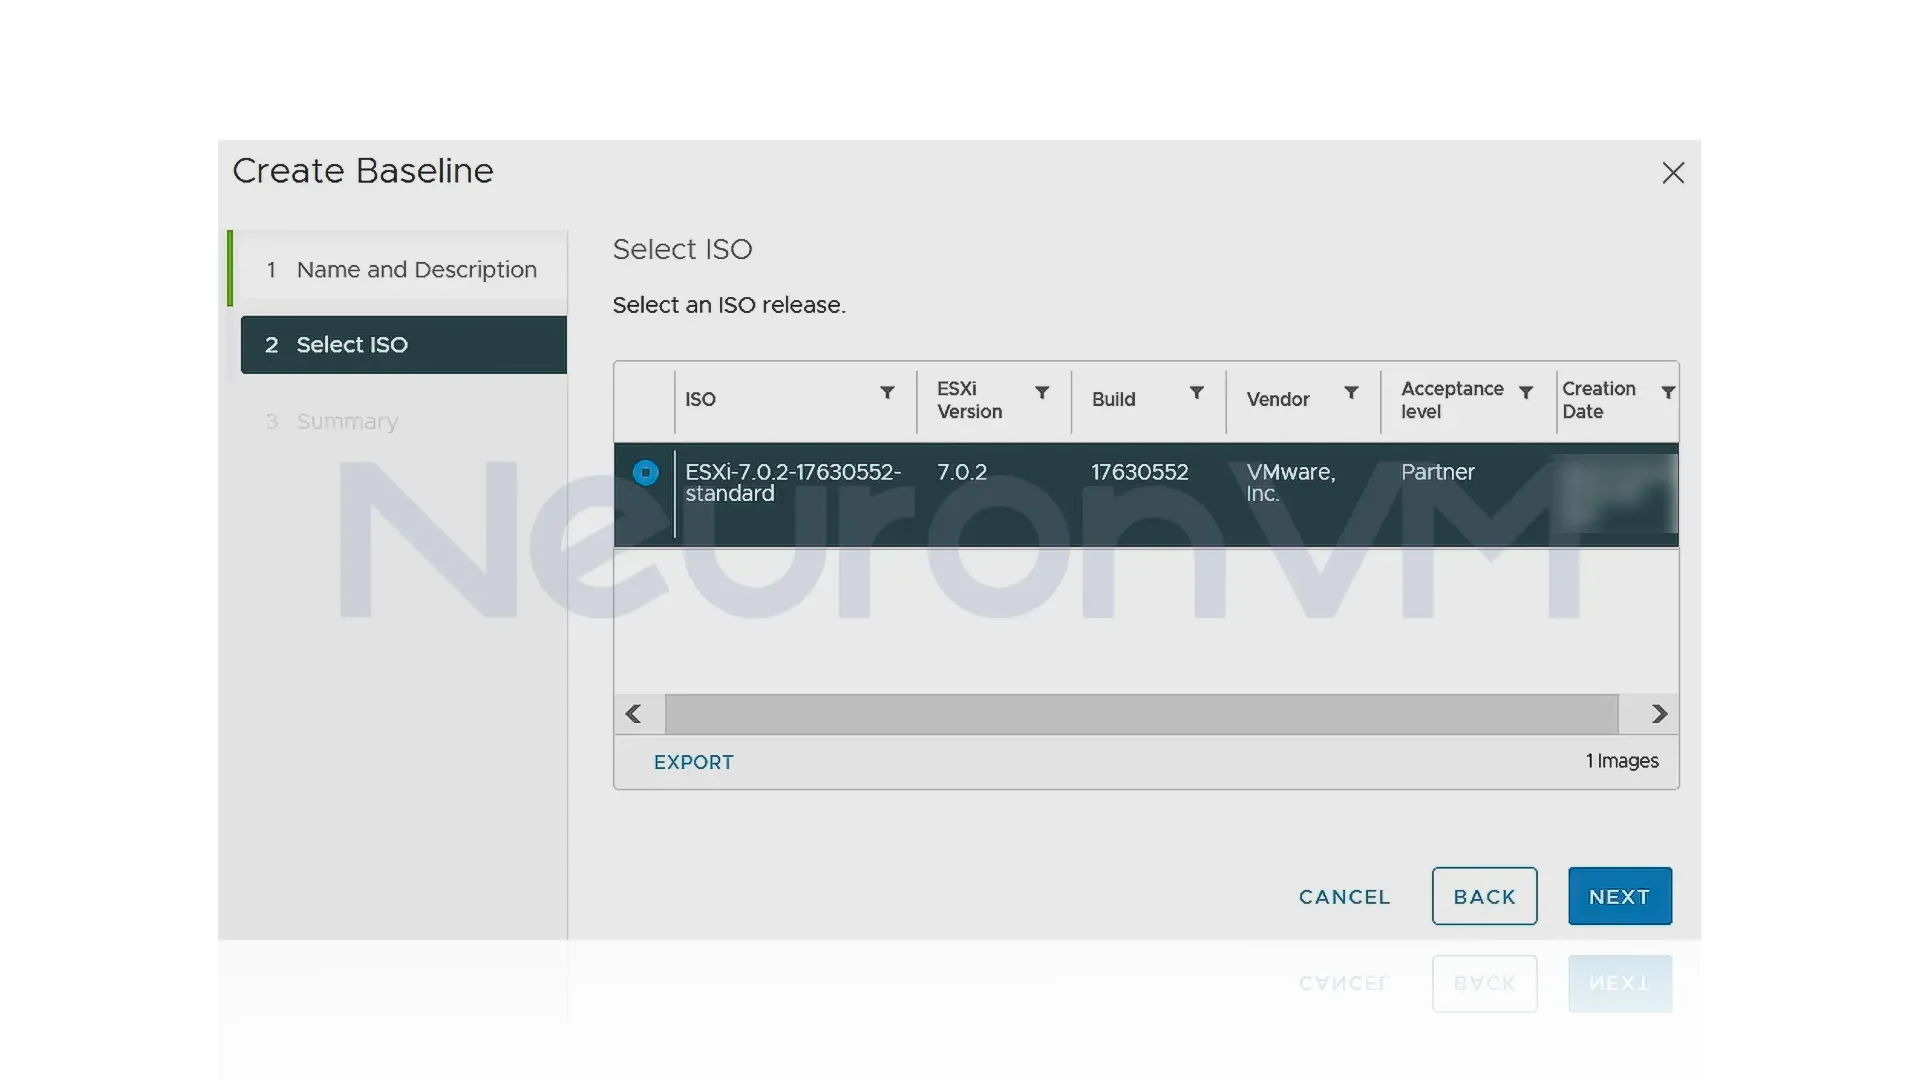
4- To create a new baseline, you should click NEW BASELINE:
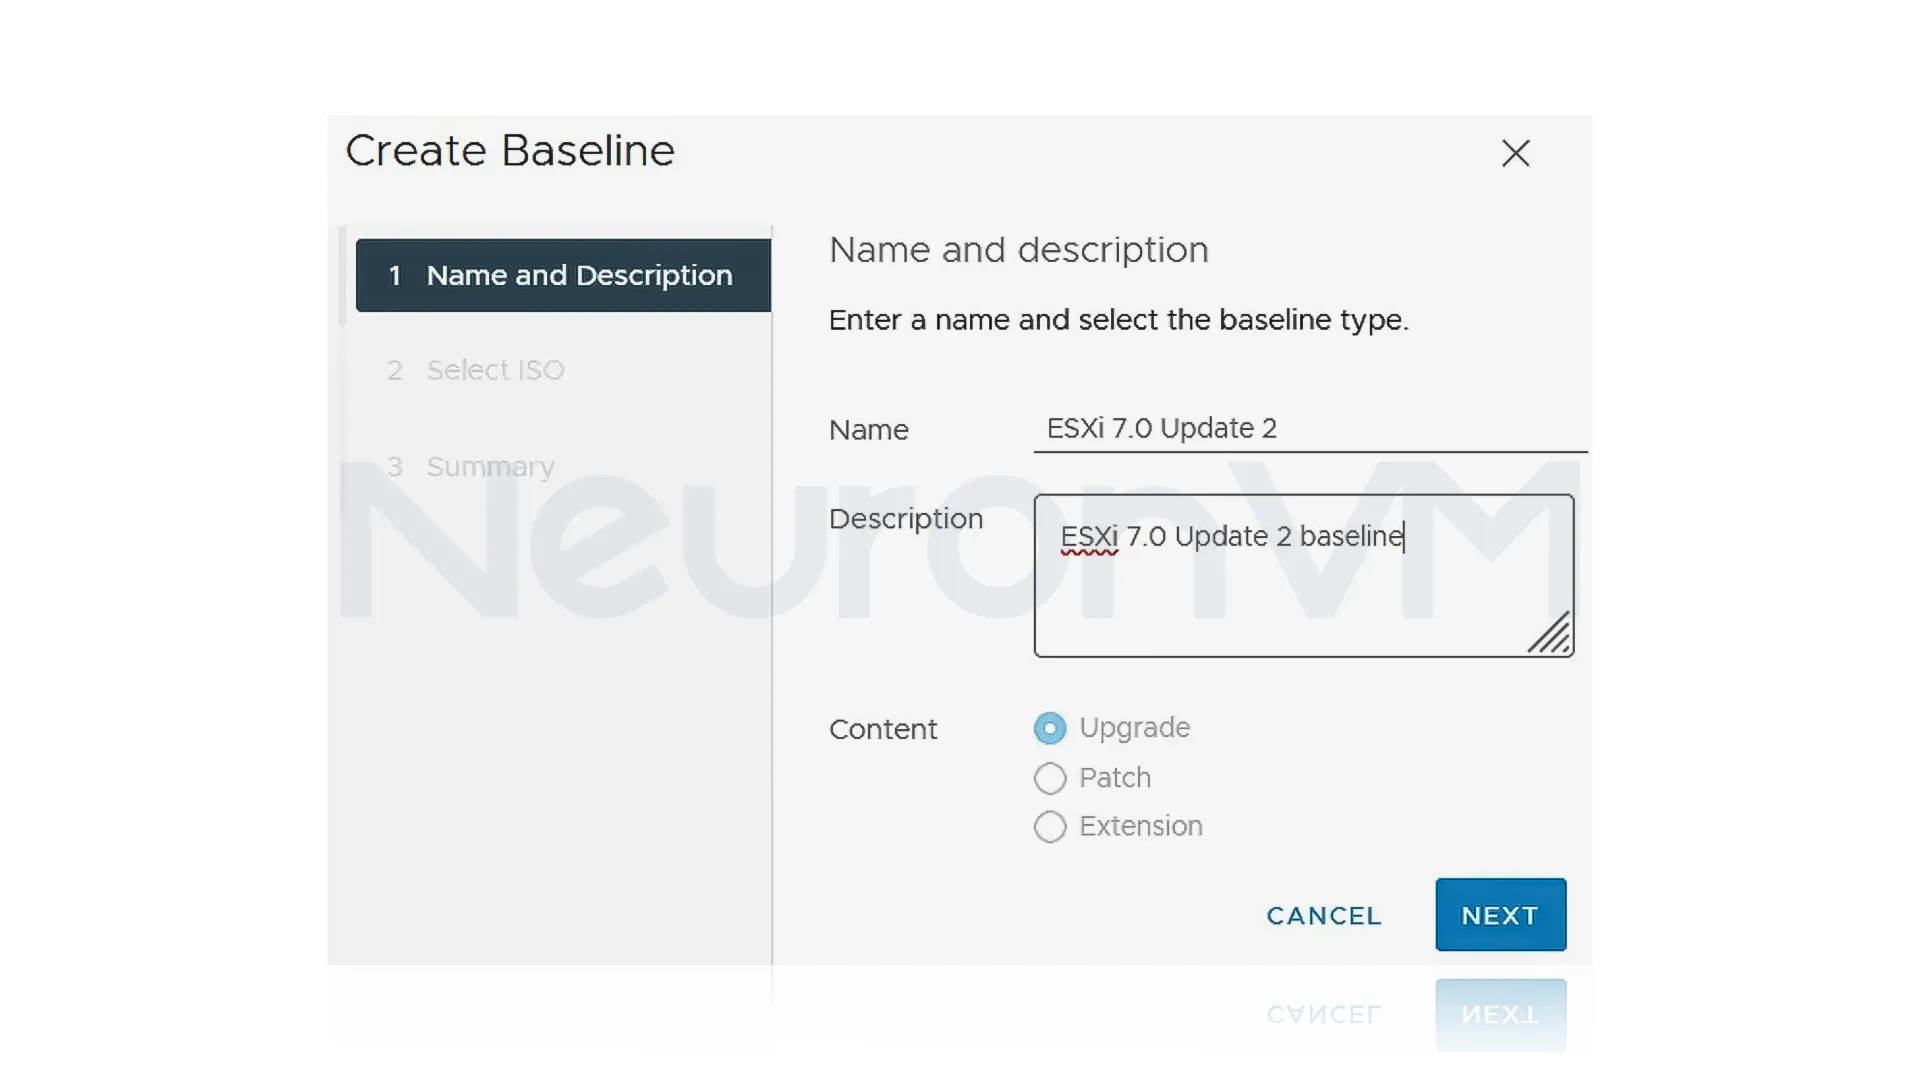
Here, you should enter your baseline Name and description:
Now you should select the ESXi ISO image that you uploaded before. As you see in the following image, the name is based on the corresponding ESXi profile: (ESXi-7.0.2-17630552-standard)
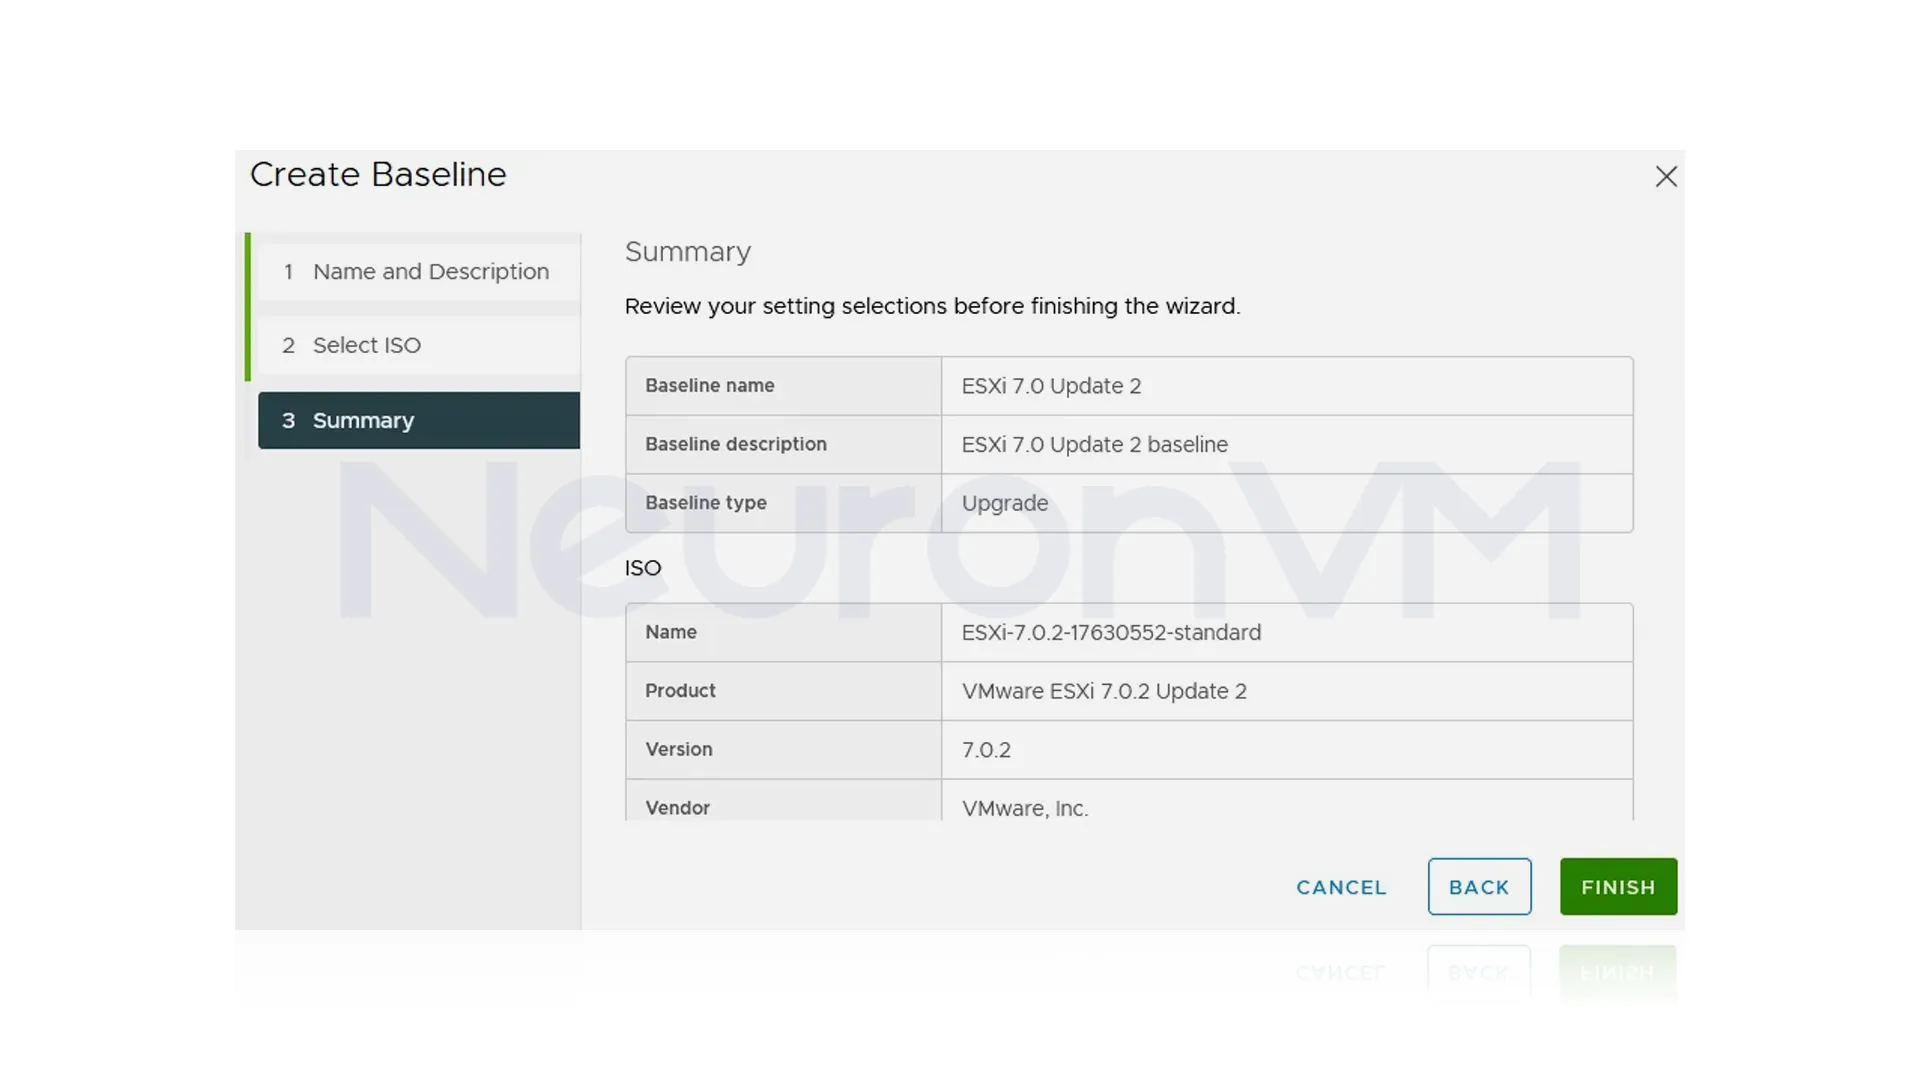
Here is the summary part. Before the creation of the baseline, review your selections:
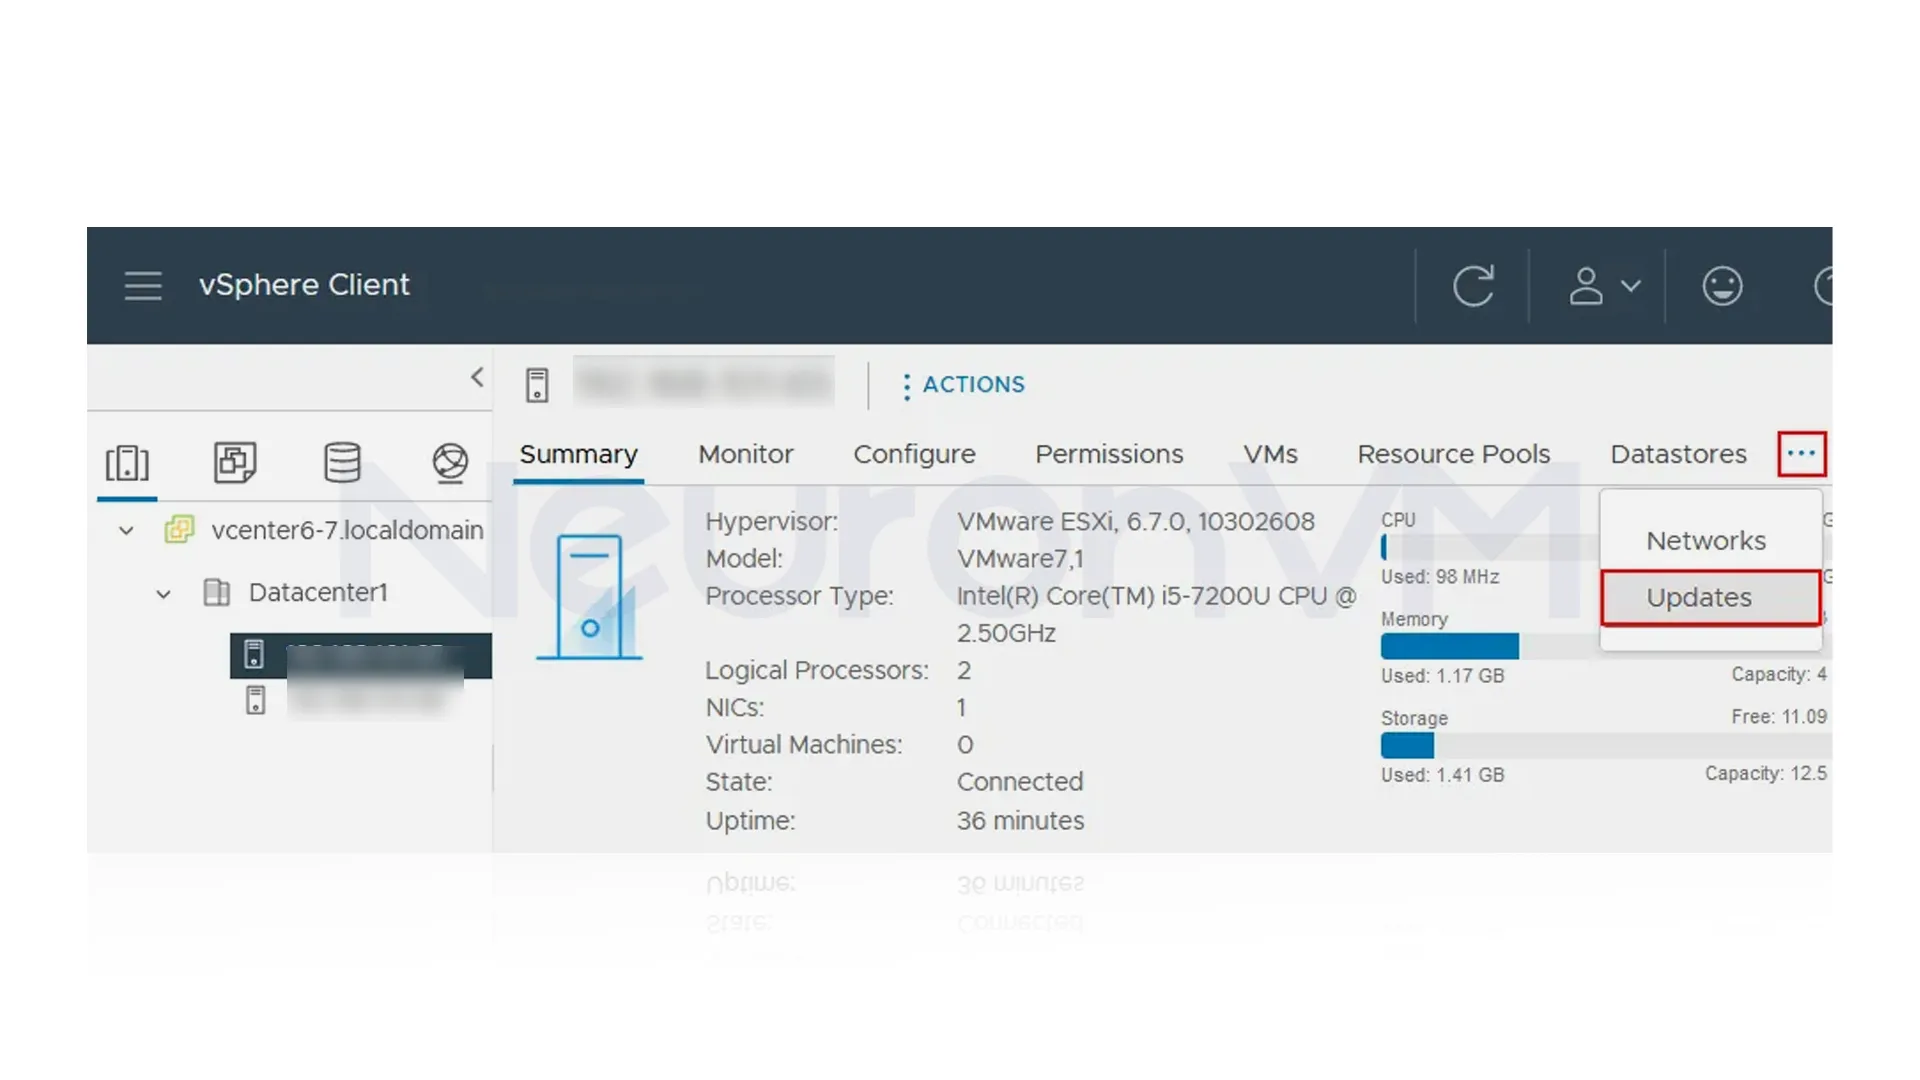
5- Go to the Hosts and Clusters screen and choose the ESXi host to update. Then in the top right side of the interface, click the Updates tab:
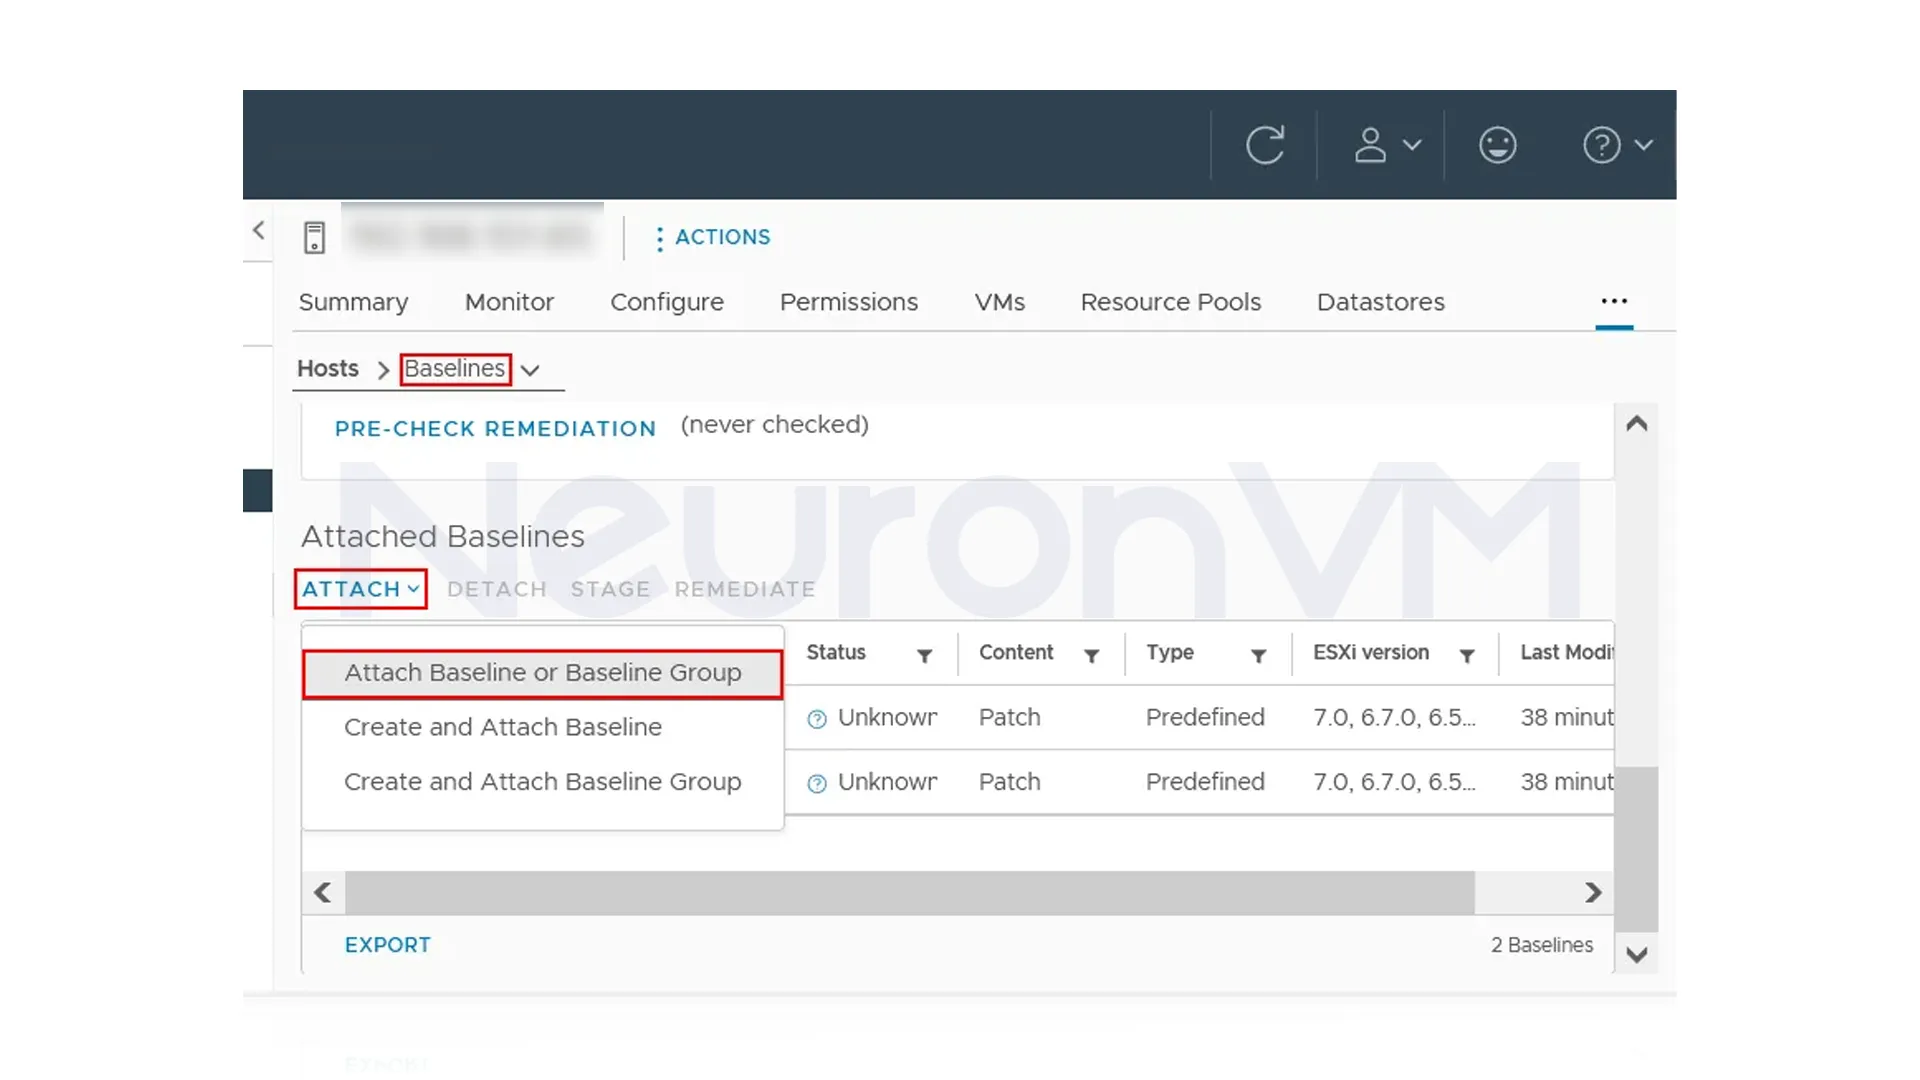
As you created the baseline, you have to attach it to ESXi hosts.
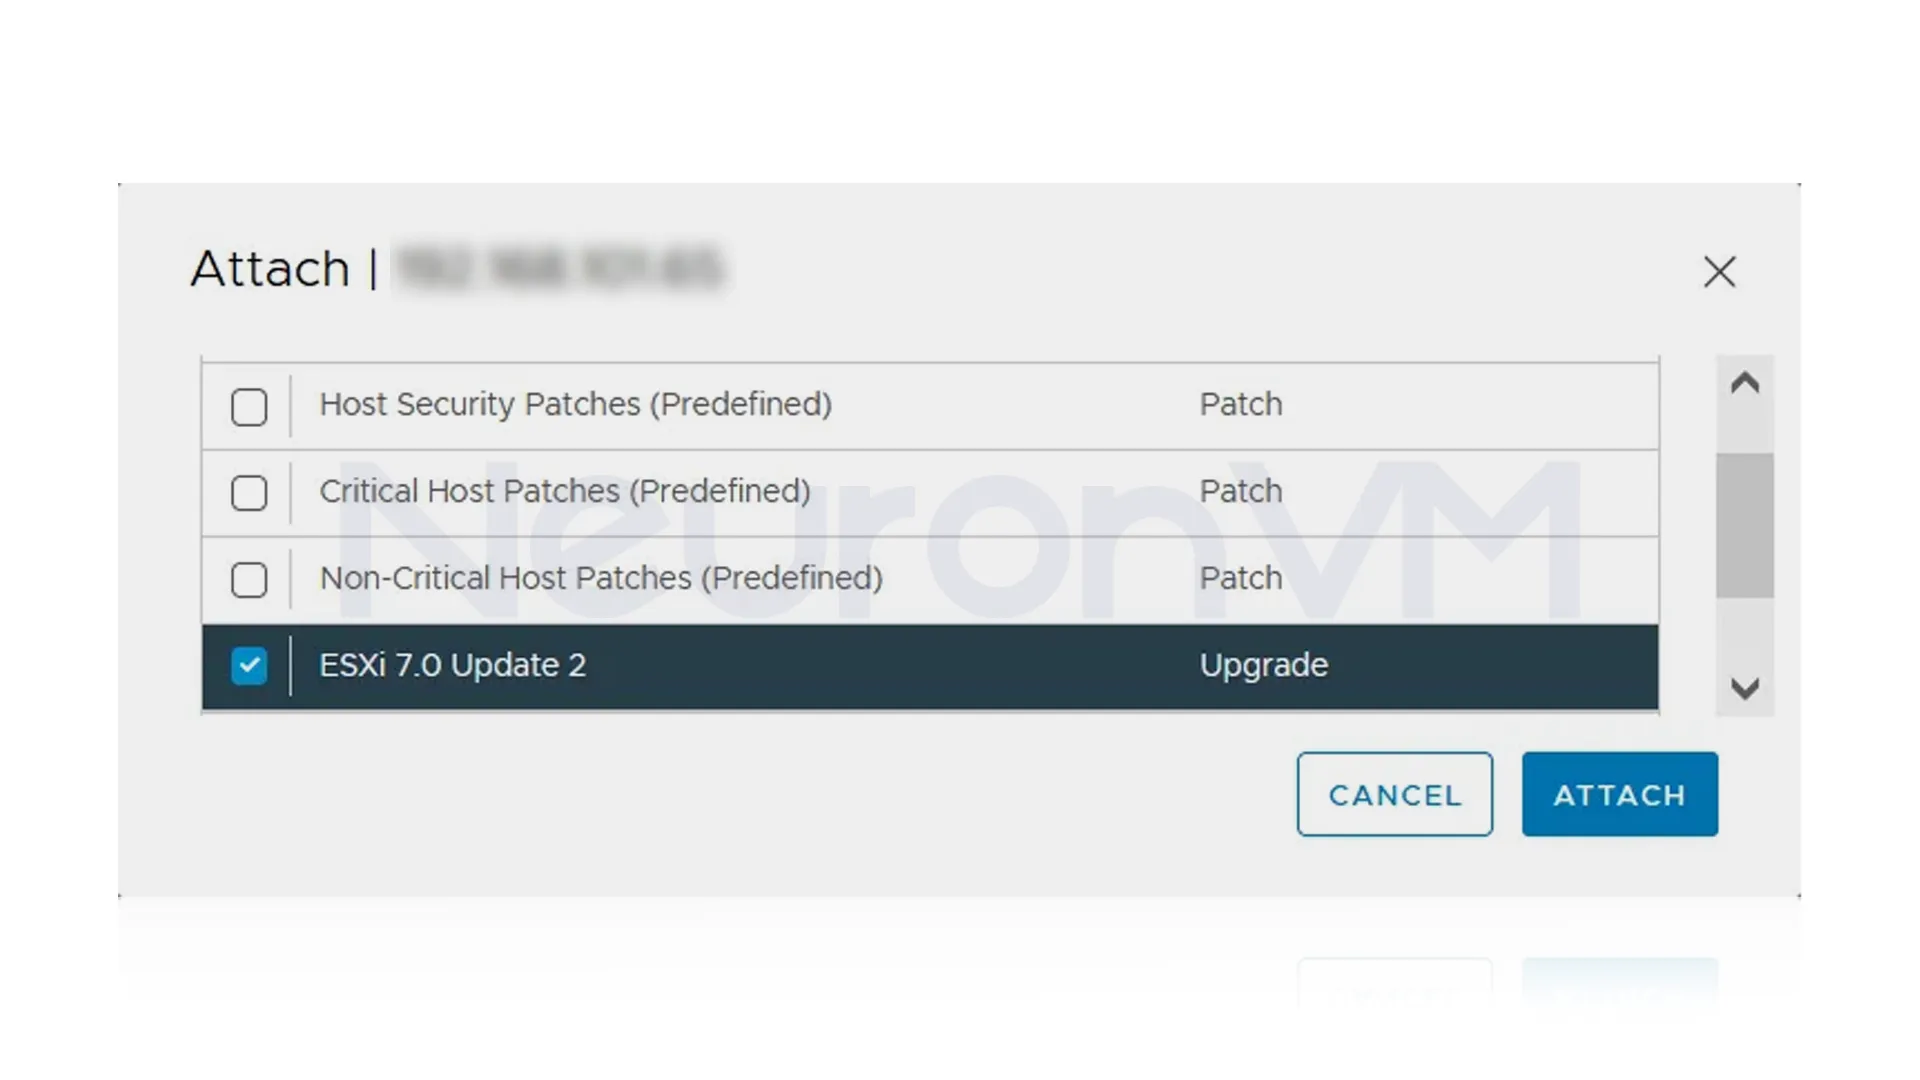
6- Click on baselines, go down and find the Attached Baseline section, then click Attach. When the menu opens, click on Attach Baseline or Baseline Group:
Choose the ESXi7.0 Update 2 baseline and click Attach. Remove other baselines by clicking Detach:
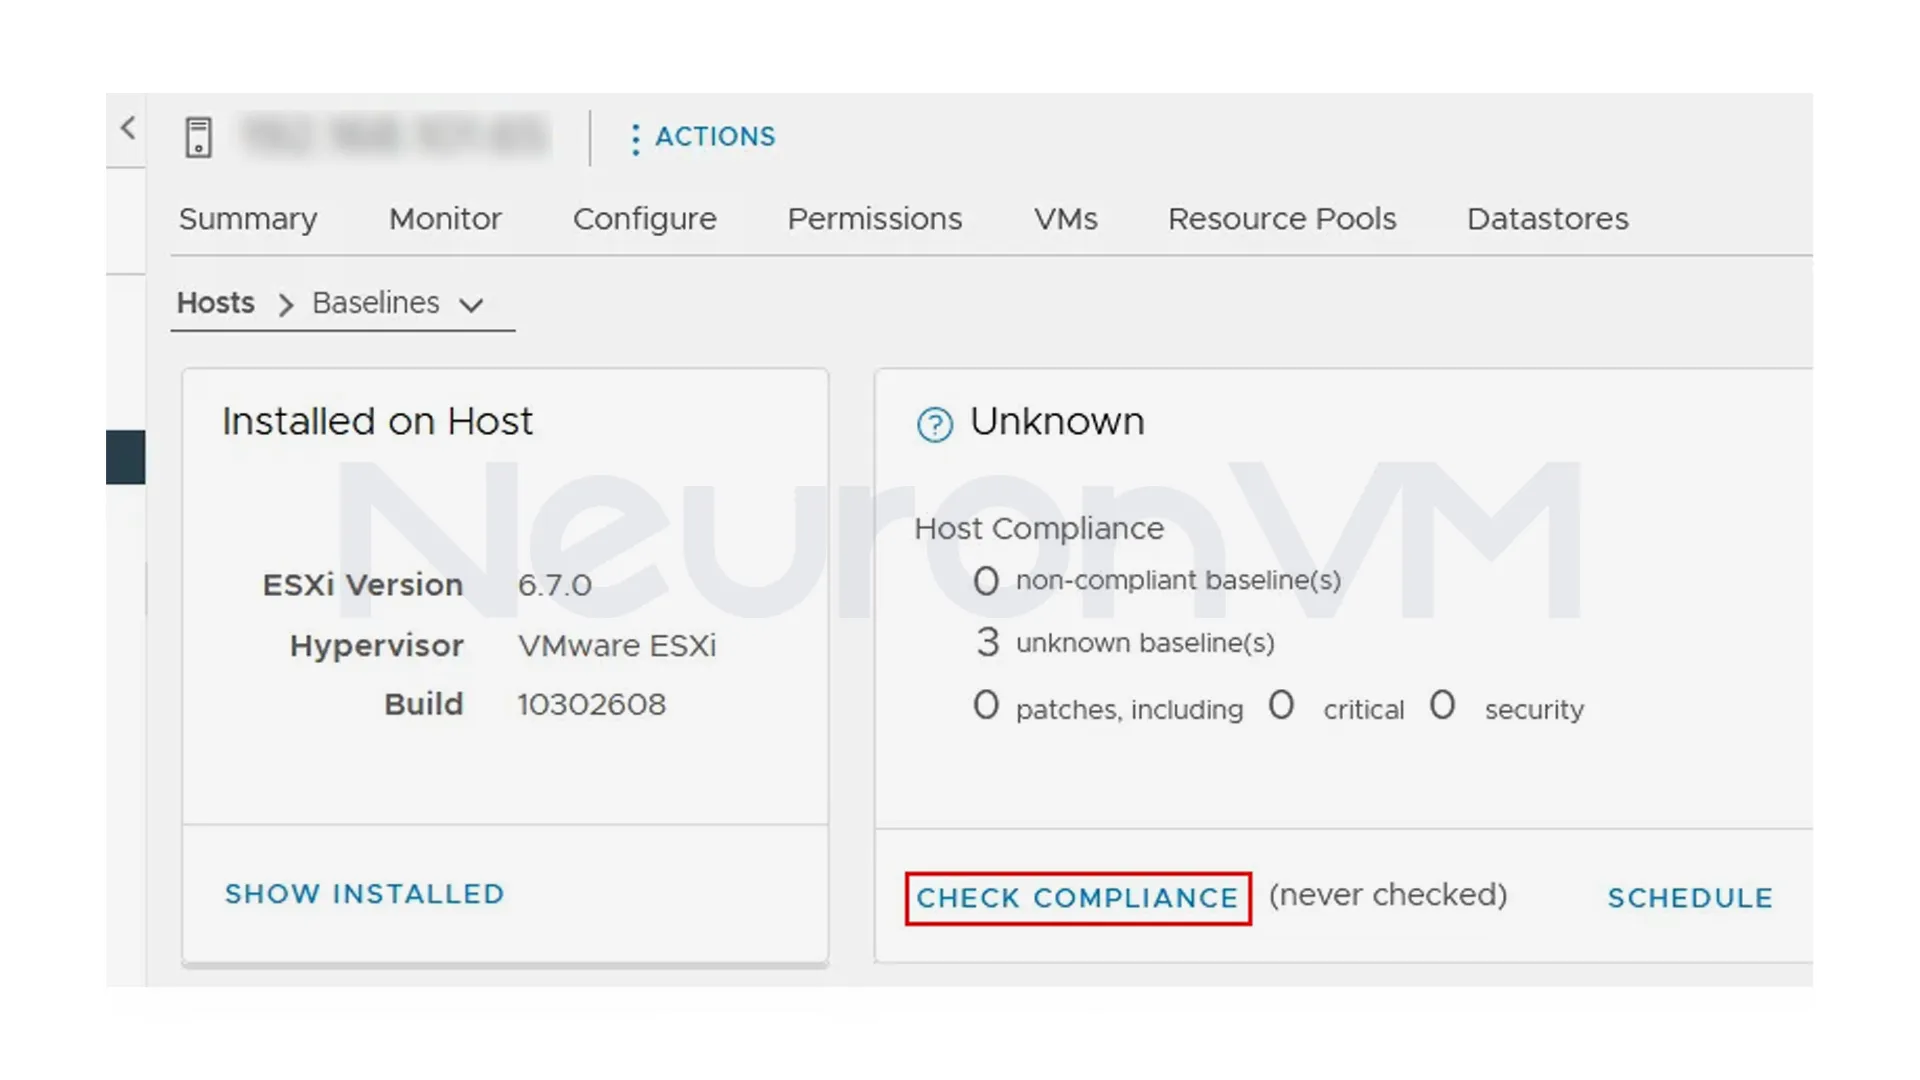
7- Now you should check compliance. The purpose of this step is to check if the ESXi host has already the update installed. Click check compliance:
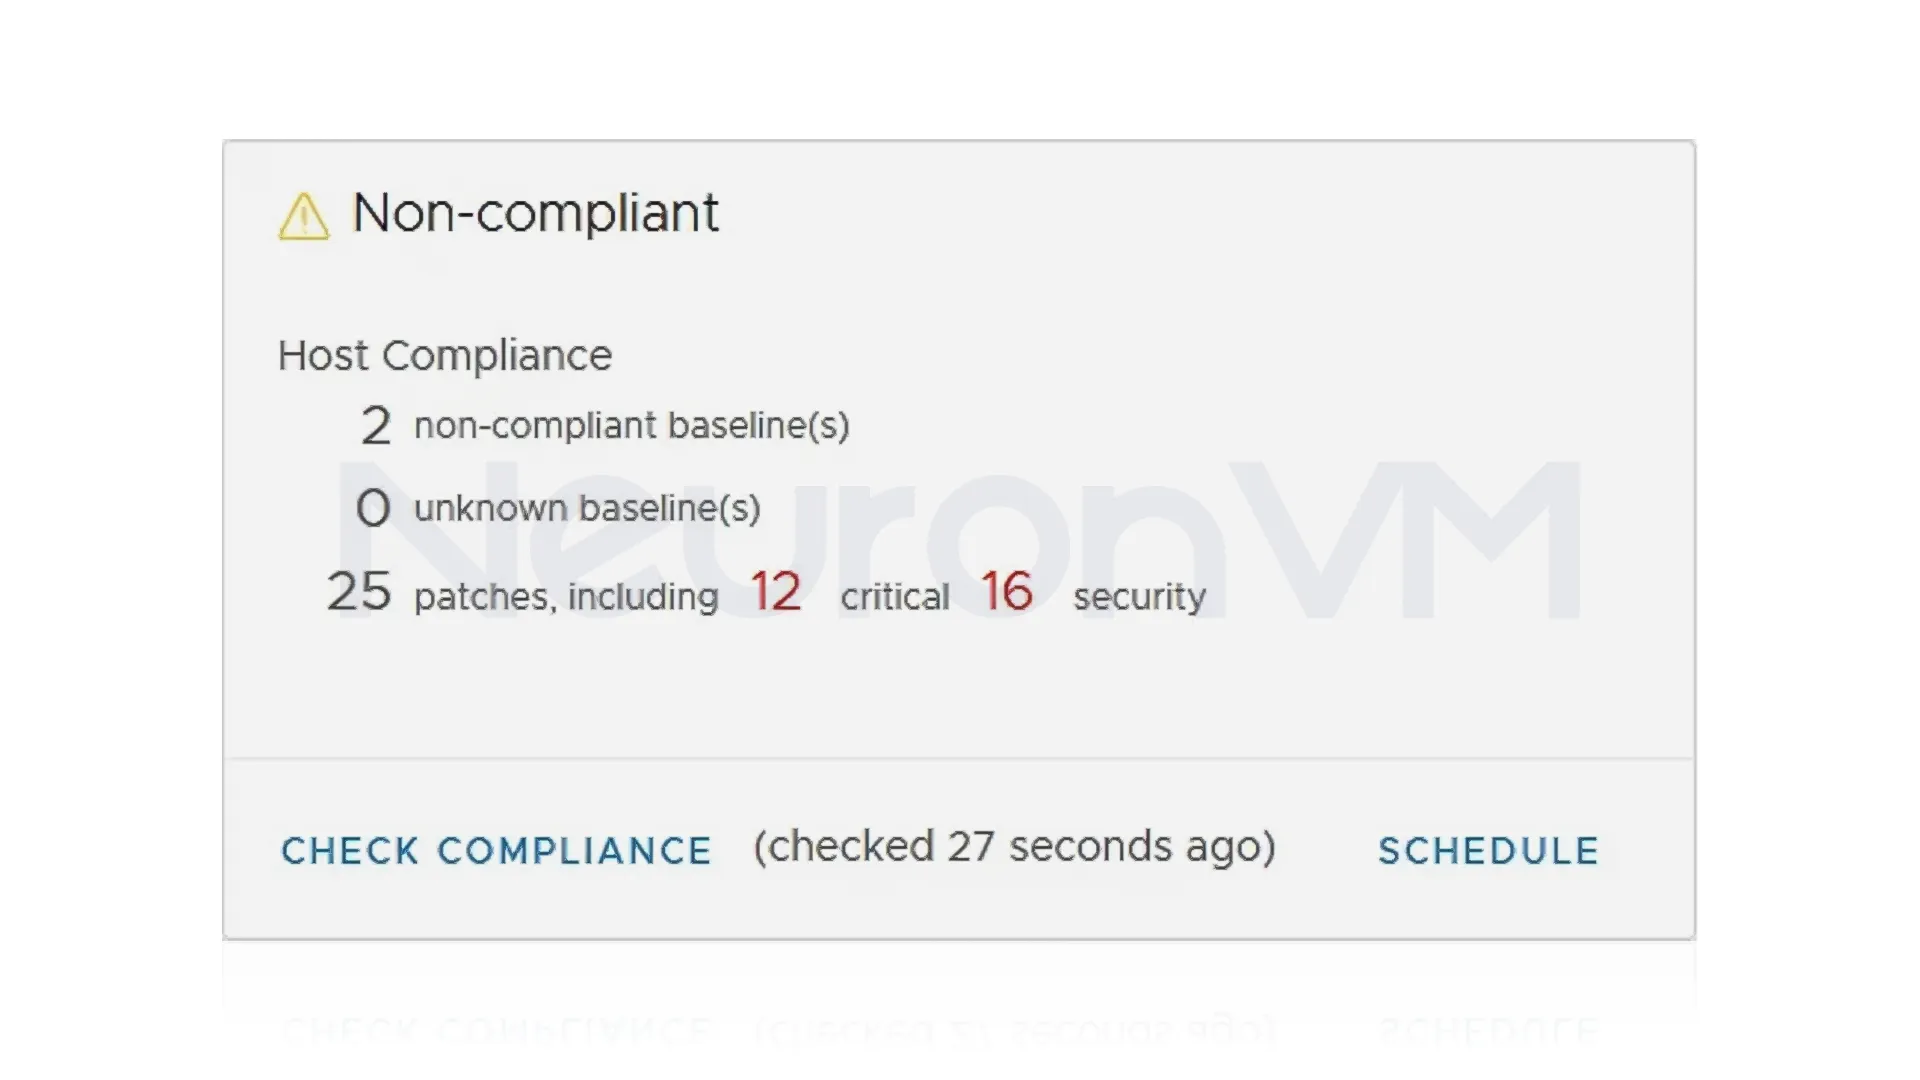
In the next image, you can see the result as non-compliant which means that you can install the needed update and upgrade the ESXi version:
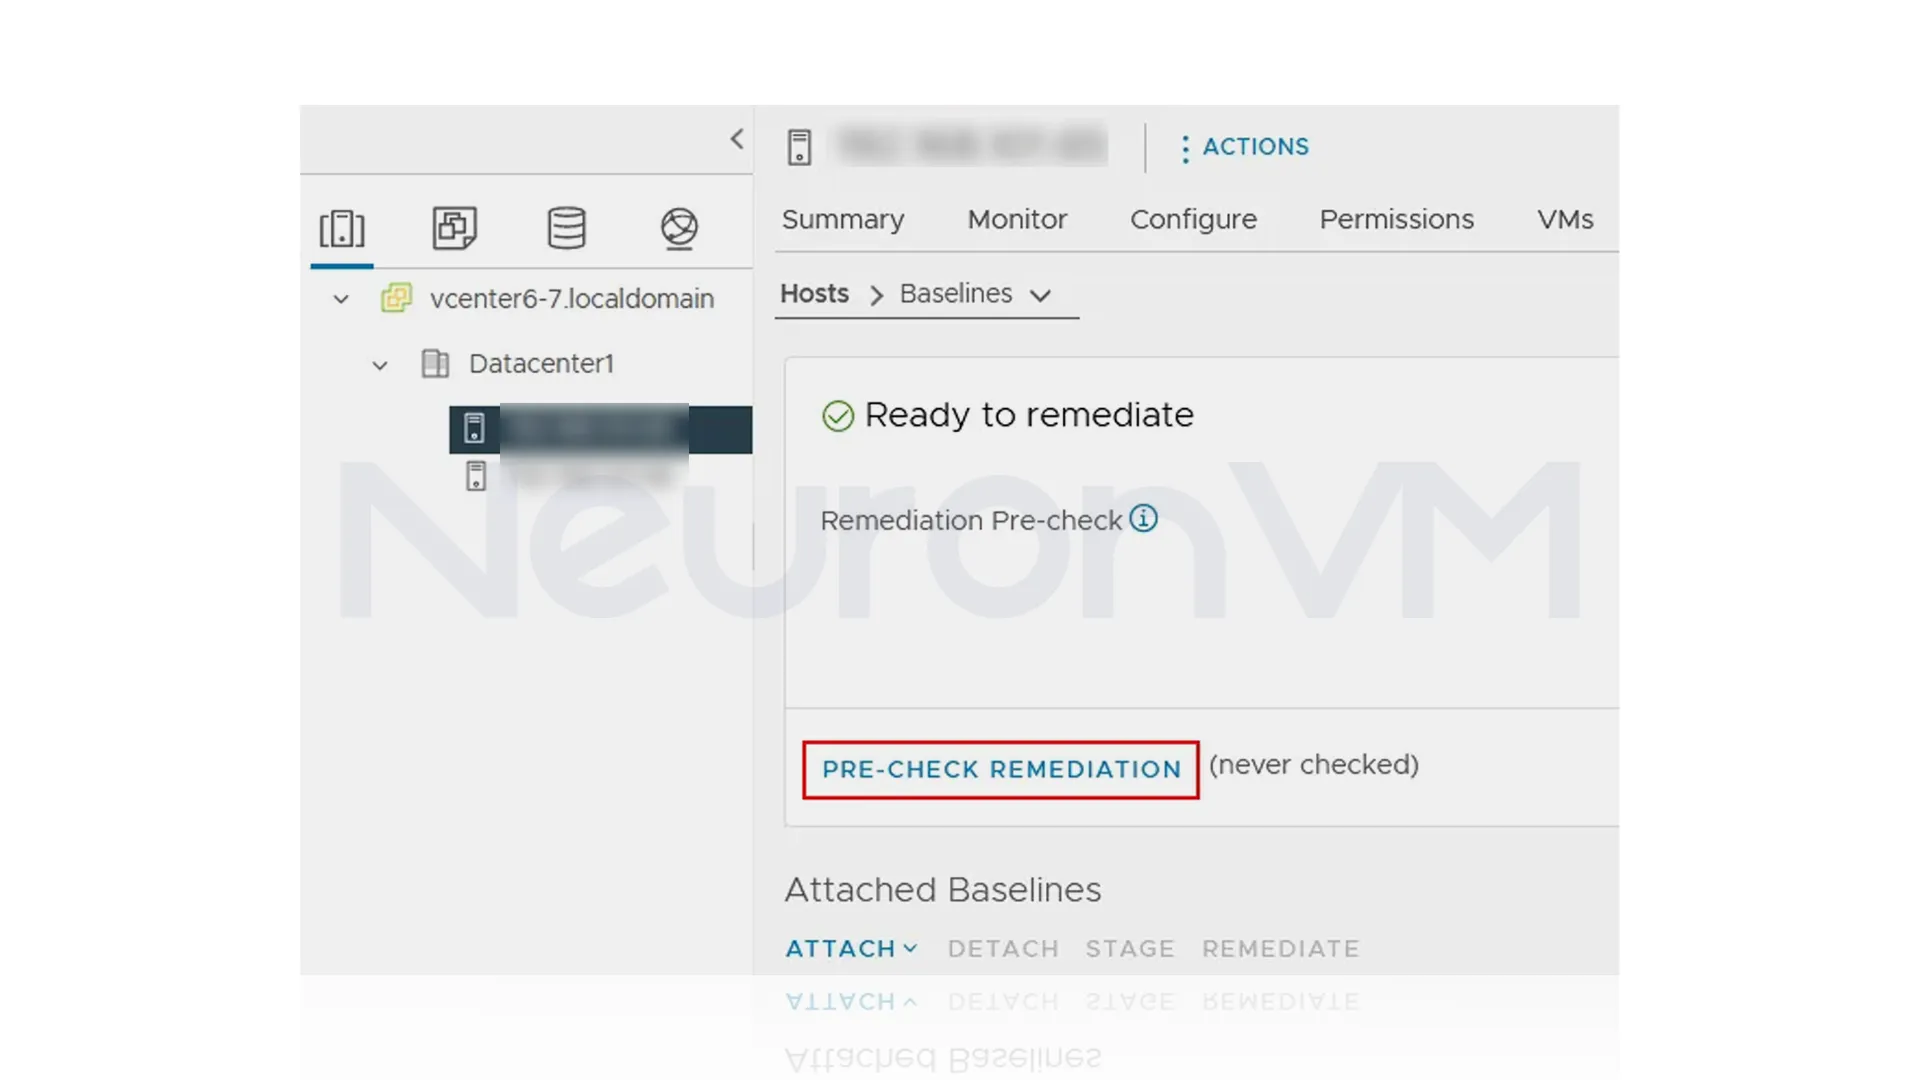
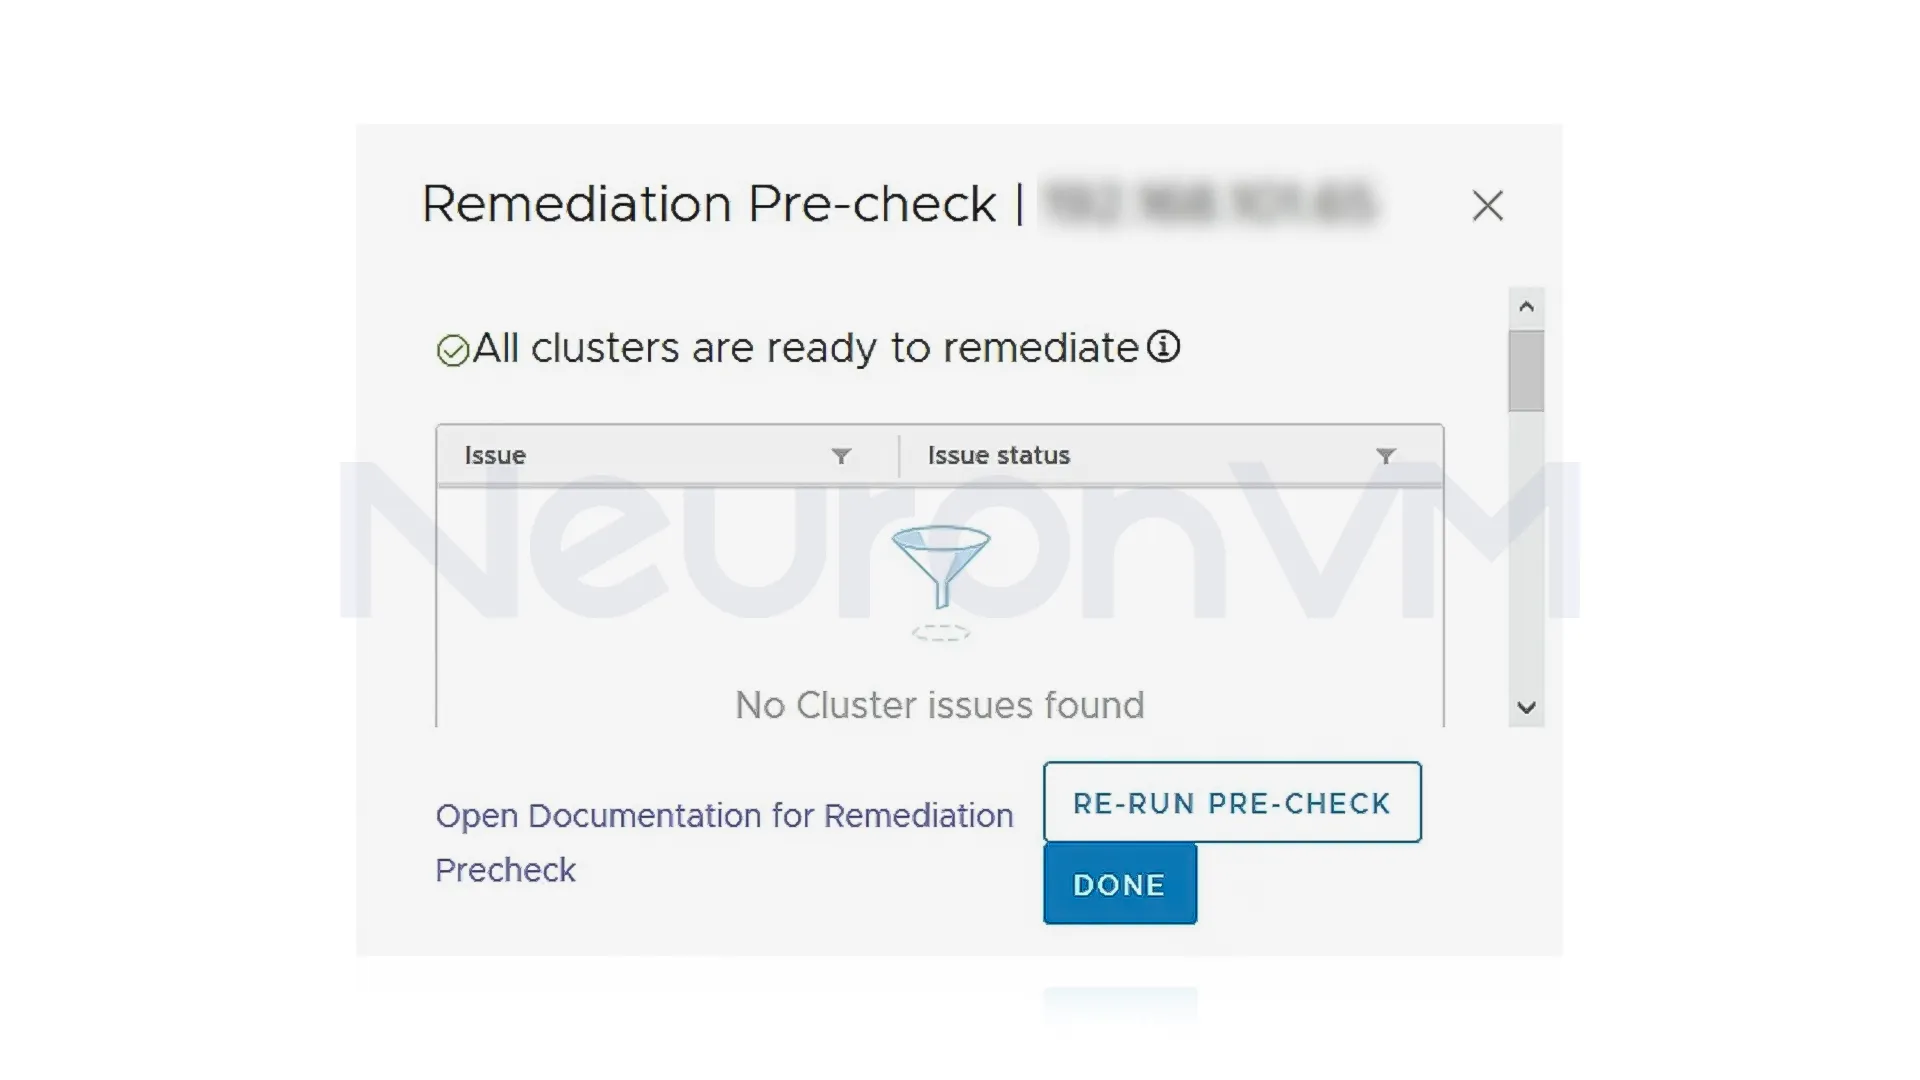
Now, it is time to pre-check the remediation check for any compliance issues that may occur after installation updates:
Here, you can press Done and go to upgrade the ESXi host:
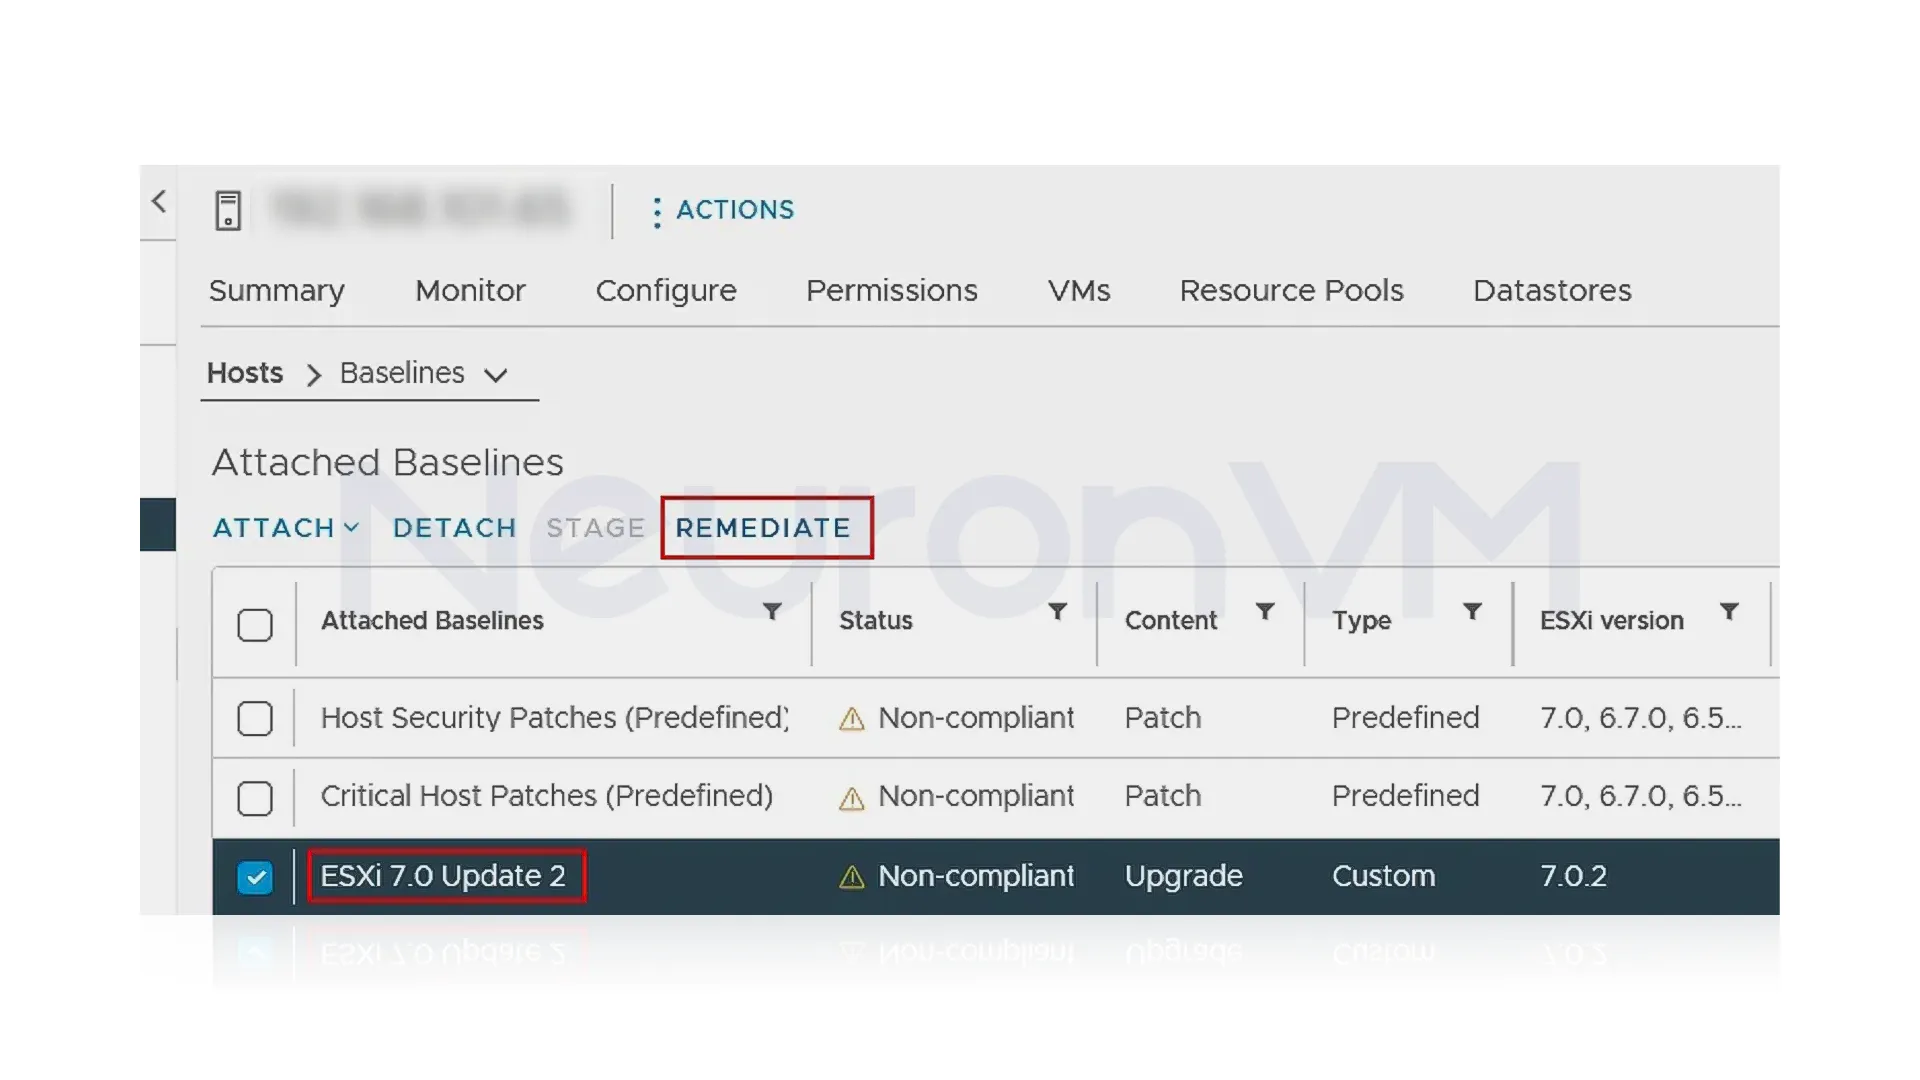
8- In the attached baseline section, select the ESXi 7.0 Update 2 baseline and click Remediate:
9- Here, you will encounter a pop-up screen, Select I accept the terms and license agreement then press OK.

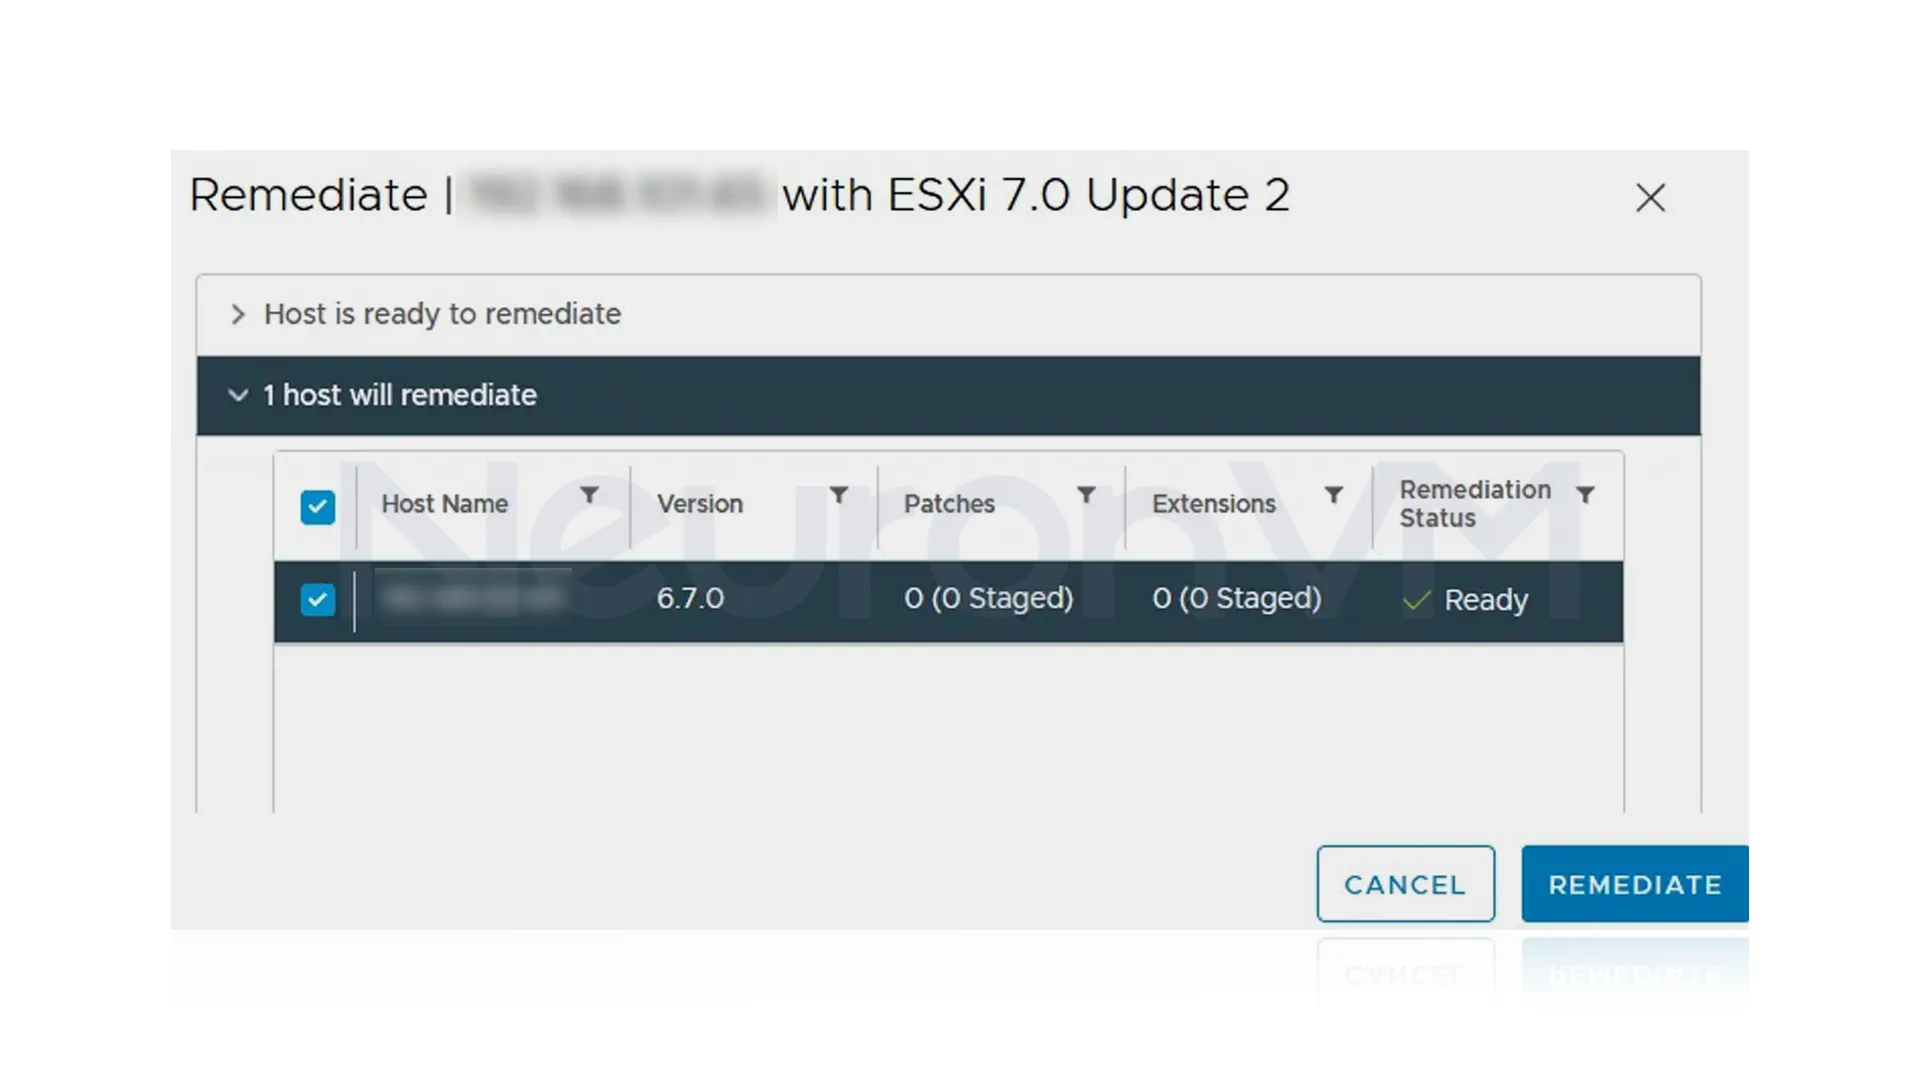
10- Power off the virtual machines and then make sure that your host is selected, and press Remediate:
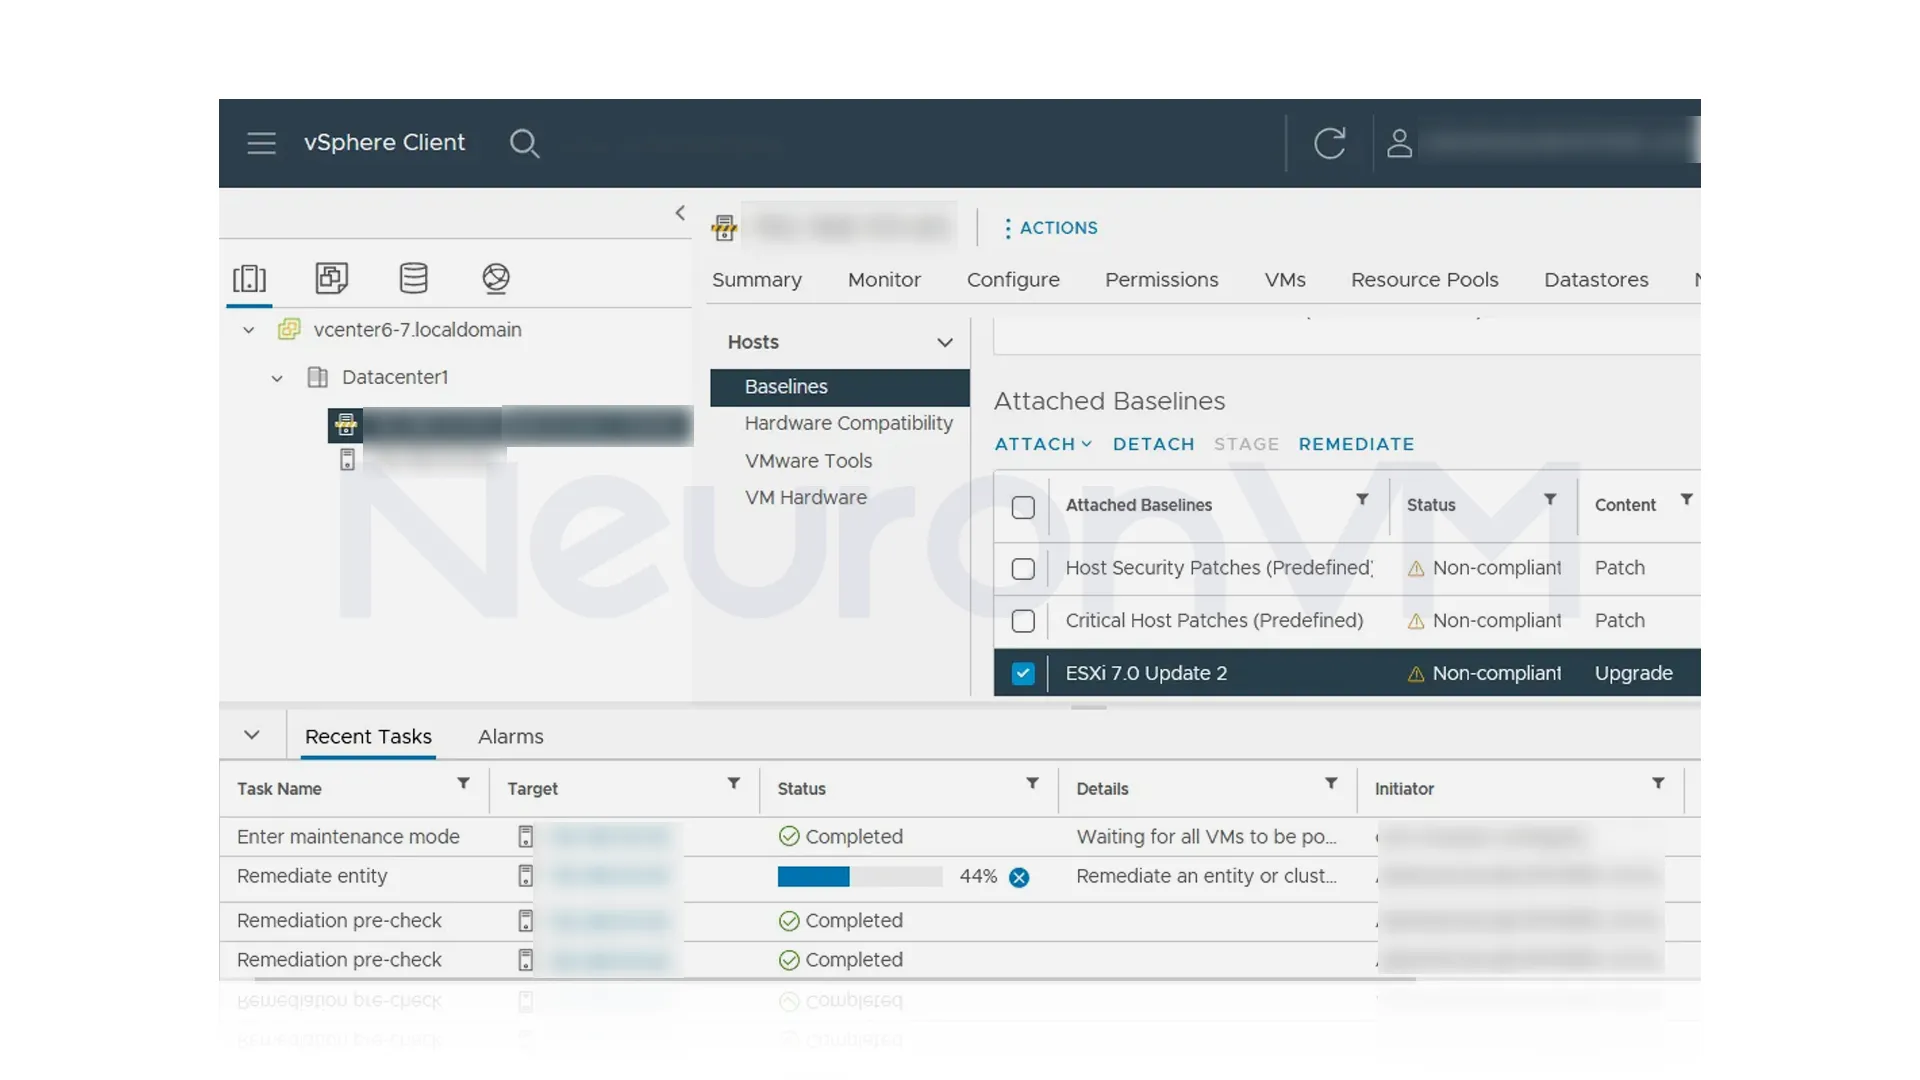
Then you will see the ESXi upgrade progress in the Recent tasks toolbar at the bottom of the VMware vSphere client interface. It will automatically be entered into maintenance mode:
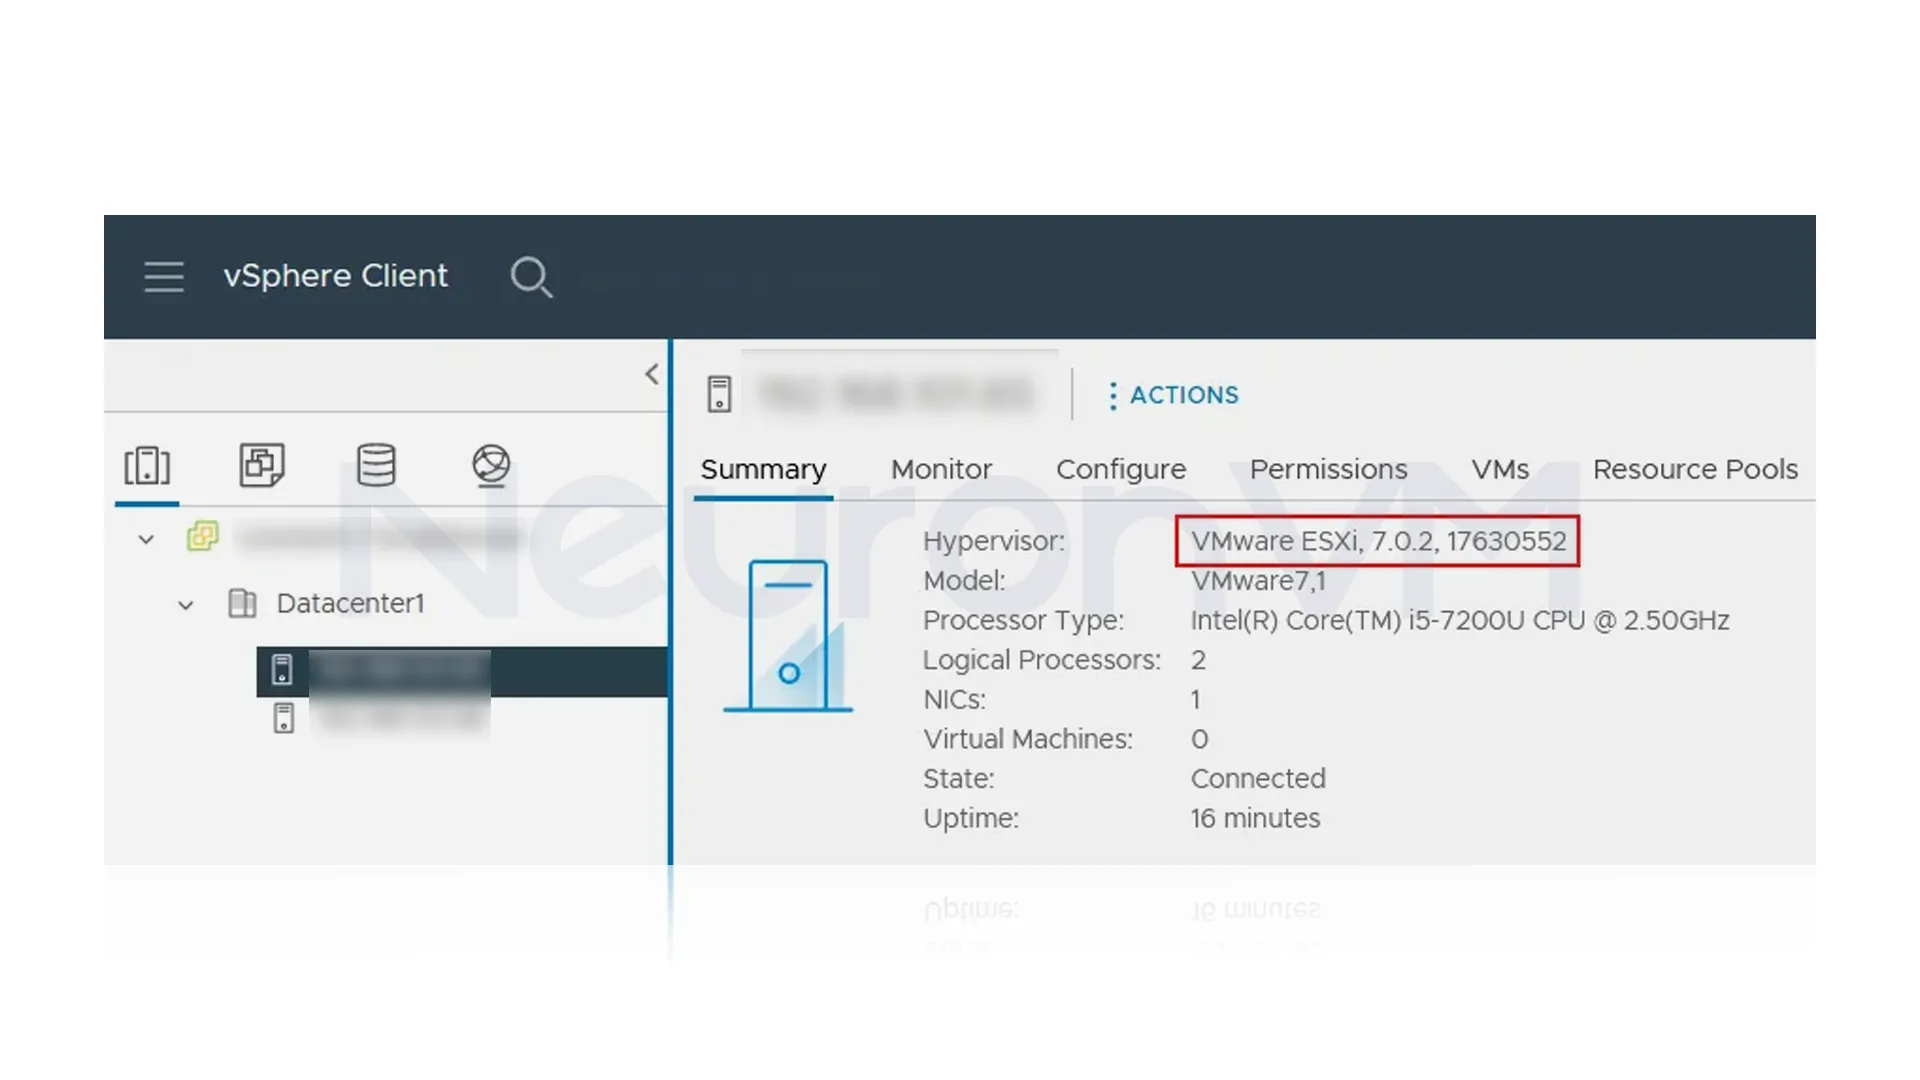
As you have finished, maintenance mode will be turned off for the host. The upgraded ESXi host is ready to work. Now you can select the ESXi host in the Hosts and Clusters view. Check the version after the upgrade part:
If you find that the license has expired after upgrading, you must apply for the license for the upgraded version.
Troubleshooting Tips
Have Backup First: Always take a full backup before upgrading, so if something goes wrong, you can roll back without stress and have your data back.
Maintenance Issues: If ESXi refuses to enter maintenance mode, you need to double-check that no VMs are running or that DRS has migrated them.
Firewall Block: If you are having a problem with installing online method, make sure HTTPClient is enabled in the ESXi firewall settings.
License Problems: After upgrading, some users see “license expired” warnings, if you see this just reapply your license key for the new ESXi version.
Real-World Example When Upgrading ESXi
When upgrading VMware ESXi, it’s not just about following steps; it’s more about understanding the impact on your environment, for example, one client running ESXi 6.5 experienced slow VM boot times and simply faced storage performance issues, by upgrading to ESXi 7.0, we not only improved boot speed by 40% but also solved hidden storage problems because of NVMe support, one common mistake is not putting the server in maintenance mode, this can leave virtual machines running and stop the upgrade from working, always make sure all VMs are turned off, and another problem is the firewall, if HTTPClient isn’t turned on, online upgrades won’t work, sharing these tips turns a basic guide into good guide that saves your time, prevents mistakes, and also helps IT teams get the best results from their ESXi upgrade.
Conclusion
Keeping ESXi updated isn’t just a checkbox; it’s peace of mind for you, by upgrading, you’re not only patching security holes but you are also unlocking performance benefits and making sure your hardware runs at its best, no matter what method you use, you’ve taken a big step toward making your system safer and more reliable, and the best part? Your future upgrades will feel easier now that you’ve done it once.
Upgrading improves performance, security and adds support.
You can upgrade ESXi using either the ESXCLI command-line tool or vCenter Liifecyycle Manager.
You might like it