How to Configure WireGuard on MikroTik

 7m
7m
 1 comments
WireGuard is a modern and efficient VPN protocol that offers secure networking capabilities. It has gained popularity due to its simplicity, high performance, and strong encryption. MikroTik is a well-known manufacturer of network equipment, including routers and switches. This article will explore how to configure WireGuard on MikroTik devices, enabling you to set up a private and secure VPN connection.
If you intend to buy and set up a Mikrotik VPS server, we recommend that you review, test, and use the plans provided on our website before doing anything. The high quality of these servers will bring you to your goals.
Prerequisites
1) MikroTik RouterOS: Ensure that your MikroTik router is running the latest version of RouterOS.
2) Access to MikroTik router: You should have access to the MikroTik router’s management interface via Winbox.
3) Public IP address: You will need a public IP address assigned to your MikroTik router. This IP address will be used for the WireGuard tunnel’s endpoint.
4) DNS resolution: Ensure that your MikroTik router can resolve domain names to IP addresses. This is necessary for establishing connections and routing traffic over the WireGuard tunnel.
Update Firmware on MikroTik
Before configuring WireGuard, it is essential to ensure that your MikroTik device is running the latest firmware version. Keeping your firmware up to date helps fix bugs and security vulnerabilities.
You can check for firmware updates on the MikroTik website or through the MikroTik device’s web interface (Winbox).
Generate WireGuard Keys on MikroTik
WireGuard operates based on a pair of public and private keys. To generate these keys, go to the “System” tab in the web interface and click “WireGuard.” Next, click on the “Add New Peer” button, enter a name for the public key, and click on the “Generate” button. MikroTik will create the public and private keys for your WireGuard configuration.
WireGuard Configuration on MikroTik
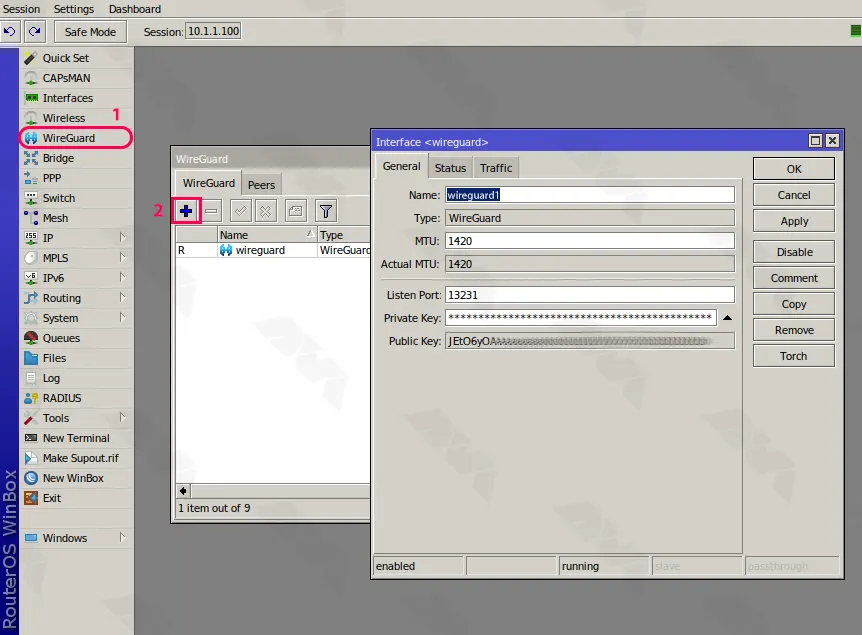
Navigate to the WireGuard section and tap on the + symbol to incorporate a fresh WireGuard connection.
Specify a title for this configuration, for example, “Wireguard1” and duplicate the Public Key to a different location.
Note: If you encounter any connection problems, please change the MTU to 1412; otherwise, leave it as 1420.

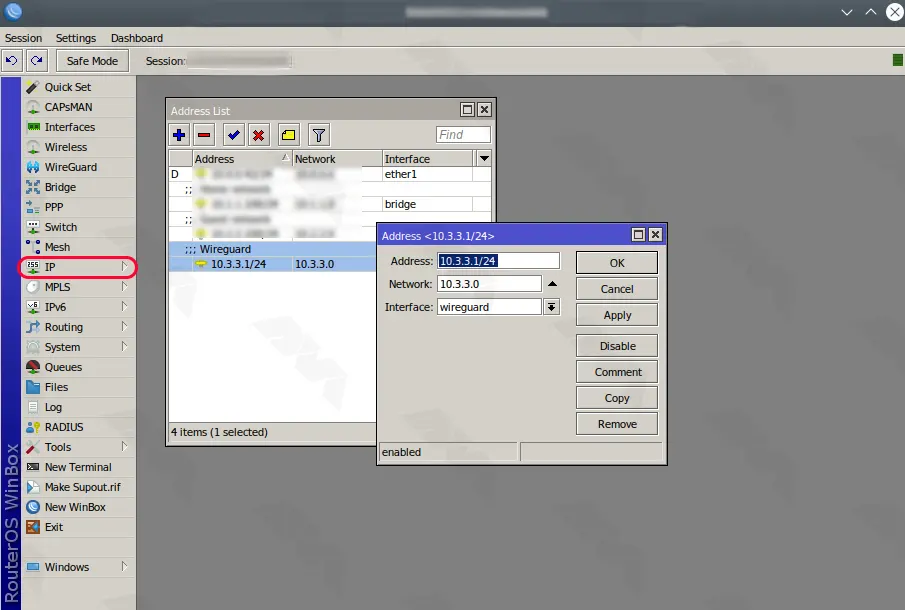
The next step is to add the IP address to your new interface.
From the menu, click “IP” and then “addresses“.
Note that it doesn’t matter what subnet you choose here. In this tutorial, we enter IP 10.3.3.0. So the IP interface should be 10.3.3.1/24:

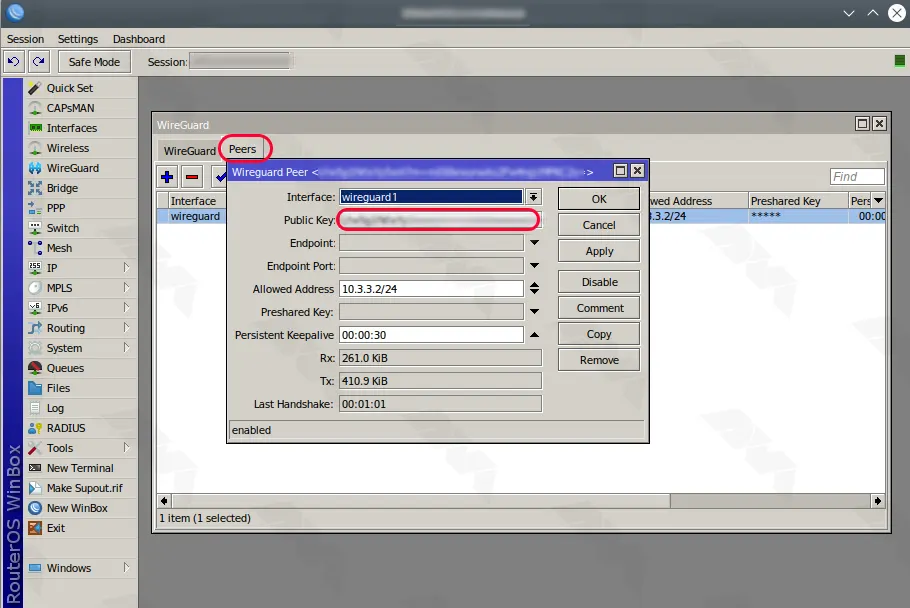
Go to the “Peers” section. Duplicate the Public Key and assign it to a specific address permitted for the WireGuard network, ensuring it has a distinct range:

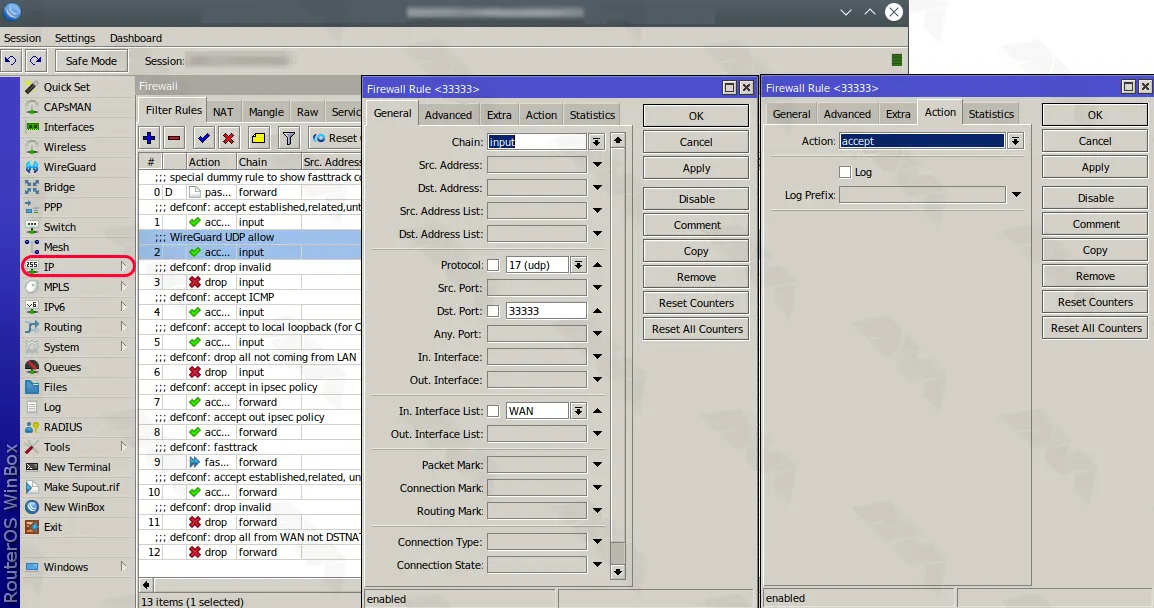
In this step, you have to allow the UDP port for WireGuard in the firewall section. In this tutorial, the port is set to 33333.
Again in the menu click on “IP” and then “Firewalland“. Now you can easily add a new rule by clicking the + icon:

Finally, you may want to access the local network from WireGuard. In this case, it is necessary to add the Wireguard interface to the interface list. This can be done in the infrastructure, so you can click on “Interface List” in the “Interfaces” menu. In the final step, click + and add Wireguard to the local network:

Conclusion
By following this comprehensive guide, you can successfully configure WireGuard on your MikroTik device. This process involves updating the firmware, installing the WireGuard package, generating WireGuard keys, configuring WireGuard peer and firewall, and enabling the WireGuard interface. Once properly set up, WireGuard on MikroTik provides a secure and efficient VPN solution for your network, allowing you to connect to remote servers and protect your data. Remember to regularly update your MikroTik device’s firmware to ensure optimal performance and security.
You might like it

How to Install WordPress on cPanel (Real Experience)

Linux Tutorials
How to Install VPN on VPS Script - Openvpn on VPS

Ubuntu Tutorials
How to Install and Configure Virtualizor on Ubuntu 20.04


