


How to Install Plesk on AlmaLinux 9 (Complete Guide)


 8m
8m
 0 comments
 Print
Print
If you are planning to install a professional, fast, and simple control panel like Plesk on your AlmaLinux 9 server, this guide is exactly for you. I have installed it on AlmaLinux many times myself, and I know that if the steps are not followed correctly, you may encounter strange errors. That is why I have explained everything from the simplest method to professional methods for you. Without further ado, let’s get to the installation, check our website for more.
Prerequisites and Things You Need to Know Before Installing Plesk
Before you get into Plesk installation, you need to know a few important points that are usually not written in simple guides, but experience has shown that if these points are not followed, you may encounter confusing errors in the middle of the installation. The first point is the minimum hardware requirements. Typically, Plesk on AlmaLinux performs best when you have at least 2 GB of RAM and 20 GB of free space. If you are installing multiple sites or email services, it is better to have 4 GB of RAM or more. My experience has been that if the RAM is less than 2 GB, Plesk will crash during the installation phase or will run slowly after installation.
The second point is to make sure that the ports required by Plesk, such as 8443 and 8447, are open. I have often seen users struggling for hours because the installation was complete but the port was closed and they could not log in to the panel.
The third point is that it is better to run the following command before installation to update the system:
dnf update -y
This will prevent package incompatibility errors. These prerequisites are simple, but meeting them will make the installation hassle-free.
Method 1: Install Plesk with just one command
If you are looking for the fastest and most hassle-free method, this is the best option. Just run one command to start the automatic installation. In your server terminal, type:
sh <(curl https://autoinstall.plesk.com/one-click-installer || wget -O - https://autoinstall.plesk.com/one-click-installer)

This command will download and install the latest stable version of Plesk. It usually takes between 30 minutes and 1 hour. It is completely automatic, and you just have to wait.
Method 2: Installing Plesk via Browser
If port 8447 is open and your server IP is accessible, you can install via browser. This method is more convenient for many.
1- Download the installer
wget https://autoinstall.plesk.com/plesk-installer
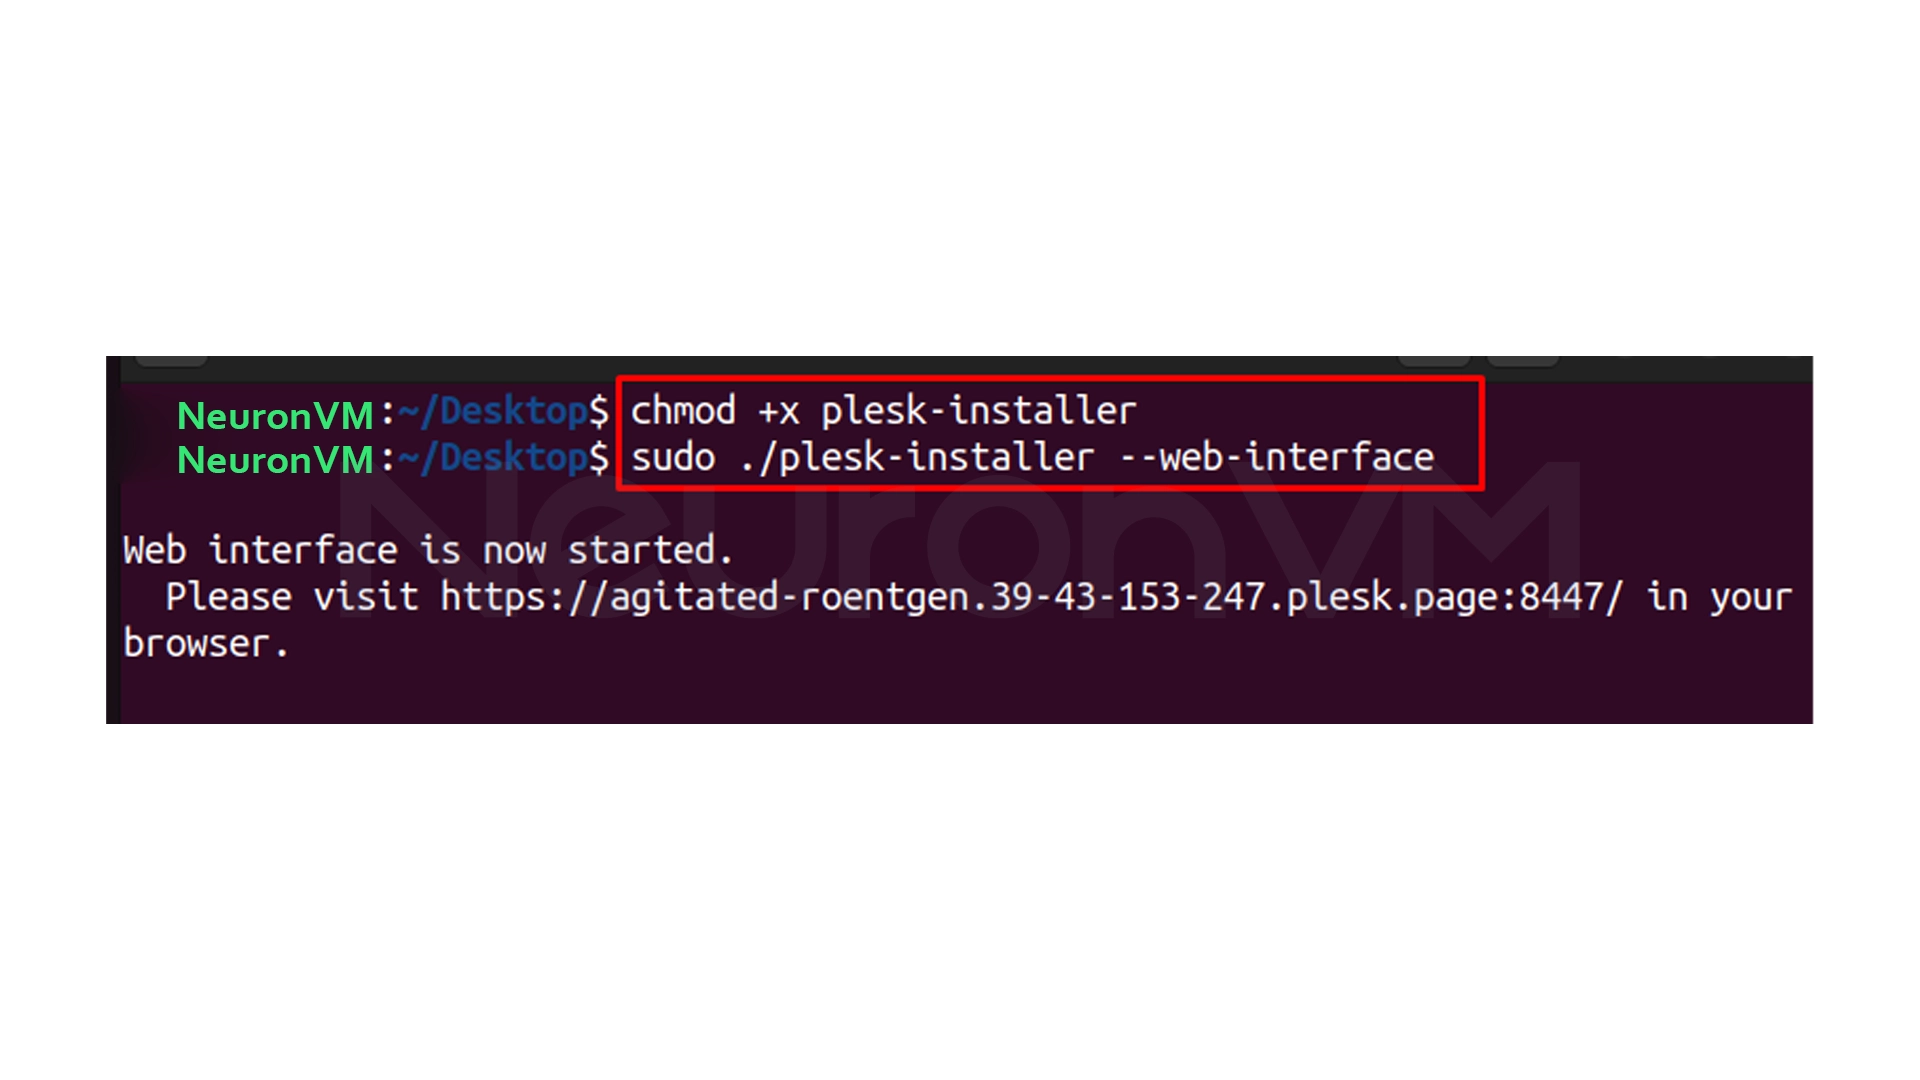
2- Granting execution access
chmod +x plesk-installer
3- Running the installer with the web interface
./plesk-installer --web-interface
4- Access the installer from a browser
Open in browser:
https://your-ip-address:8447
5- Login with root user
Username: root
Password: server password
6- Select the option “Install or upgrade product”
7- Select the stable version of Plesk and continue the installation
8- Choose the installation type
You can perform a standard, complete, or manual installation (by selecting components). The rest of the steps are done automatically.
Method 3: Installing Plesk via the Command Line (CLI)
If you are one of those administrators who prefer to do everything over SSH, this method is the best choice.
1- Download the installer
wget https://autoinstall.plesk.com/plesk-installer
2- Apply execute access
chmod +x plesk-installer
3- Perform installation
./plesk-installer
Or if you want to see different versions:
./plesk-installer --all-versions
During the installation process:
- Select Go forward
- In all-versions mode, you can select the desired Plesk version
- Wait for the installation to complete
Method 4: Installing Plesk via ISO
This method is usually suitable for VPS servers or data centers.
Plesk provides dedicated ISOs for some operating systems (such as Ubuntu and CentOS) that automate the installation.
General steps:
1- Setting virtual machine parameters and booting from ISO
2- Normal OS installation
3- After reboot, the Plesk installation will be done in the background
4- Once ready, Plesk will be accessible
This method is not always available on AlmaLinux, but it works very well on CentOS.
Method 5: Quick Installation of Plesk via Web Installer (Official Site)
If you are looking for the easiest way with a graphical interface, this method is great.
Steps:
1- Log in to this page:
https://get.plesk.com/
2- Enter your server IP or hostname
3- Enter your root password or private key
4- Accept the terms and conditions and click Install
5- Wait for the installation process to complete
6- Click Login and log in to your Plesk panel
(If you see a secure connection warning, just click “Continue” or “Make exception”)
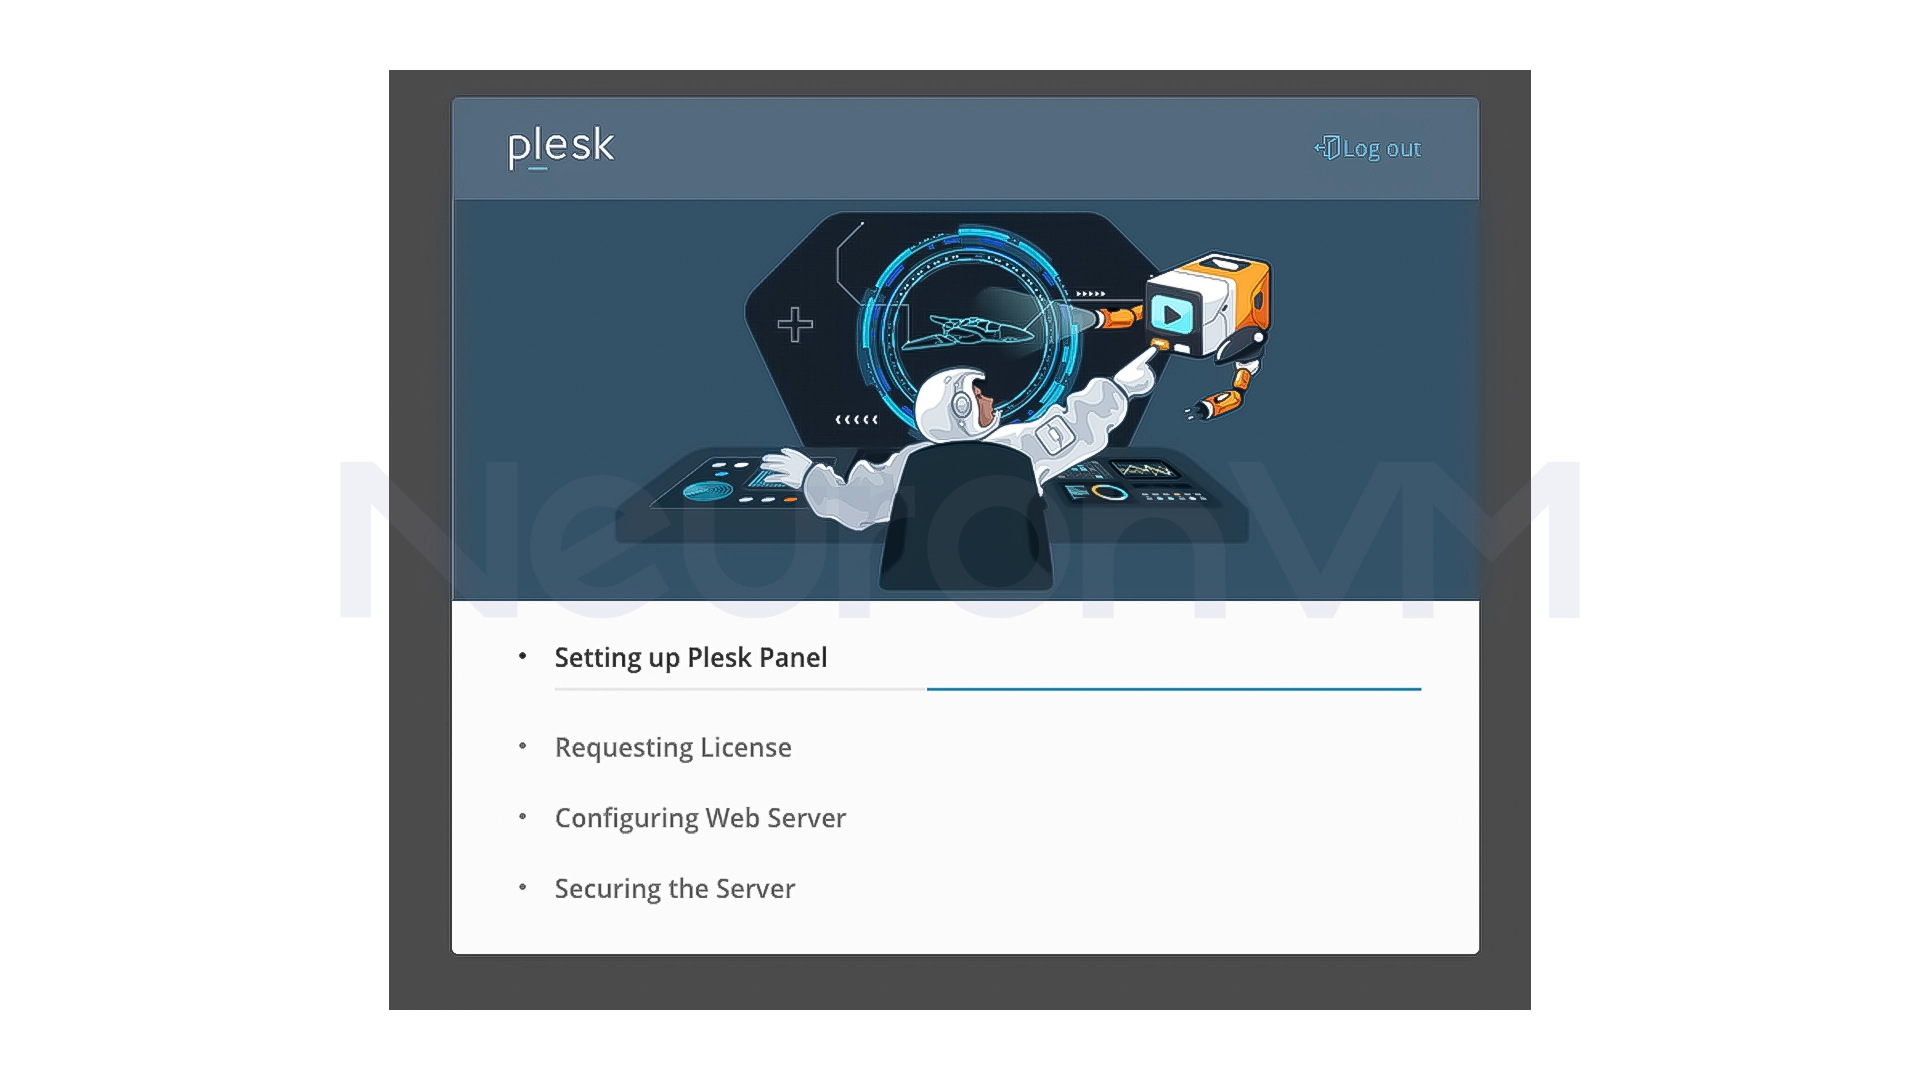
Final Step: Initial Plesk Settings After Installation
After installation, you need to configure Plesk for the first time.
Log in to your browser:
https://your-ip:8443
In this section, you need to:
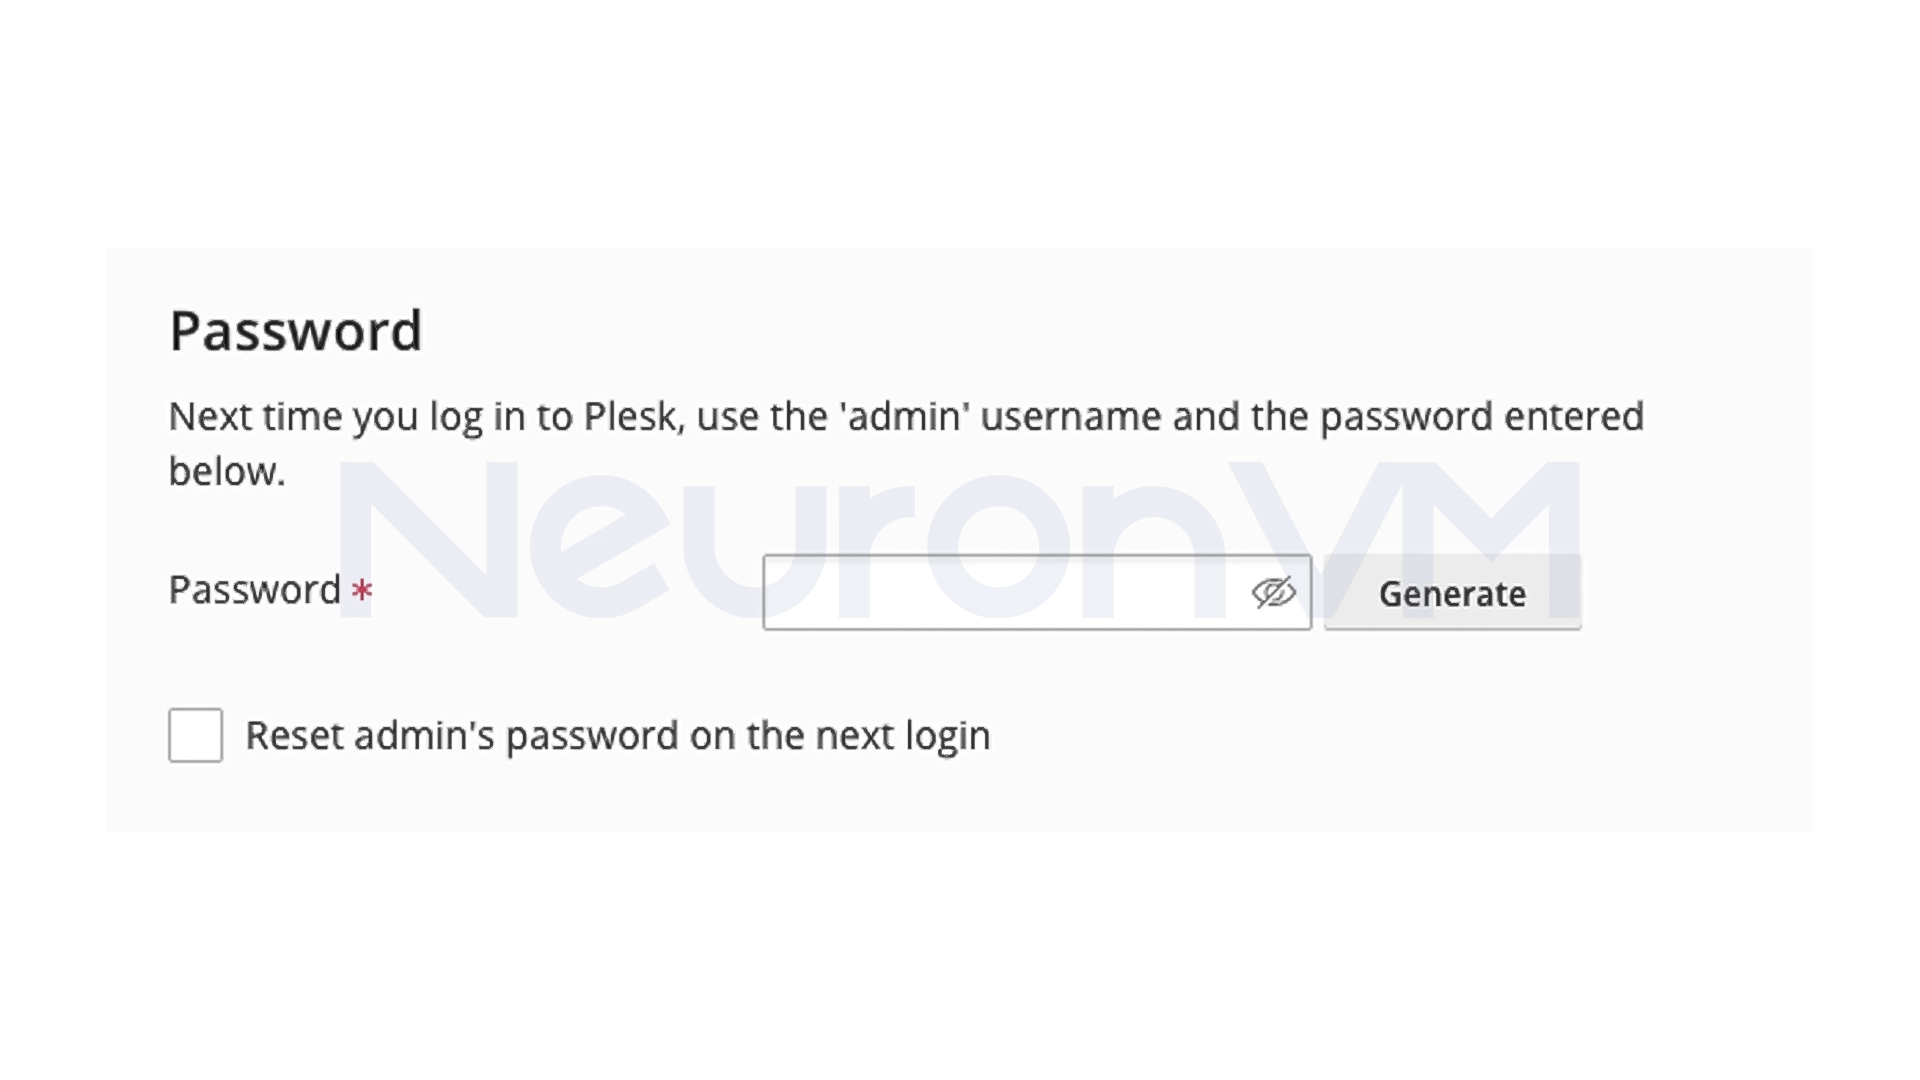
1- Enter administrator information (name and email)
2- Set a new password for admin
3- Select or enter a license
- If you have a license -> Enter the activation code
- If you don’t have one -> Use the free Trial version
4- Accept the terms and conditions
5- Log in to Plesk and enjoy its professional features, check the Plesk main website for more information.
Personal Experience and Analytical Tips on Choosing an Installation Method
When I first started working with AlmaLinux 9, one of my constant questions was which method of installing Plesk was faster and more reliable? After several installations on different servers, I came to the conclusion that the answer to this question depends on the needs and conditions of the service you want to set up. For example, if your server is newly set up and no other services are installed on it, the one-click installation is the best choice, fast and without conflict.
But if the server is already configured or has many packages installed, the CLI method is better for you, because we have more control, and in case of an error, the terminal output shows exactly where the problem is.
In environments where the user or client does not have direct access, I usually use the Web Installer because it is both simple and allows you to see complete and step-by-step information during all installation steps. These explanations may seem small at first glance, but they are exactly the points that will help you choose the right installation method and avoid wasting time.
Conclusion
Installing Plesk on AlmaLinux 9 is truly easy when you know the prerequisites and key points before you begin the methods that are explained in this guide are suitable for a variety of situations, from quick and automated installations to methods that give you way more control, in my personal experience, whenever I have followed simple steps before installation, such as updating the system, and opening ports, the Plesk installation has been error-free and completed in the shortest possible time However, whenever these points have been ignored, the seemingly simple installation has become a time-consuming challenge.
If you are looking to set up a stable and professional environment, choosing the right installation method and paying attention to these small details really makes a difference. I hope this guide has not only given you the installation steps, but also given you a better perspective on choosing the best path and avoiding potential problems.
Yes, it is fully compatible, you just need to meet the prerequisites such as sufficient RAM and open ports.
The One-Click Installer method is the fastest and least troublesome.
Yes, it is completely safe if you use the correct IP and root access. The SSL warning is normal in the early stages.
You might like it

Ubuntu Tutorials
How to Install XFCE Desktop on Ubuntu 20.04


Debian Tutorials
How to Install NVIDIA Drivers on Debian Linux (Step-by-Step)


Linux Tutorials
How to Uninstall Steam Games on Ubuntu
