How to Configure VPN on Mikrotik Router
 6m
6m
 0 comments
Configure VPN on Mikrotik router can be done using the Point-to-Point Tunneling Protocol (PPTP), Layer 2 Tunneling Protocol (L2TP), or OpenVPN. In this example, We will provide a step-by-step guide on how to setup a VPN on Mikrotik Router. Please note that PPTP is considered less secure than other VPN protocols like L2TP or OpenVPN, and its use is not recommended for highly sensitive data.
7 Easy Steps to Setup VPN on Mikrotik Router
Considering routerOS, which won the Nobel Prize, Mikrotik is one of the best and most widely used routers and wireless products in ISPs and network companies. Now, if we want to install our required VPN on Mikrotik with a simple setup, we can use 3 different ways as mentioned before, which will be fully explained in the next sections. So keep reading but we suggest you to test and use Mikrotik VPS plans offered on our website.
Note: Ensure you have administrative access to your Mikrotik router before proceeding with these steps.
Step 1: Gathering Required Information
– Get hold of your VPN service credentials, including the server address, VPN protocol, username, and password.
– Ensure you have admin access to your Mikrotik Router.
Step 2: Accessing RouterOS Configuration
– Open your web browser and type your Router’s IP address in the address bar.
– Enter your login credentials (username and password) to access the RouterOS Configuration:

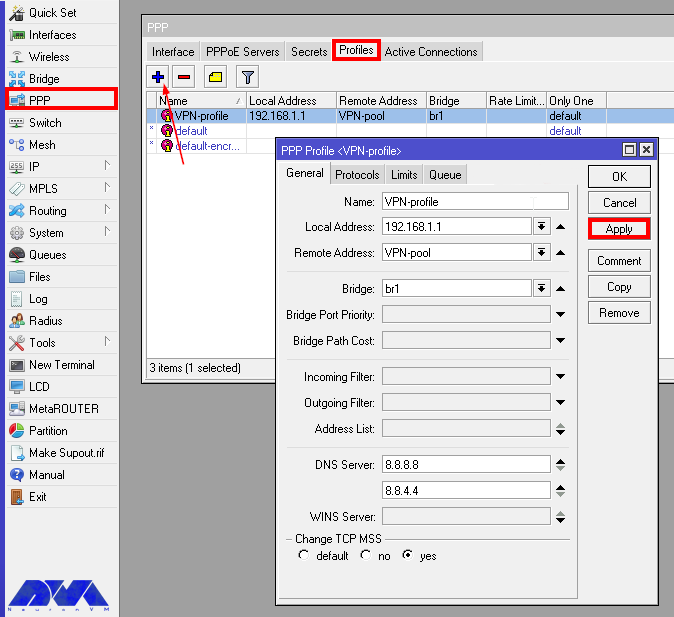
Step 3: Creating a New PPP Profile
– Navigate to the “PPP” section in the left-hand menu.
– Click on “Profiles” and then “Add New.”
– Give your profile a name and select the desired VPN protocol (PPTP, L2TP, or OpenVPN).
– Configure additional settings such as encryption, authentication, and MTU size. (Check your VPN provider’s documentation for recommended values) and press Apply.
Step 4: Setting up the VPN Client
– Go to the “PPP” section and click on “Interface.”
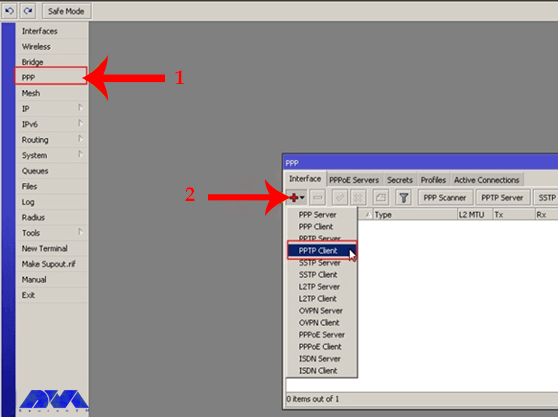
– Click on “Add New” and select the VPN protocol you chose in Step 3.
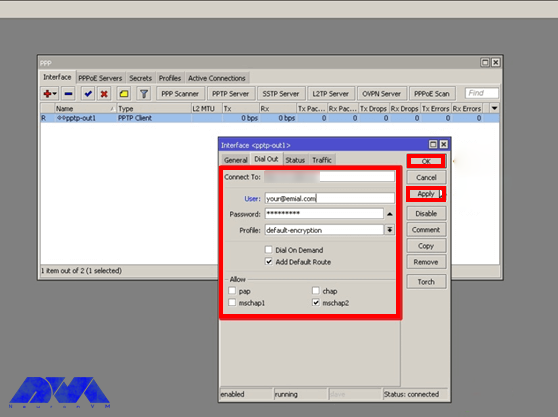
– Configure the required fields, such as name, user, and password.
– Specify the remote server’s IP address or hostname provided by your VPN service.
– Check the “Add Default Route” box to route all traffic through the VPN.
Step 5: Configuring Firewall Rules
– Navigate to “IP” in the left-hand menu and click on “Firewall.”
– Select the “NAT” tab and click on “Add New.”
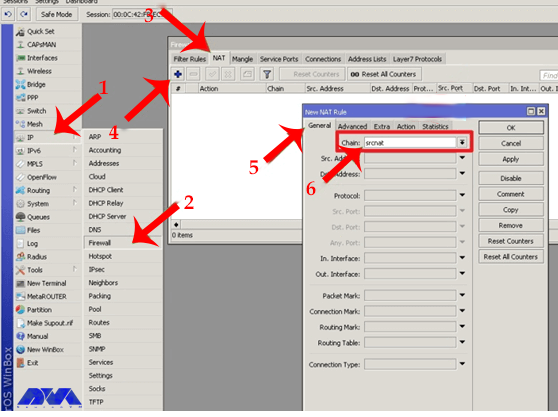
– Choose the “srcnat” chain and configure the source and out-interface appropriately.
– Set the action as “masquerade” to conceal the client’s IP address.

Step 6: Testing the VPN Connection
– Connect to the Internet through your Mikrotik Router and activate the VPN connection you established.
– Open your web browser and visit a website to verify if the VPN is functioning correctly.
– Perform a DNS and IP leak test to ensure your actual IP and DNS information is concealed.
Step 7: Troubleshooting Common Issues
– As the final step, if you encounter issues, double-check your configuration settings, especially the VPN server address and authentication details.
– Verify that your Firewall rules are correctly setup to allow VPN traffic.
– Consult your VPN service provider’s support documentation or seek assistance from their customer support for specific troubleshooting guidance.
Conclusion
Congratulations! You have successfully configured a VPN on your Mikrotik Router, taking control of your online privacy and security. With your new VPN connection, you can now confidently browse the web, access geo-blocked content, and protect your sensitive information from prying eyes. Remember to stay updated with the latest RouterOS releases and periodically review your VPN settings for optimal security.
You might like it

Linux Tutorials
How to Create Ruby app in cPanel by Cloudlinux

Ubuntu Tutorials
How to Install Ubuntu 22.04 on Windows 10: Dual Boot or Repl...

Kali Linux Tutorials
Setup Maltego on Kali Linux for Information Gathering


