


Using a VPN (Virtual Private Network) means you’ll leave no trace of yourself on the Internet for the ISP or anyone else. Instead of connecting directly to a crowded and insecure Internet space, a VPN connects you to a private Internet network that is limited to you. A VPN chooses your location based on IP, where it does not belong to you at all. In this way, you can ensure your security in the Internet space. Another use of a VPN is to remotely run a company’s employees to the office’s private network, even if they are not physically present in the office. Due to the importance of VPN, we decided to teach you in this article about the Tutorial Create VPN Connection on RDP 2016.
Using a VPN can be beneficial for you in two different ways. Firstly, activating it allows you to access the internet from another country through VPN hosting servers, which can be useful for accessing content that is not available in your country of residence. Secondly, and most importantly, using a VPN encrypts all your traffic data over the internet, providing you with enhanced security.
By connecting to VPN servers, you are provided with an encrypted connection with trusted links, and you can use the Internet normally and without any restrictions. Keep in mind that using a VPN slows down download and upload speed. That’s because when using a VPN data transfer speed reduces.
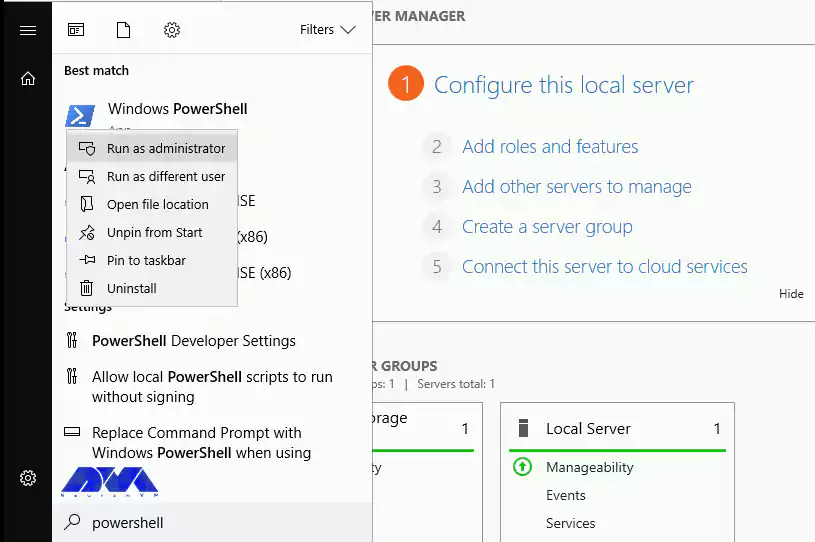
Before starting the training on how to create a VPN account, we recommend you choose and buy the plan you need from the cheap Admin RDP plans provided on our website. The first step is to type PowerShell in the Windows Start menu and right-click on Run as Administrator and open it in Administrative mode.
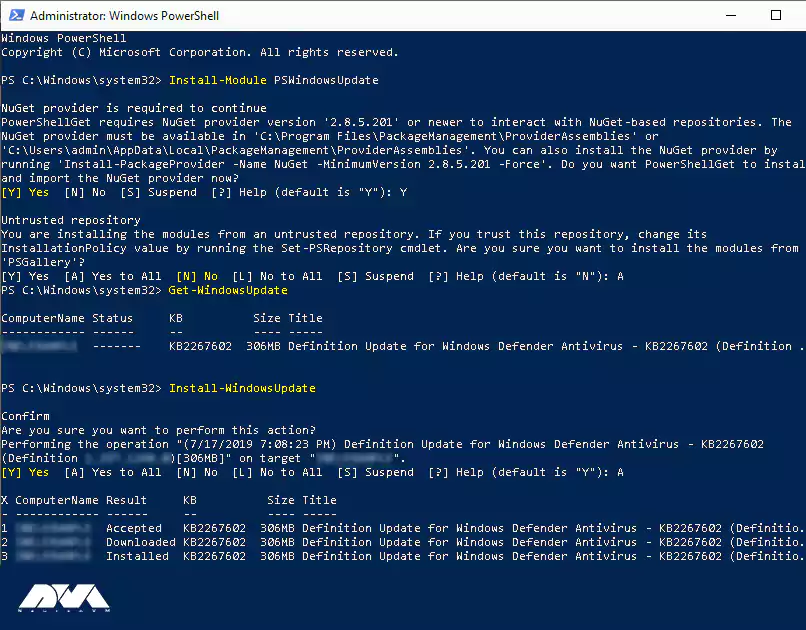
By running the following command, you will install the Windows Update module for PowerShell:
Install-Module PSWindowsUpdate
If you are asked to confirm, you can press Y and enter.
Then run the following command to get a list of the latest updates:
Get-WindowsUpdate
Finally, run the following command to install the updates.
Install-WindowsUpdate
After the updates are installed, run the following command to restart the computer:
Restart-Computer
To install the Remote access feature with Direct Access and VPN (RAS) and Routing with the management tools, you must first open PowerShell in administrative mode again and then enter the following commands:
Install-WindowsFeature RemoteAccess
Install-WindowsFeature DirectAccess-VPN -IncludeManagementTools
Install-WindowsFeature Routing -IncludeManagementTools

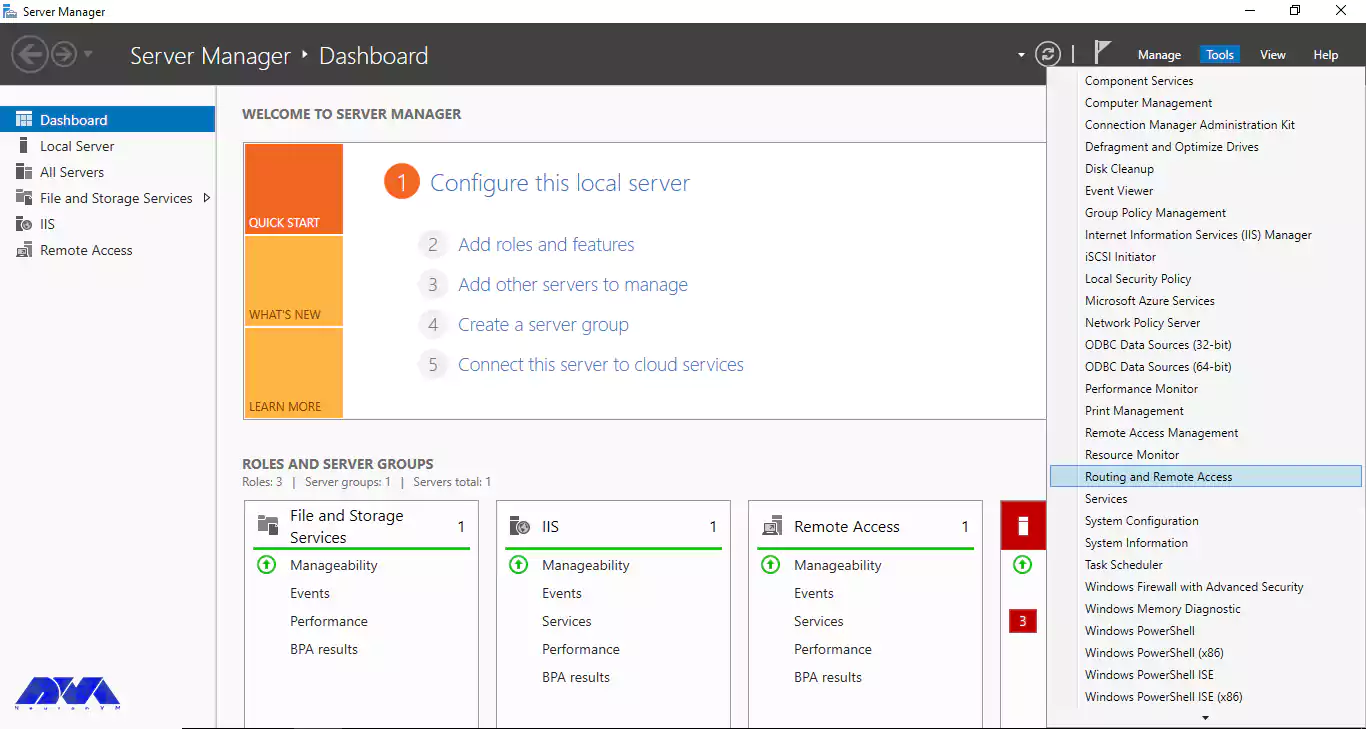
First, open the Server Manager in your RDP 2016 and click on Routing and Remote Access from the Tools section.
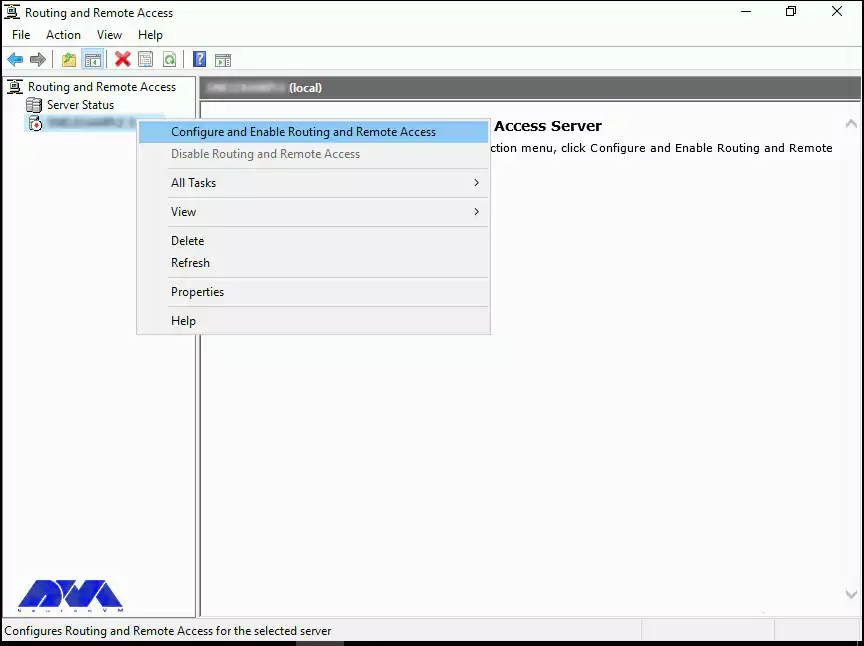
In this step, you must right-click on the local server and click on Configure and Enable Routing and Remote Access.
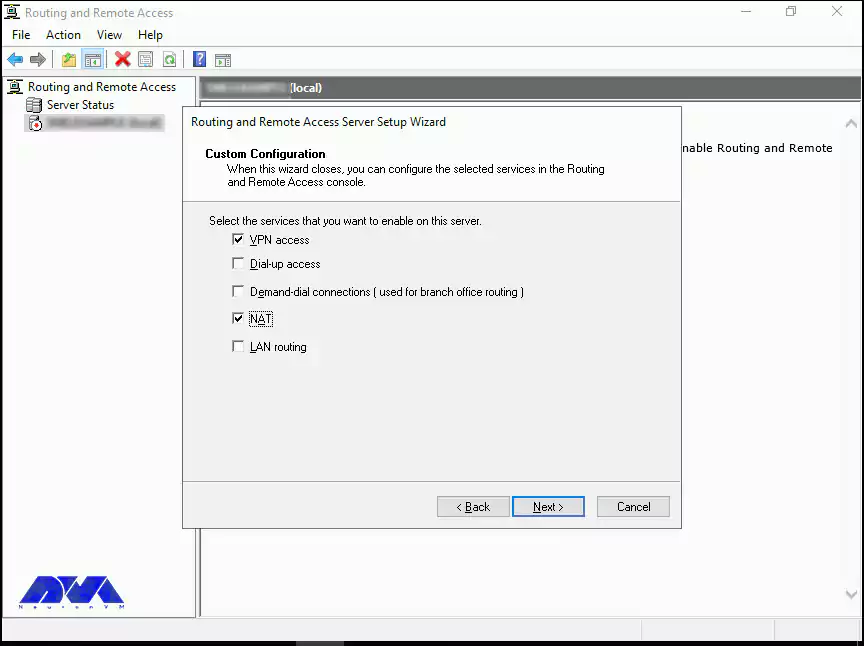
Because the routing and access configuration is done manually, select the Custom Configuration button here and click Next.

Now you must select the VPN and NAT boxes and click Next.
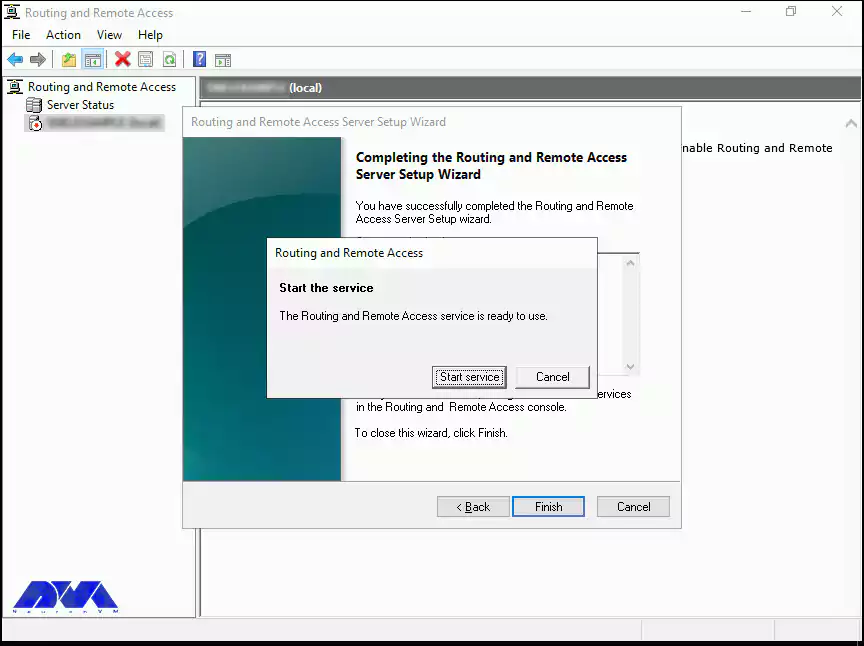
Finally, click Finish. Then click on Start Service after seeing the instruction to start Routing and Remote Access Services.
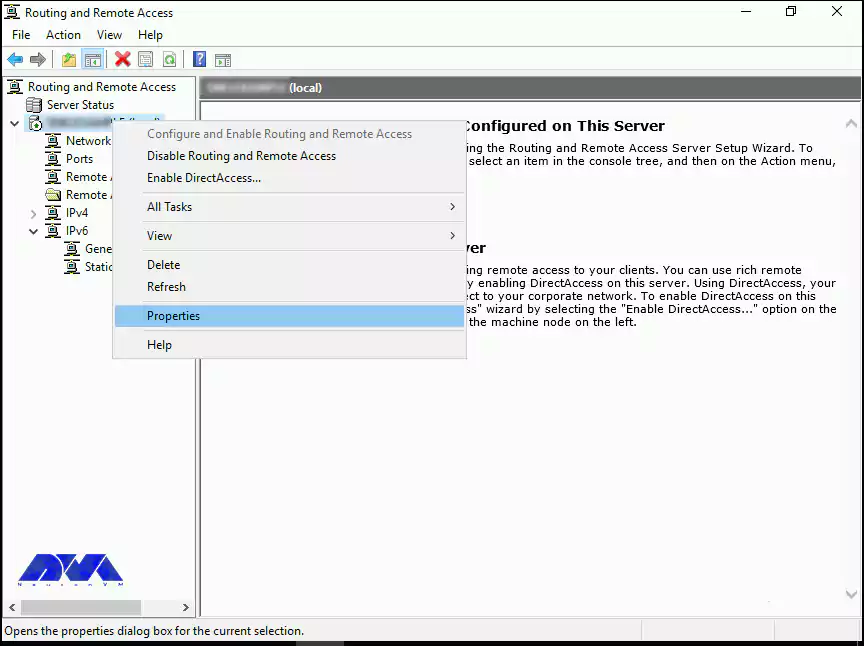
Now it’s time to configure VPN. First, right-click on your local server and then click Properties.
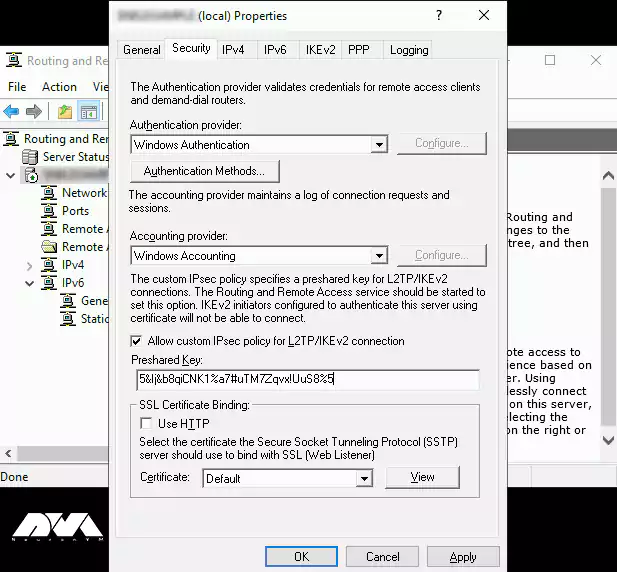
Now you need to go to the Security tab and mark the check box of Allow custom IPSec policy for L2TP/IKEv2 connection, insert a very long PSK (Pre-shared key). Remember to write down the PSK as the PSK must be shared with any user who connects to the server. You can use any tool to generate a random key.
In this step, you have to go to the IPv4 section and select the Static address pool option from the IPv4 address assignment section and click Add. After the pop-up window opens, enter the IP address ranges. You must put the starting address and ending address of the IP address range you want users to assign.
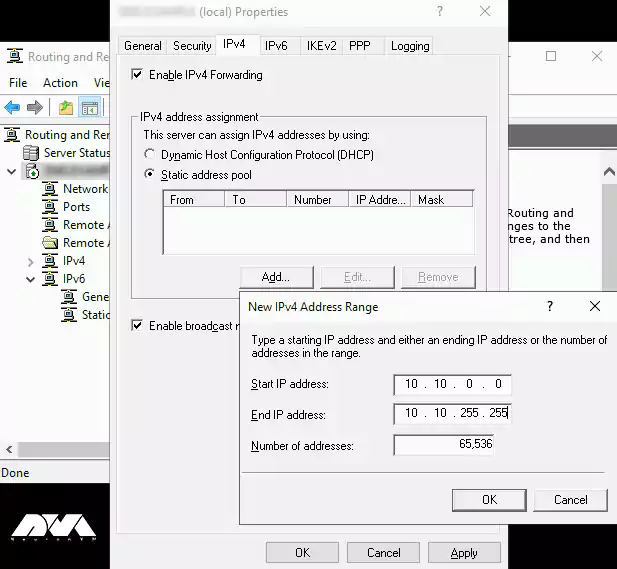
Now click OK to save the address range and finally click OK again to save the changes. Click OK if you receive the “you need to restart the Routing and Remote Access for changes to apply” warning.
In the Start menu, type, and then open the Computer Management window. Open the Local Users and Groups window on the left, right-click Users, and then click New User.

In the New User prompt, you must enter a username, full name, and strong password, Uncheck the “User must change password at next logon” box and then click Create.

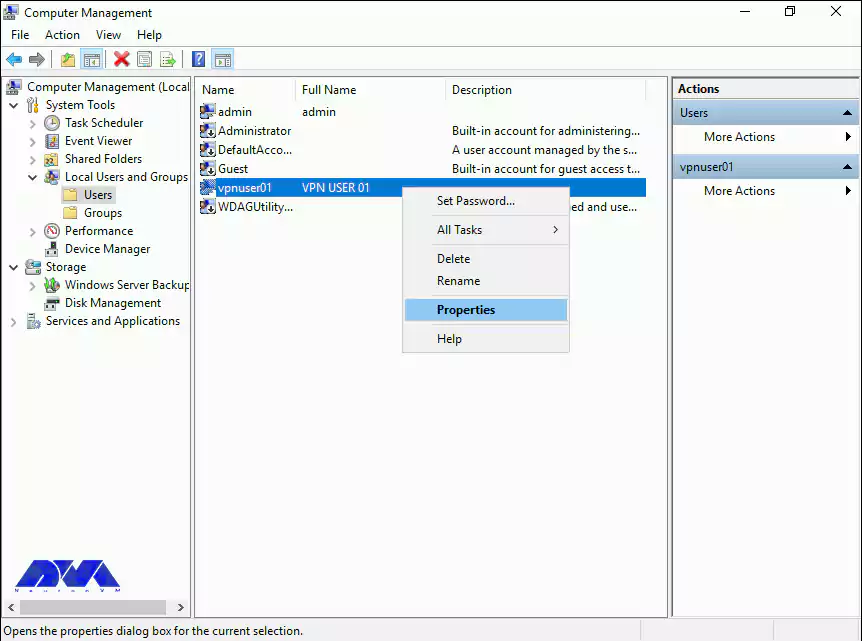
After creating the user, if you return to the computer management interface, you can find a new user in the list of users. To view the list of users in the Computer Management section, right-click Users and click Properties.
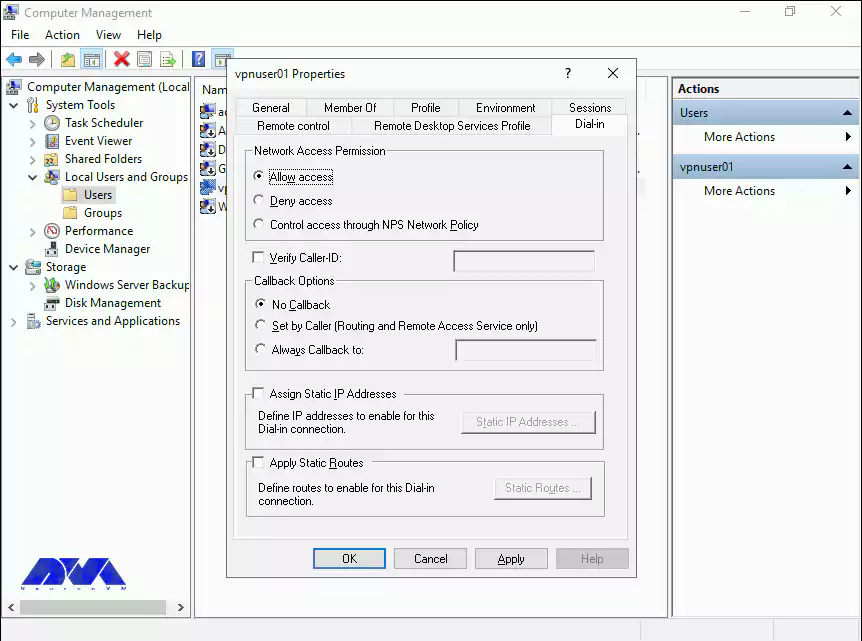
In the VPN users properties section, go to the Dial-in tab. Then select the Allow access option from the Network Access Permission settings. Finally, click OK to save the properties.
Finally, the L2TP/IPSec VPN server can accept connections.
To connect to VPN Clients you must share the PSK and Windows username and password with the user who wishes to connect to the remote VPN server.
Creating a VPN connection on RDP 2016 is a simple and effective way to enhance security and privacy when accessing remote servers or networks. By following the step-by-step tutorial provided, users can establish a secure connection and ensure that their data remains encrypted and protected. Implementing a VPN not only safeguards sensitive information but also provides a seamless and efficient remote working experience. With the increasing importance of remote access, understanding how to create a VPN connection on RDP 2016 is a valuable skill for any user or organization.


The "Kernel Security Check Failure" error is a critical issue that can occur on Windows op...


 Tags
Tags
A firewall generally prevents dangerous attacks on the local network and computer. In simple terms, ...
Tags


