


In this article, we are going to teach you How to Add an Additional IP on a Dedicated Server. It is quite normal that after purchasing a dedicated server, you decide to add an additional IP to the server. Because there are many reasons for this, using separate IPs for each different topic is one of the most important ones.
If you want to buy a dedicated server, we suggest you choose and use the cheap dedicated server plans provided on our website.
Prerequisites:
– Available IP addresses
– Proper network configuration
– Firewall and security settings
– DNS configuration
IP or Internet Protocol is an address that computers use to communicate with each other in any network, including the Internet. Dedicated servers come with 1 IP by default, but adding additional IP is possible. Let’s go to see how can you add an additional IP on a Dedicated Server.
You can add an additional IP on Windows both via Network Connections and Command Prompt.
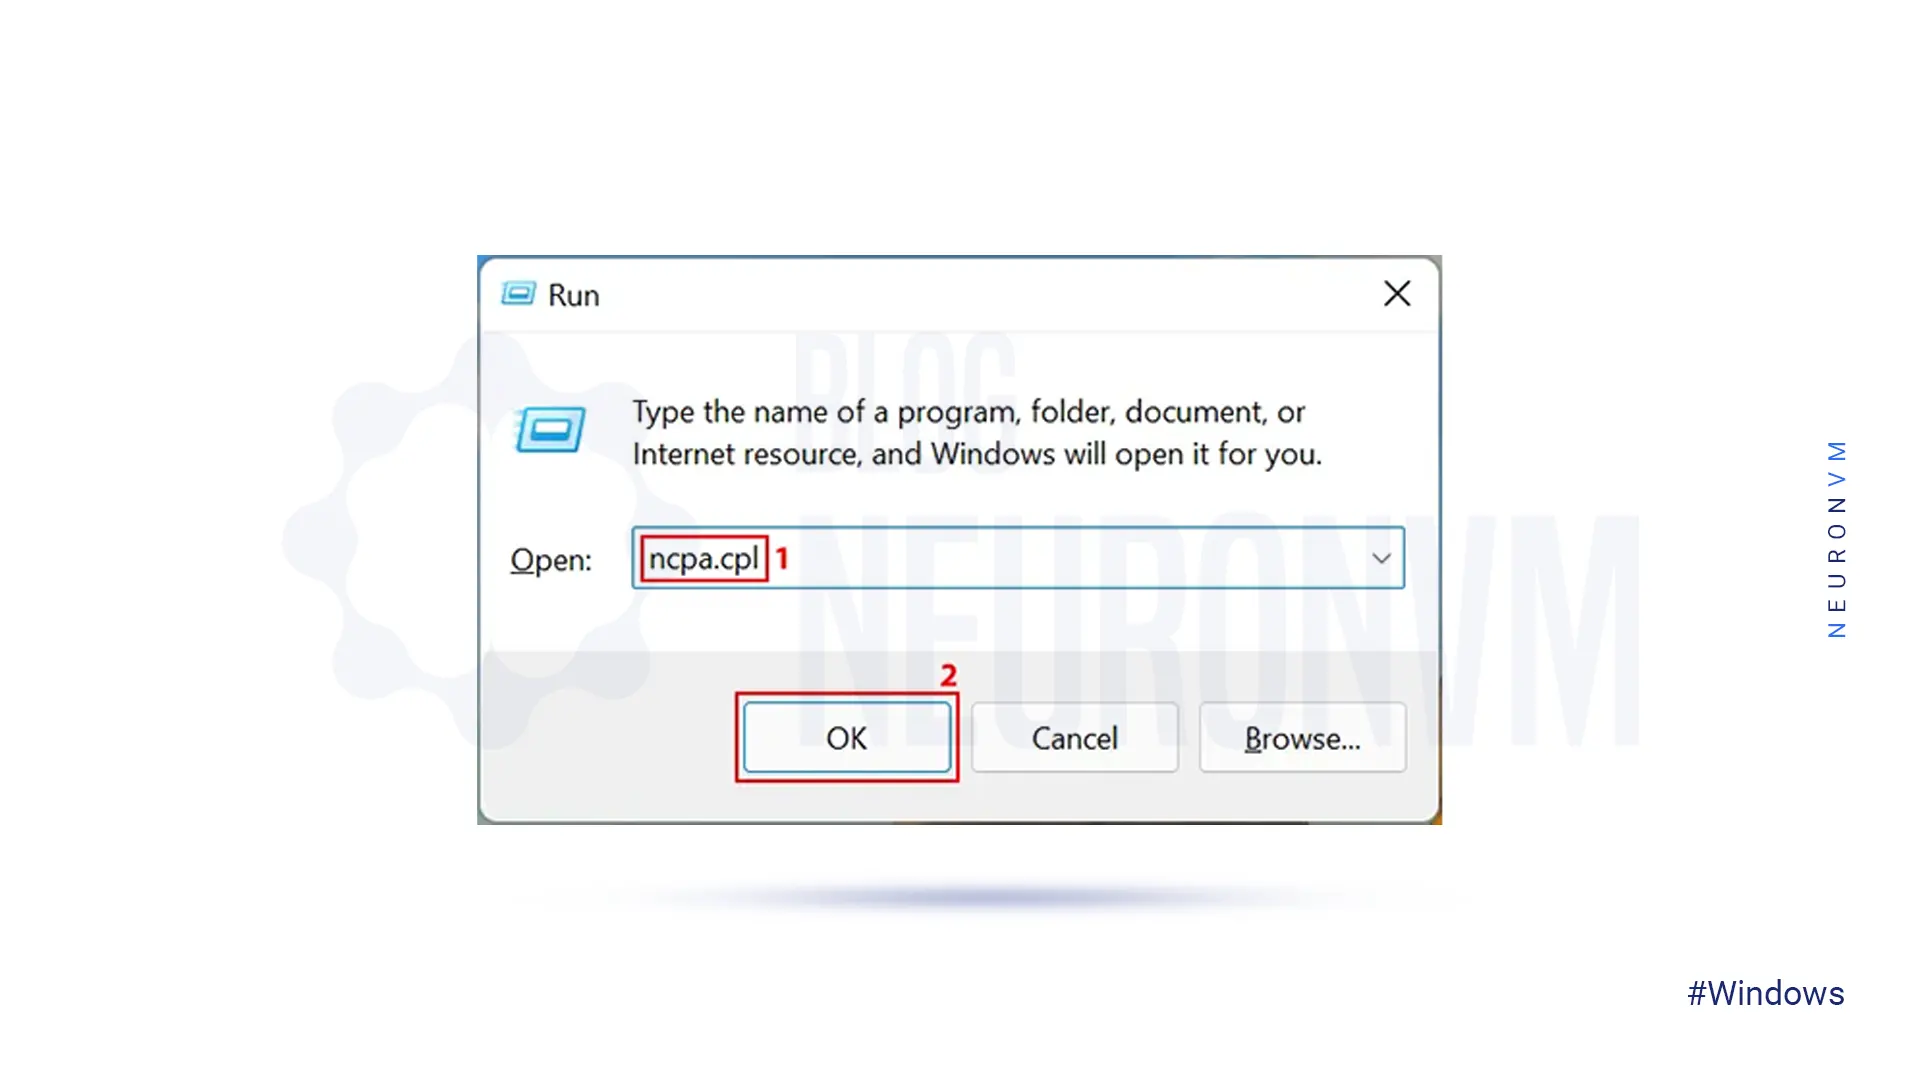
First, hit Windows+R, enter ncpa.cpl in the text field and press Enter to launch the Network Connections window:
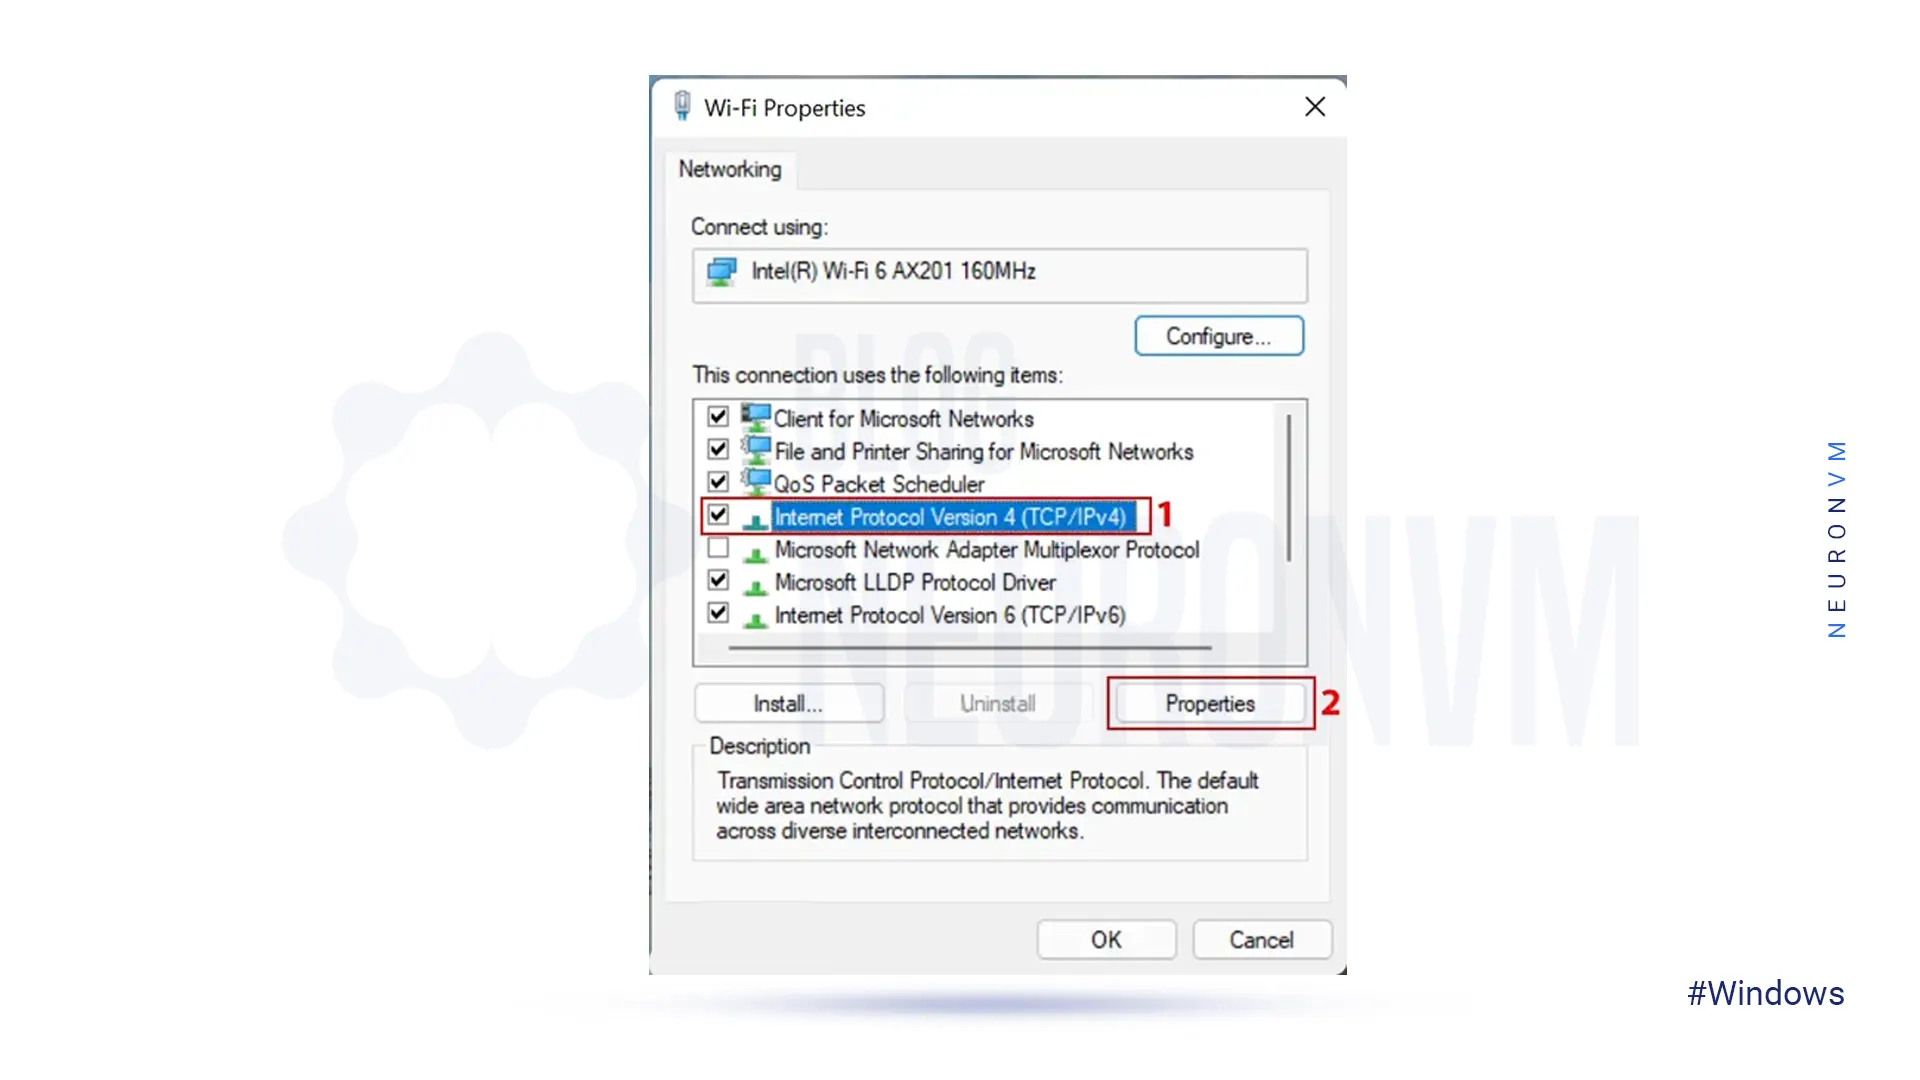
Right-click the Relevant Network Adapter on the Network Connections page and select Properties.
WiFi Properties will open, you should double-click Internet Protocol Version 4 (TCP/IPV4) and Click on Properties:
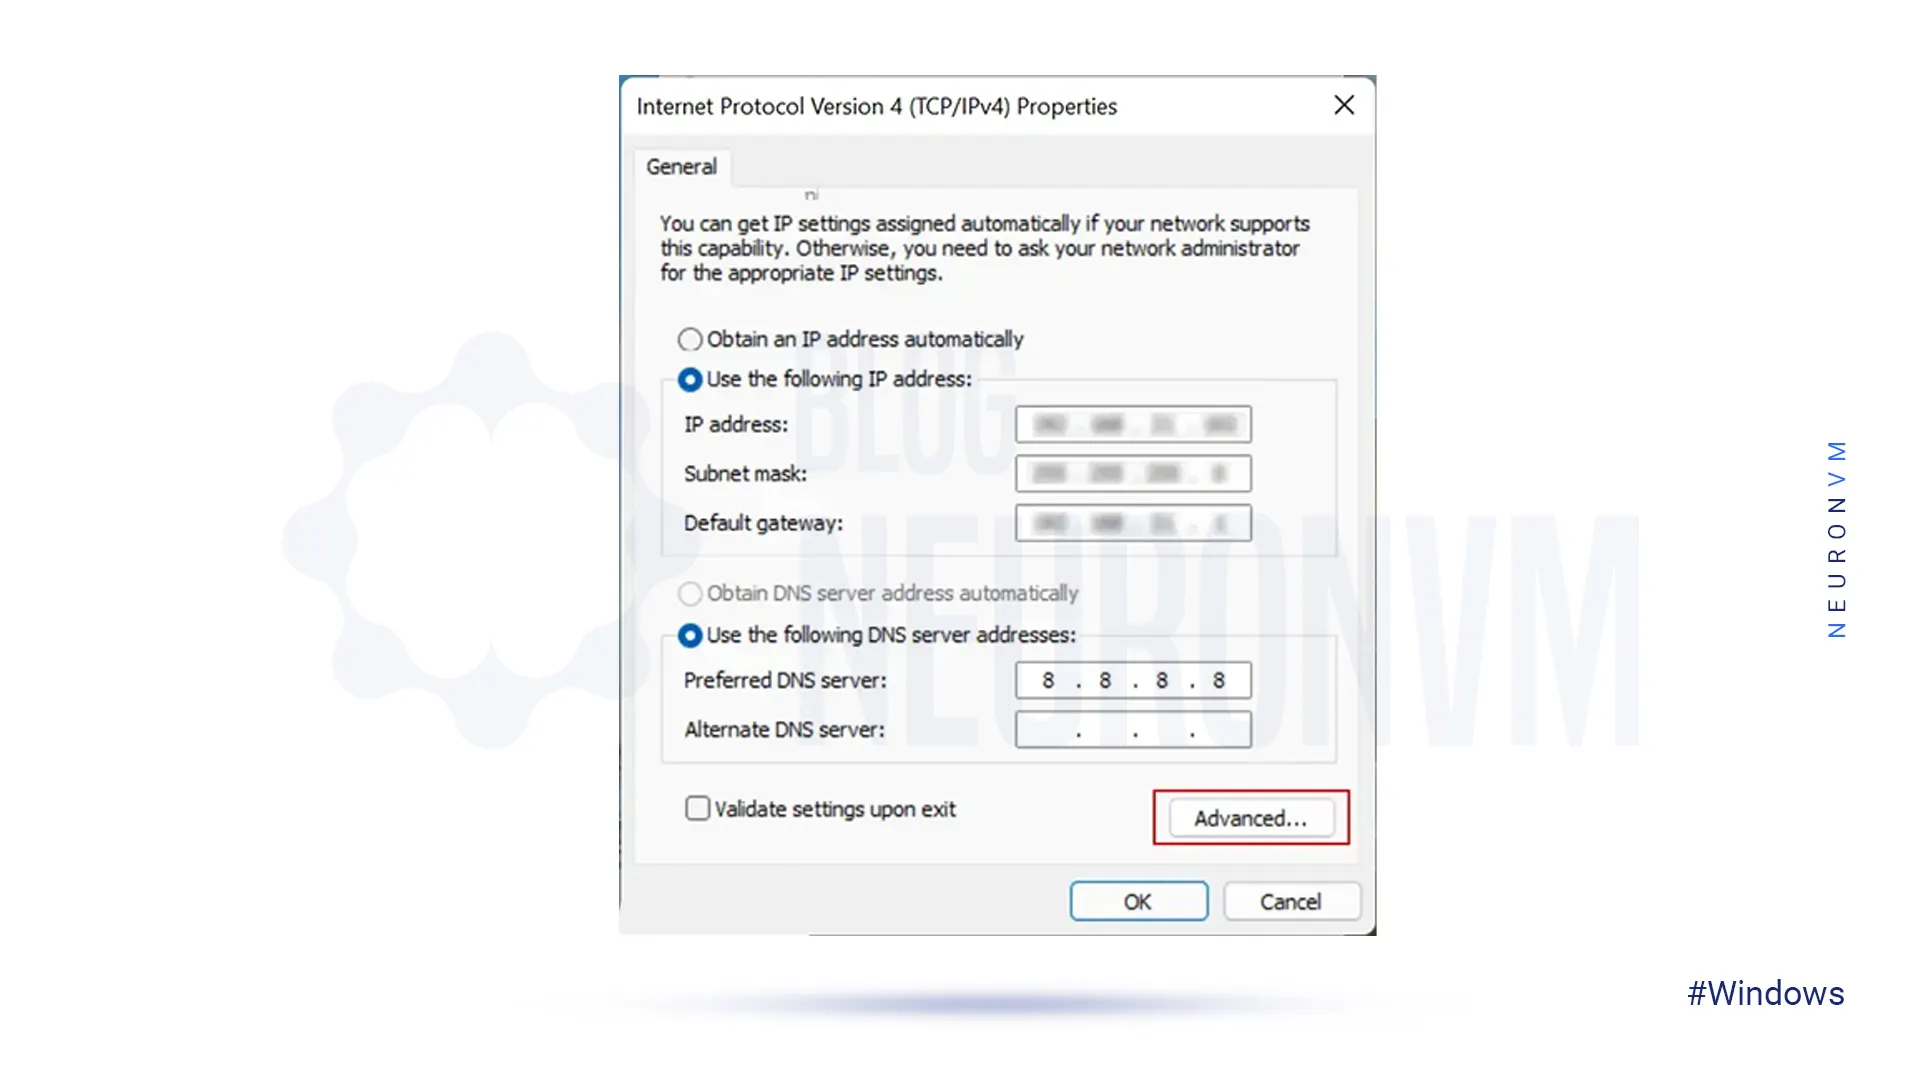
Now, enter the desired IP addresses in the fields under the Use the following IP address and Use the following DNS server addresses options.
Once done, click on Advanced:
Next, click on Add:
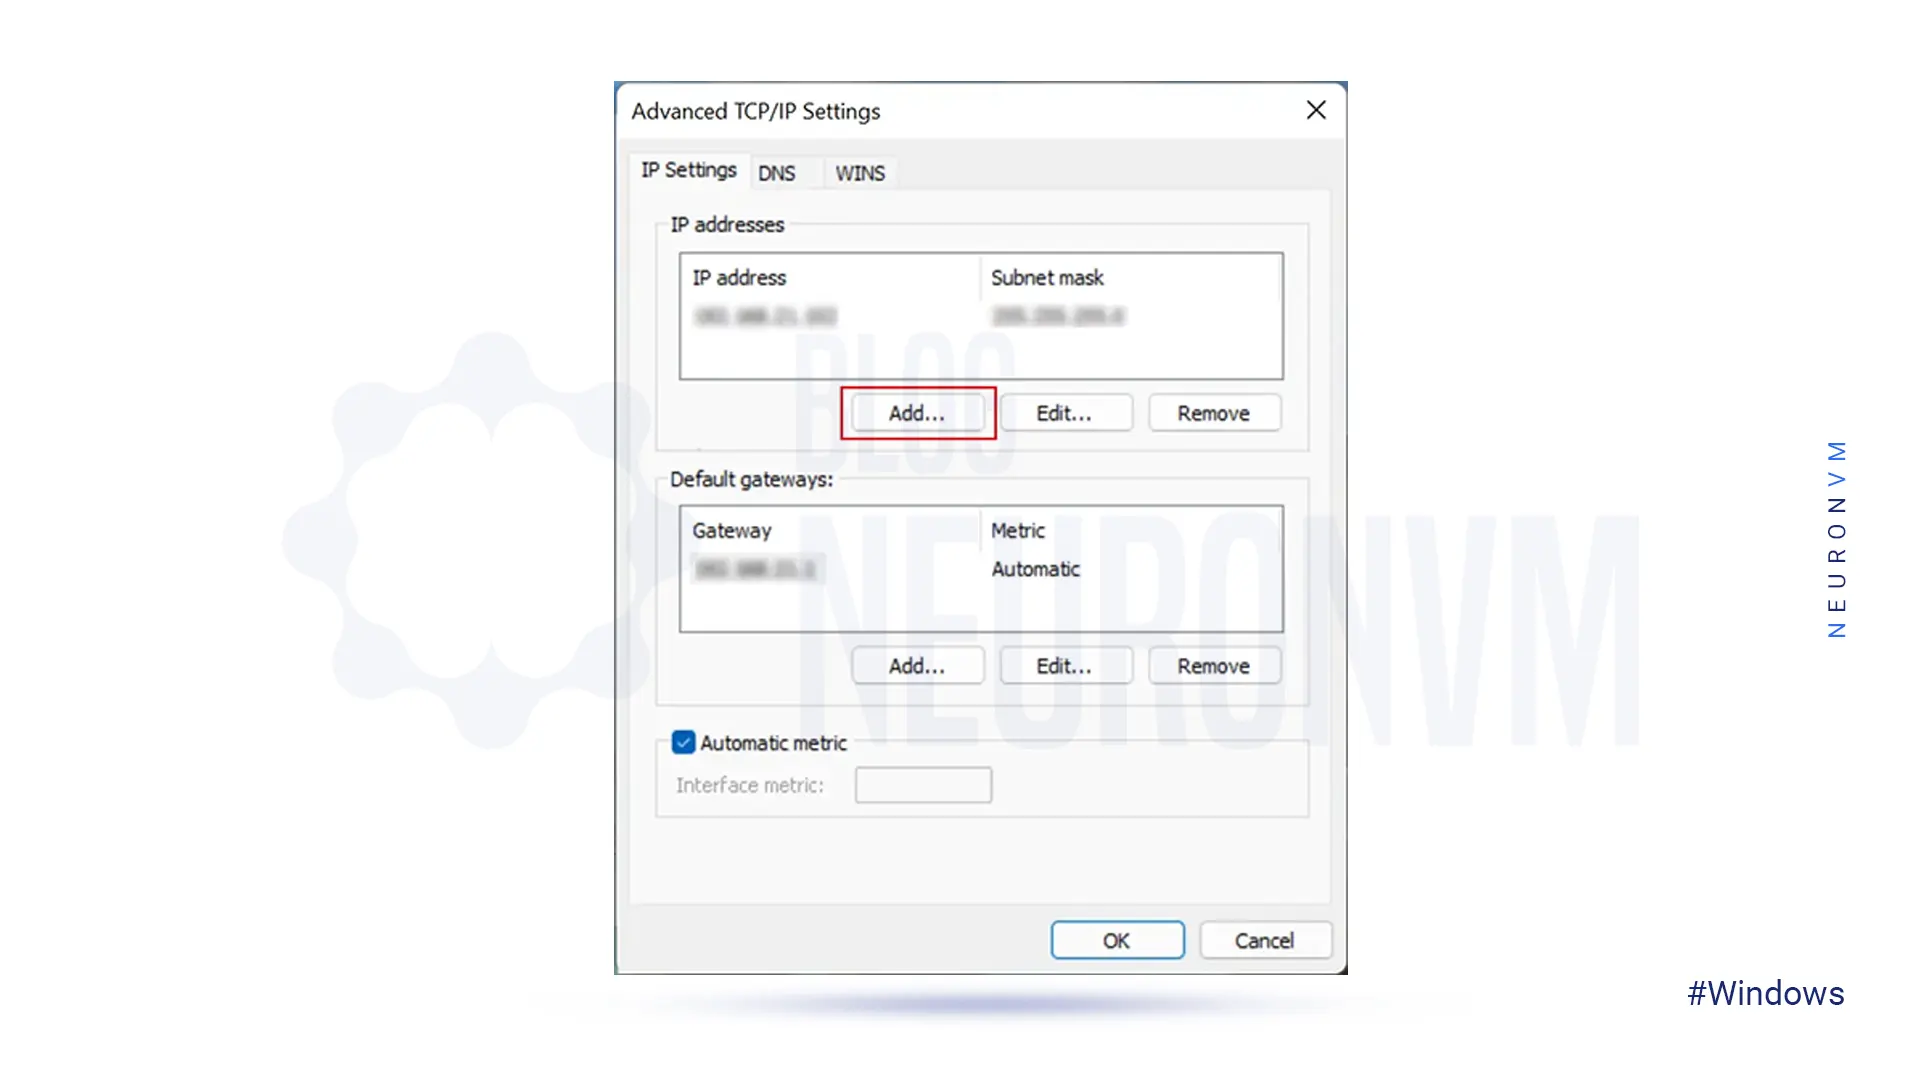
In these fields, you should enter the IP address and Subnet and then click on Add:
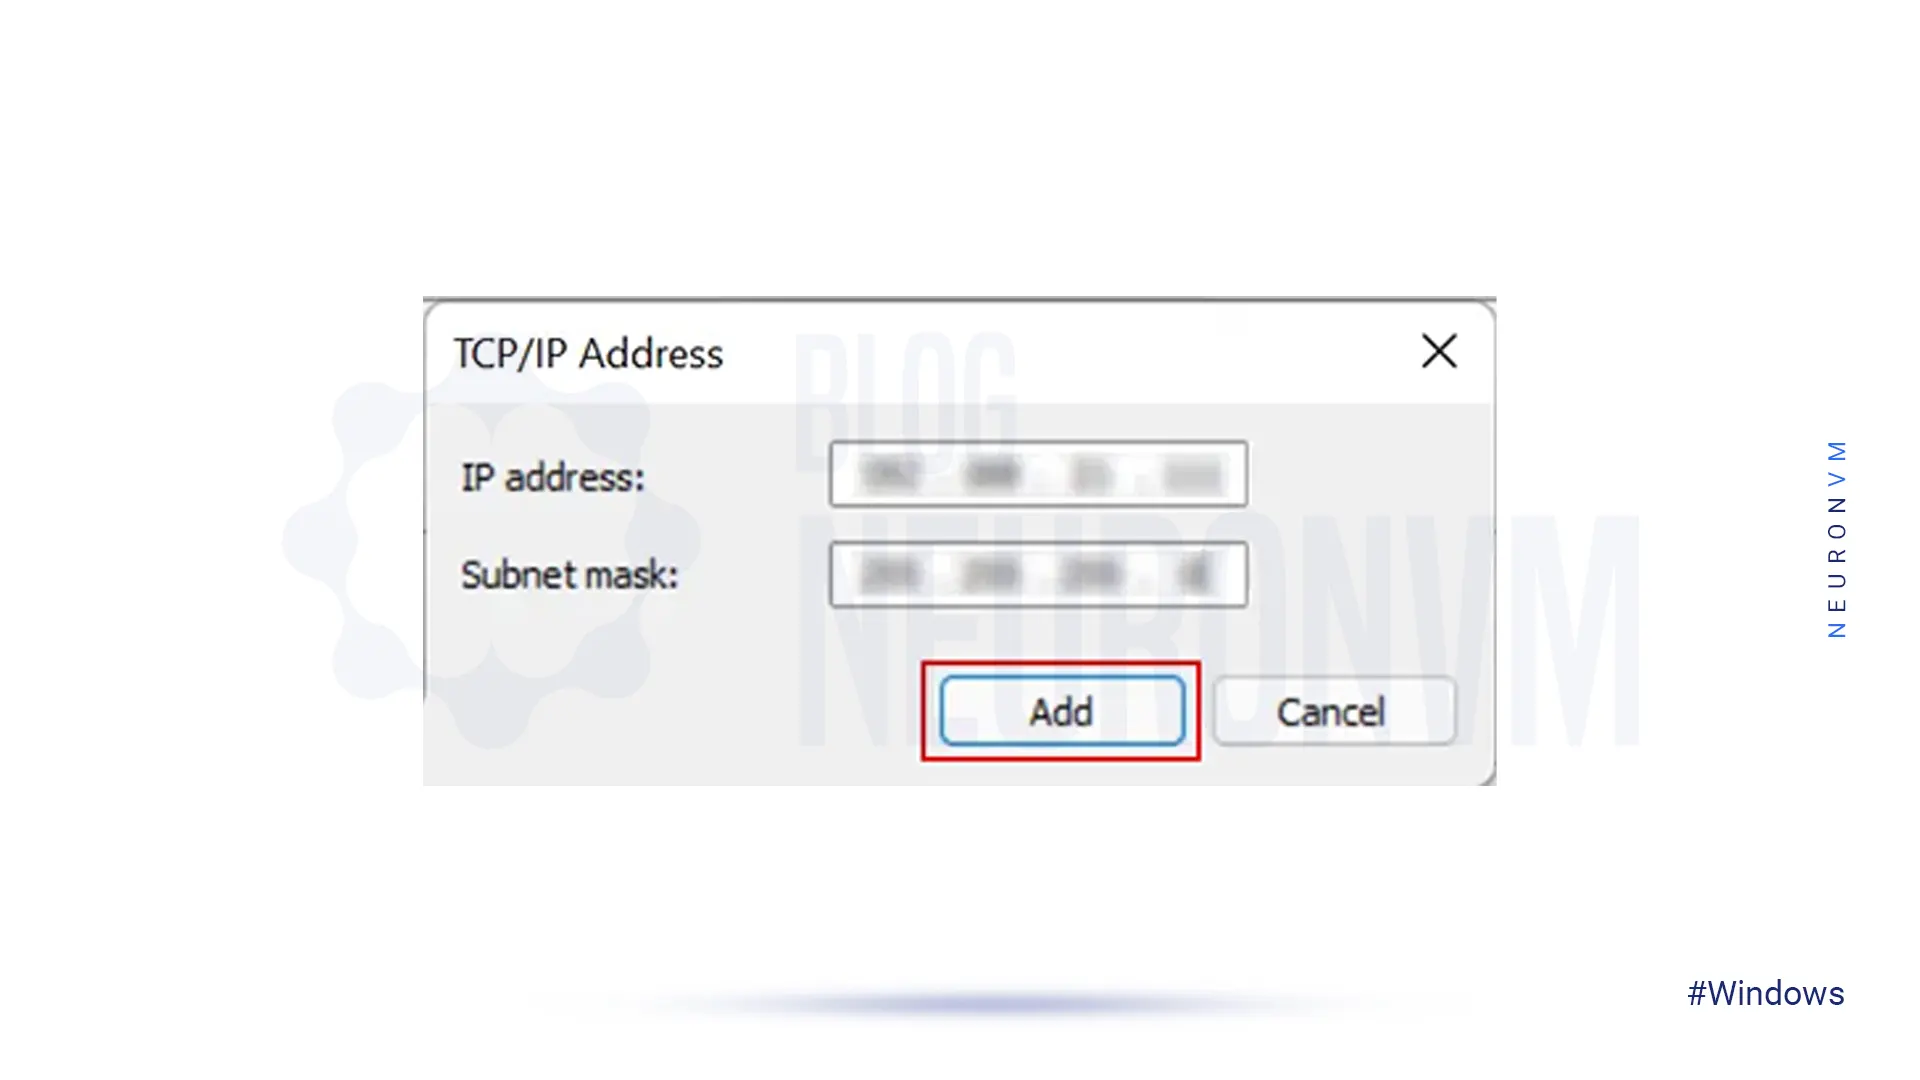
Finally, click on OK to save the changes.
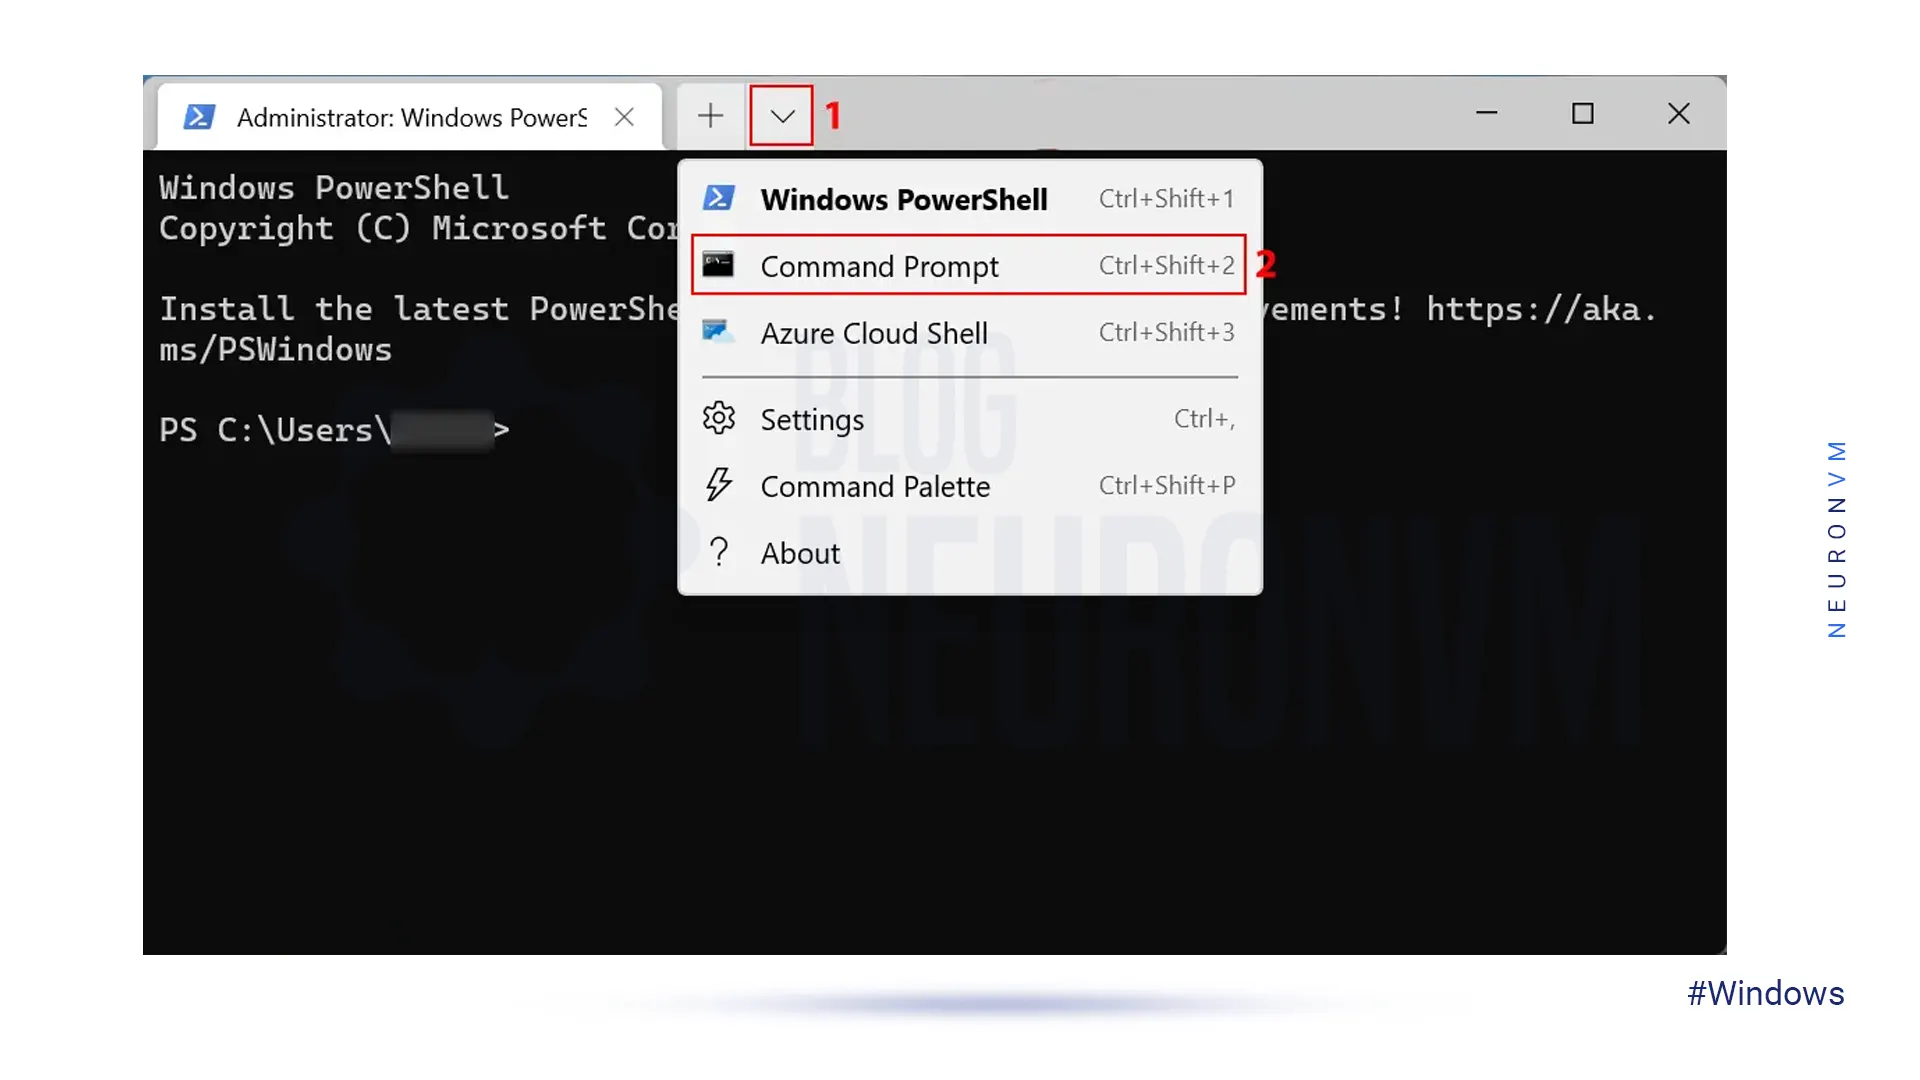
Firstly, launch the Search menu by pressing Windows+S, enter Windows Terminal in the text field at the top, right-click on the relevant search result, and select Run as administrator:

Now, press the downward-facing arrow and from the list of options choose Command Prompt:
Now, run the command below:
netsh int ipv4 add address "NIC name" IP_address Subnet
Remember to replace the NIC (Network Interface Card) name, IP address, and subnet.
Here, we are going to teach you how to add an additional IP on Ubuntu 18.04, 20.04, 22.04, CentOS, and Debian. Let’s start with Ubuntu.
Ubuntu version 18.04 and higher uses the Netplan tool for network configuration.
If you want to permanently add an additional IP address to your system, you need to edit the /etc/netplan/50-cloud-init.yaml file.
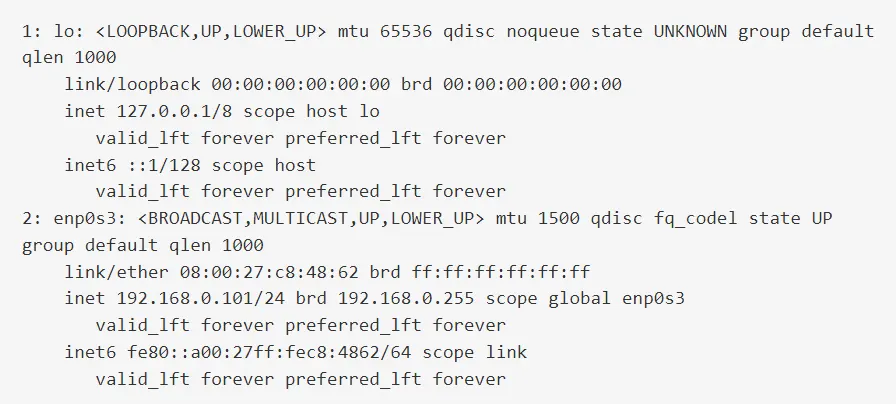
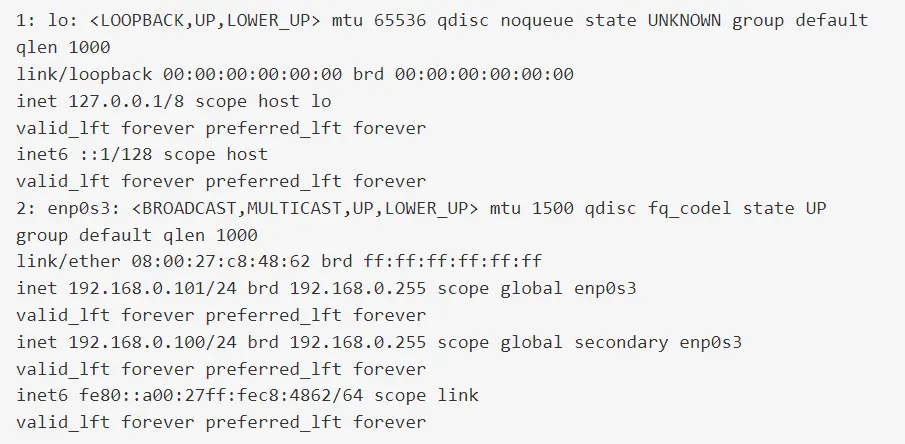
To do this, first, enter the following command to view your IP address:
ip addr
Output:
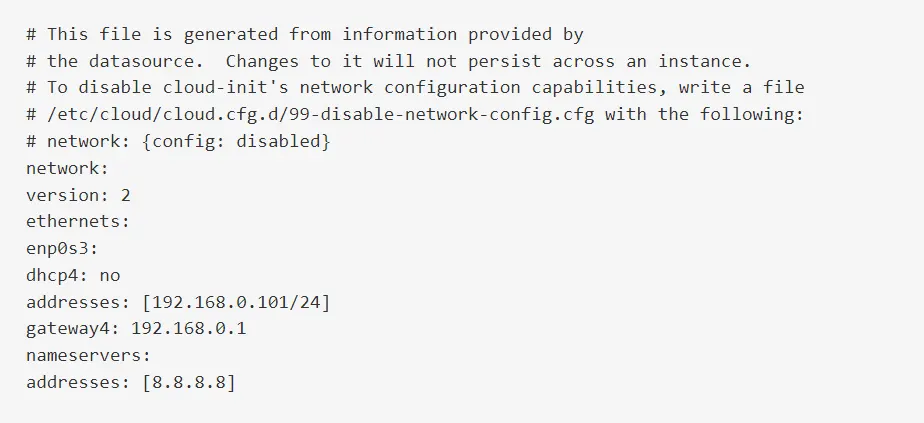
Run the following command to view your existing network configuration:
cat /etc/netplan/50-cloud-init.yaml
The output should show your existing network configuration:
Make sure that the IP address 192.168.0.101 is assigned to the interface in the above output.
– enp0s3: It is the name of the device to be configured.
– dhcp4: It is used to enable or disable dhcp4.
– dhcp6: It is used to enable or disable dhcp6.
– addresses: It is the IP address of the device.
– gateway4: It is the IP address of your gateway.
– nameservers: It is the IP address of your DNS server.
Now open your file /etc/netplan/50-cloud-init.yaml from a desired text editor:
nano /etc/netplan/50-cloud-init.yaml
And add an additional IP address 192.168.0.100 to the server.
After you add an additional IP address, your file should look something like this:
network:
version: 2
ethernets:
enp0s3:
dhcp4: no
addresses: [192.168.0.101/24, 192.168.0.100/24]
gateway4: 192.168.0.1
nameservers:
addresses: [8.8.8.8]
Save and close the file. To enable the new configuration, run the following command:
netplan apply
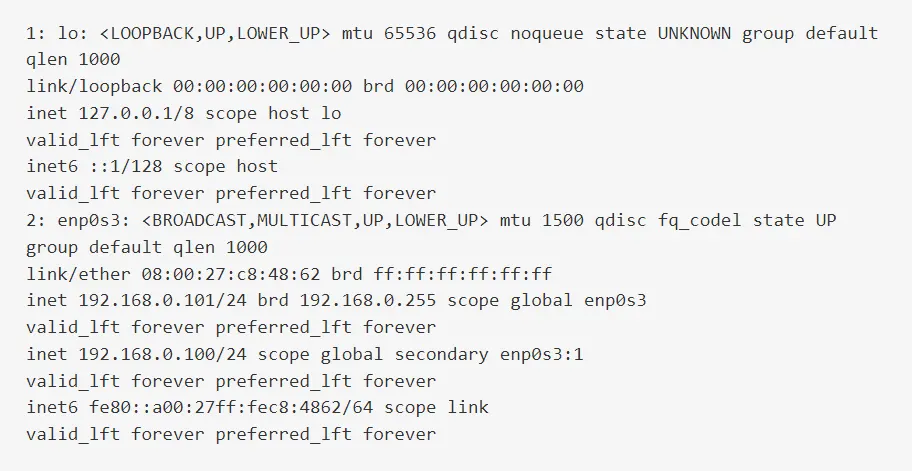
You can check your new IP address using the command below:
ip addr
Both IP addresses should be in the output:
If you want to add an additional IP address temporarily, just enter the additional IP address with the ip addr command as follows:
ip addr add 192.168.0.100/24 dev enp0s3 label enp0s3:1
Then check your IP address with the following command:
ip addr
The output should show that the new IP address 192.168.0.100 has been assigned to the enps3:1 interface:
To add an additional IP to the CentOS server, just add it to the NIC. A NIC (Network Interface Controller) card is usually a circuit board that is installed on a computer to connect to a network.
For this, you should first connect to the server through ssh. After connecting, create the /etc/sysconfig/network-scripts/ifcfg-eth0:0 file with the following content:
DEVICE=eth0:0
ONBOOT=yes
BOOTPROTO=static
IPADDR=192.168.0.11
NETMASK=255.255.255.255
Remember that the IPADDR and NETMASK data use the ones you received when you ordered the IP address.
Open the network-scripts directory with your desired text editor and create a new file:
nano ifcfg-eth0:0
Now restart the network service as shown below:
service network restart
Finally, run the following command:
ifconfig
You should see that eth0:0 has appeared.
If you want to permanently add additional IP to Debian, first enter the Debian terminal environment and open the /etc/network/interfaces file with a text editor of your choice:
nano /etc/network/interfaces
Now enter the following phrase at the end of the opened file:
auto eth0:1 iface eth0:1 inet static address 192.168.0.101 netmask 255.255.0.0 broadcast 10.10.10.255 network 192.168.0.101
When you add the eth0:1 phrase, a virtual NIC will be added to your Debian and will use your main NIC to connect to the network.
Now save the file and exit.
Next, you should turn on your virtual network card with the following command:
ifup eth0:1
To turn off the added virtual network card, just enter the following command:
ifdown eth0:1
But if you want to add an additional IP to Debian temporarily, first enter the Debian terminal environment and enter the following command to add an additional IP:
ifconfig eth0:1 192.168.0.101 netmask 255.255.0.0 up
The above IP command will be removed after rebooting the operating system.
That’s all about adding an additional IP on your Dedicated Server
You may decide to add an additional IP to the server after purchasing a dedicated server. In this tutorial, we taught you how to add an additional IP on a dedicated server. You can ask your questions in the comments section. If you use the CentOS operating system and need to change the IP address, we suggest you read the article The Ultimate Guide to Change IP Address on CentOS.
 Tags
Tags


Have you ever heard about Android emulators? This emulator is a software program that simulates an A...


 Tags
Tags

Since the creation of the Internet, the priority was to send packets without defects and damage, and...


