


Nowadays, the importance and application of virtualizers on a dedicated server are clear to all the activists in the field of hosting. In this tutorial, you will learn 2 ways to upgrade VMware ESXi on a Dedicated server. As you upgrade this useful virtualizer, you will enjoy many functional features. Also, many companies are willing to upgrade their VMware. This hypervisor is the central part of vSphere.
Prerequisites
– A Dedicated Server; We recommend a cheap dedicated server from NeuronVM.
– Up-to-date system with up-to-date components. You can refer to the VMware Hardware Compatibility Guide.
– Minimum of 8 GB physical RAM
Note: If you are managing ESXi hosting by vCenter, the version of vCenter must be the same as the desired version of ESXi after the upgrade.
– If you need to get familiar with VMware installation steps, we suggest that you read the How to Install and Configure VMware ESXi article.
Here we are going to introduce 2 different methods to upgrade Vmware on a dedicated server.
ESXCLI is a command line interface that can be used to upgrade VMware ESXi. You can use it for standalone ESXi hosts and hosts are managed by vCenter.
Updating ESXi is an easy process using ESXCL, but before starting your task you should have an ESXi backup. So if you encounter any problem, you can use the backup file and go to the previous version.
There are two methods to upgrade ESXi by ESXCLI:
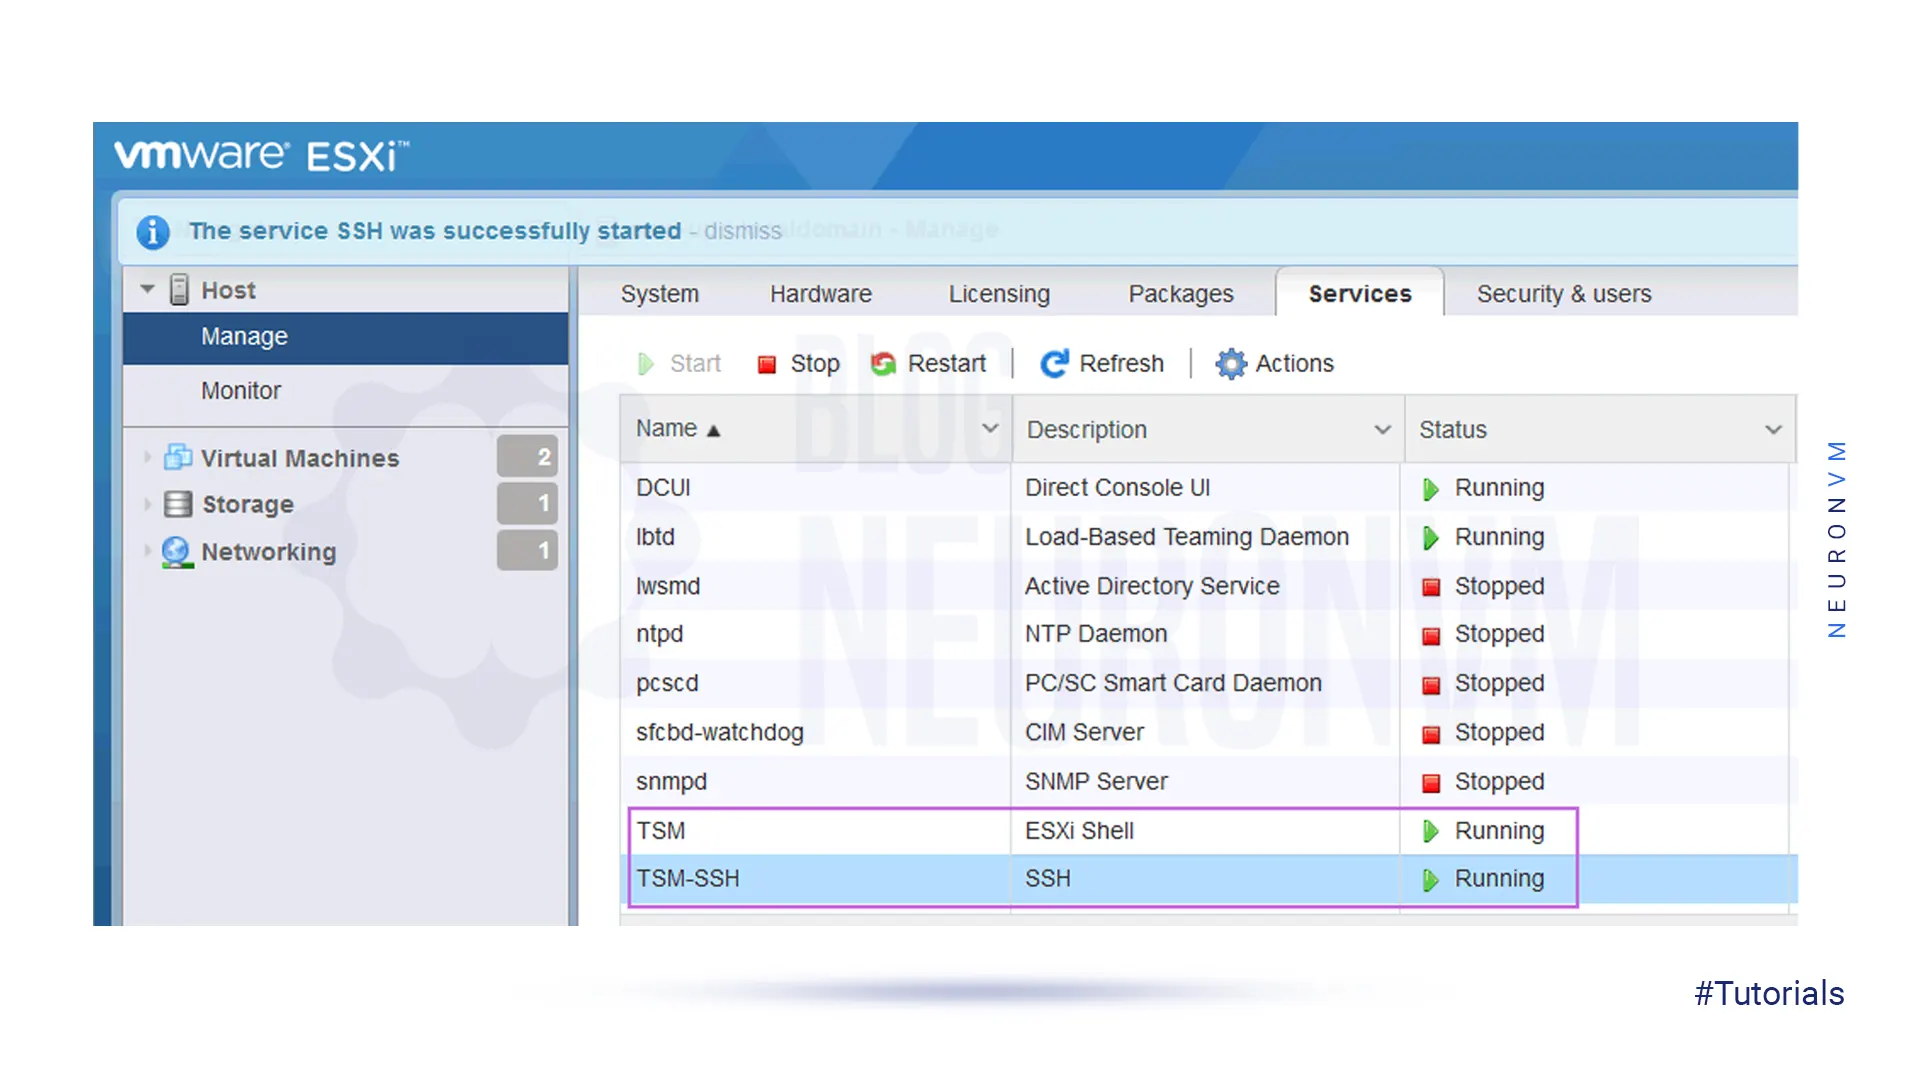
1_ To enable system customization in ESXi, access the direct console and navigate to the troubleshooting options. Enable both the ESXi shell and SSH options. As you wish, you can disable them manually
2_ The second method, is to enter your ESXi host IP address in a browser. Then use your ESXi root credentials to log in to the VMware Host Client and go to the manage -> services part.
Start the services this way:
_ TSM
_ TSM-SSH
As you started the services on the VMware host client, the services will be enabled until the system reboots:
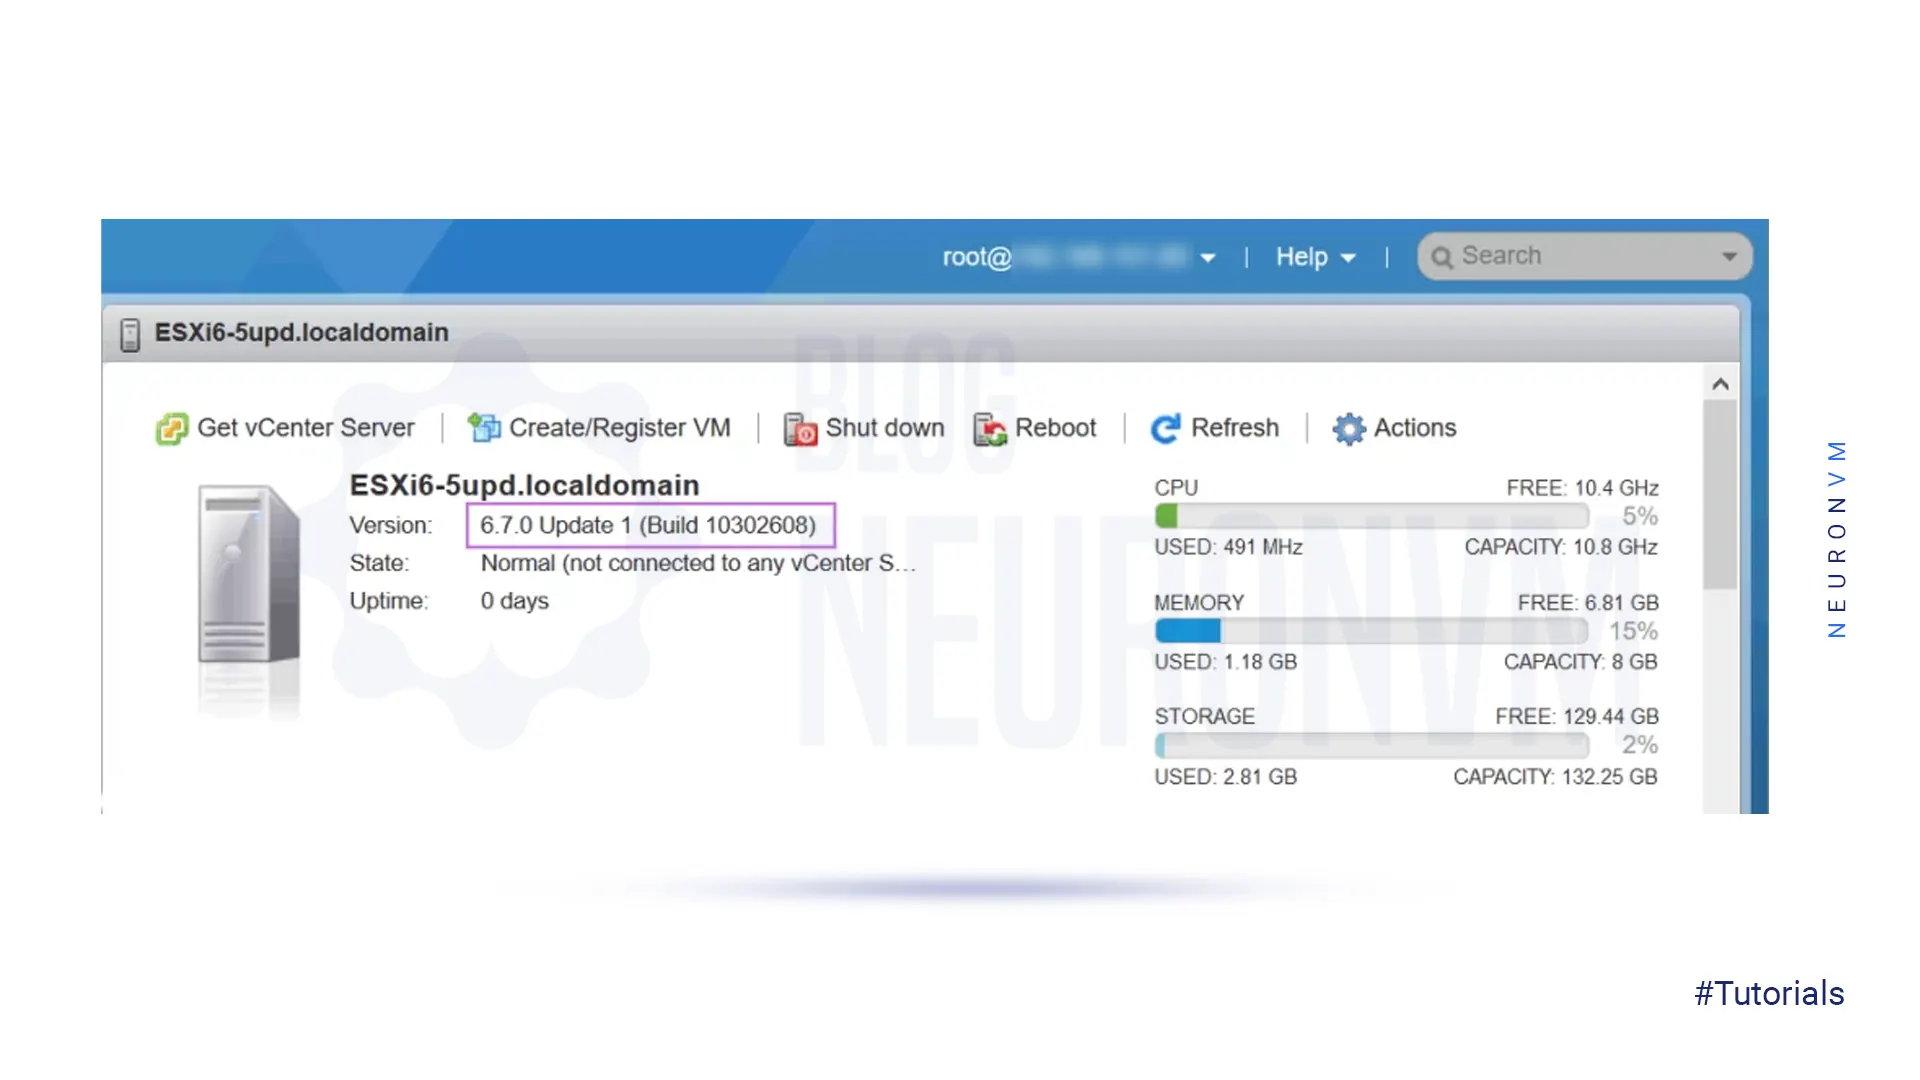
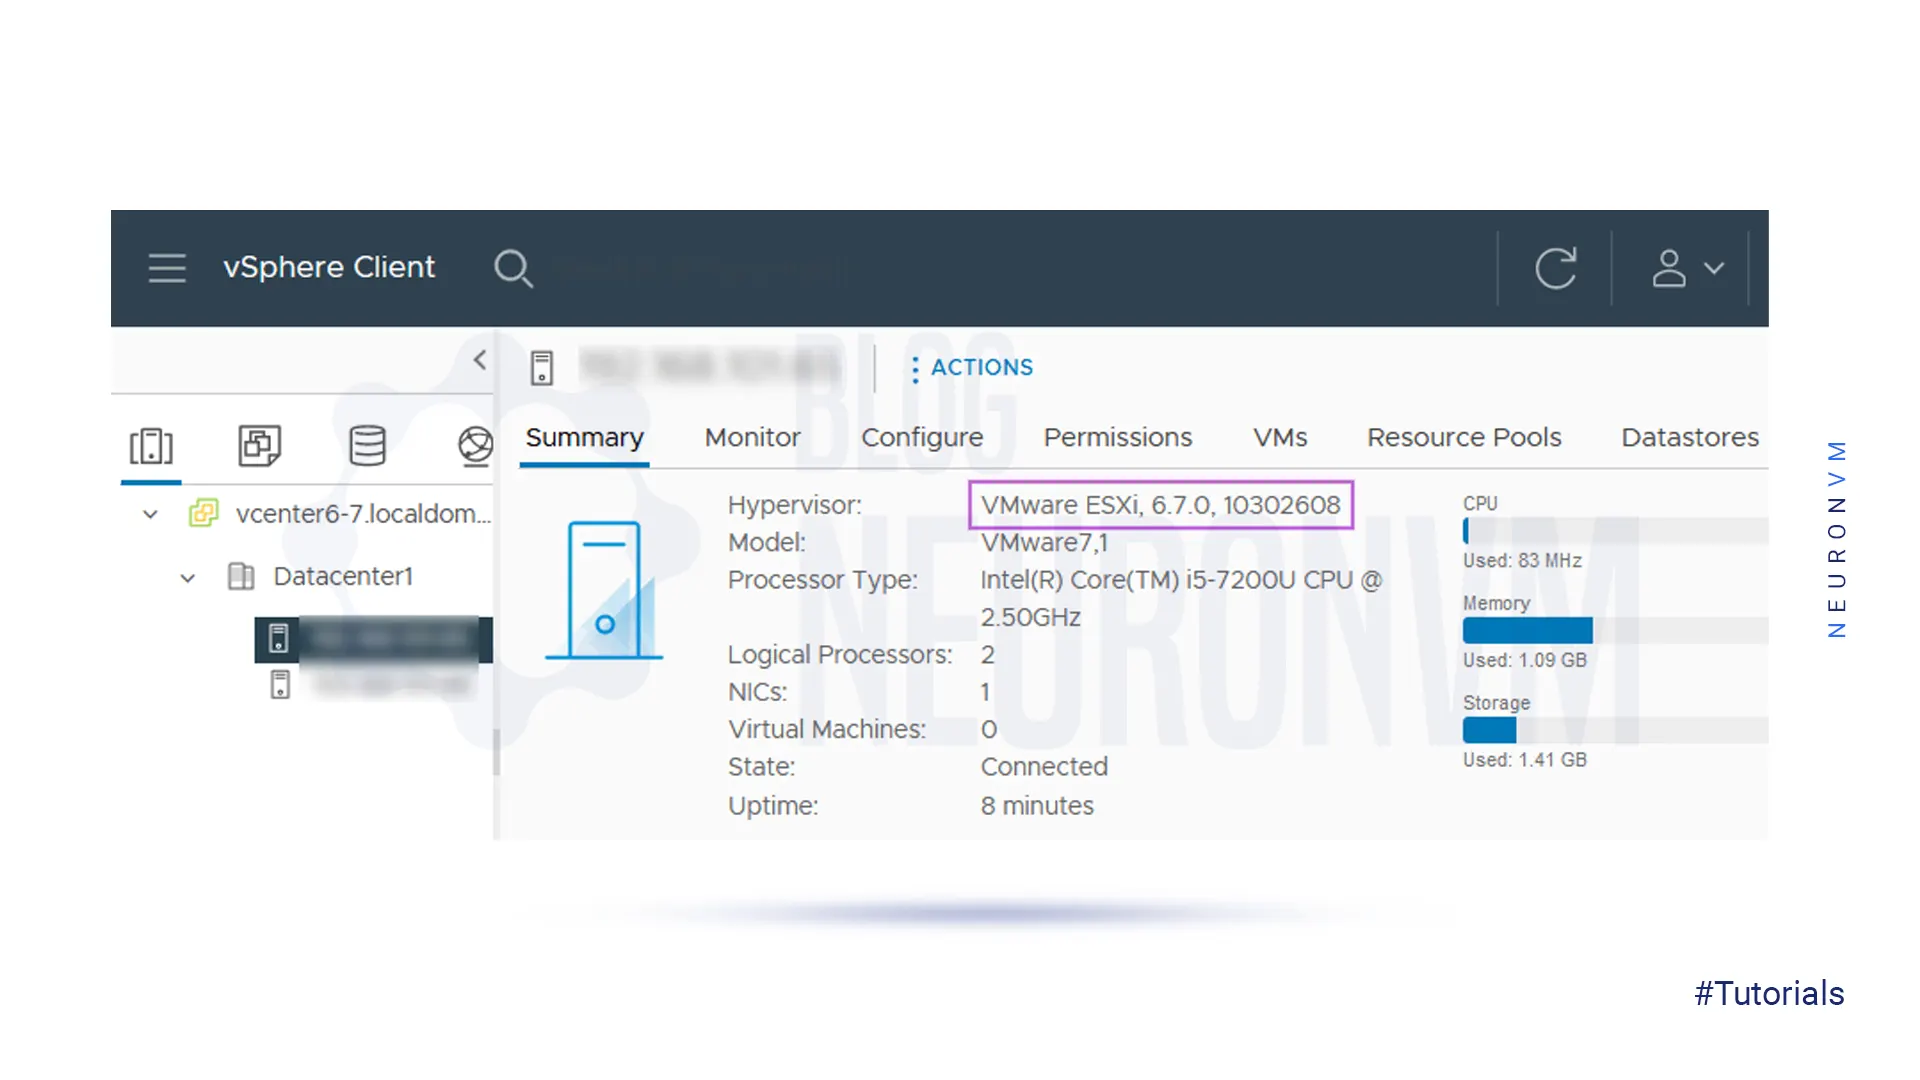
Use the VMware -v command or go through Help -> about on the VMware host client to check the current version:
Note that you should shut down all virtual machines running on the ESXi host.
If you want to use ESXCLI, you will have two types to choose from:
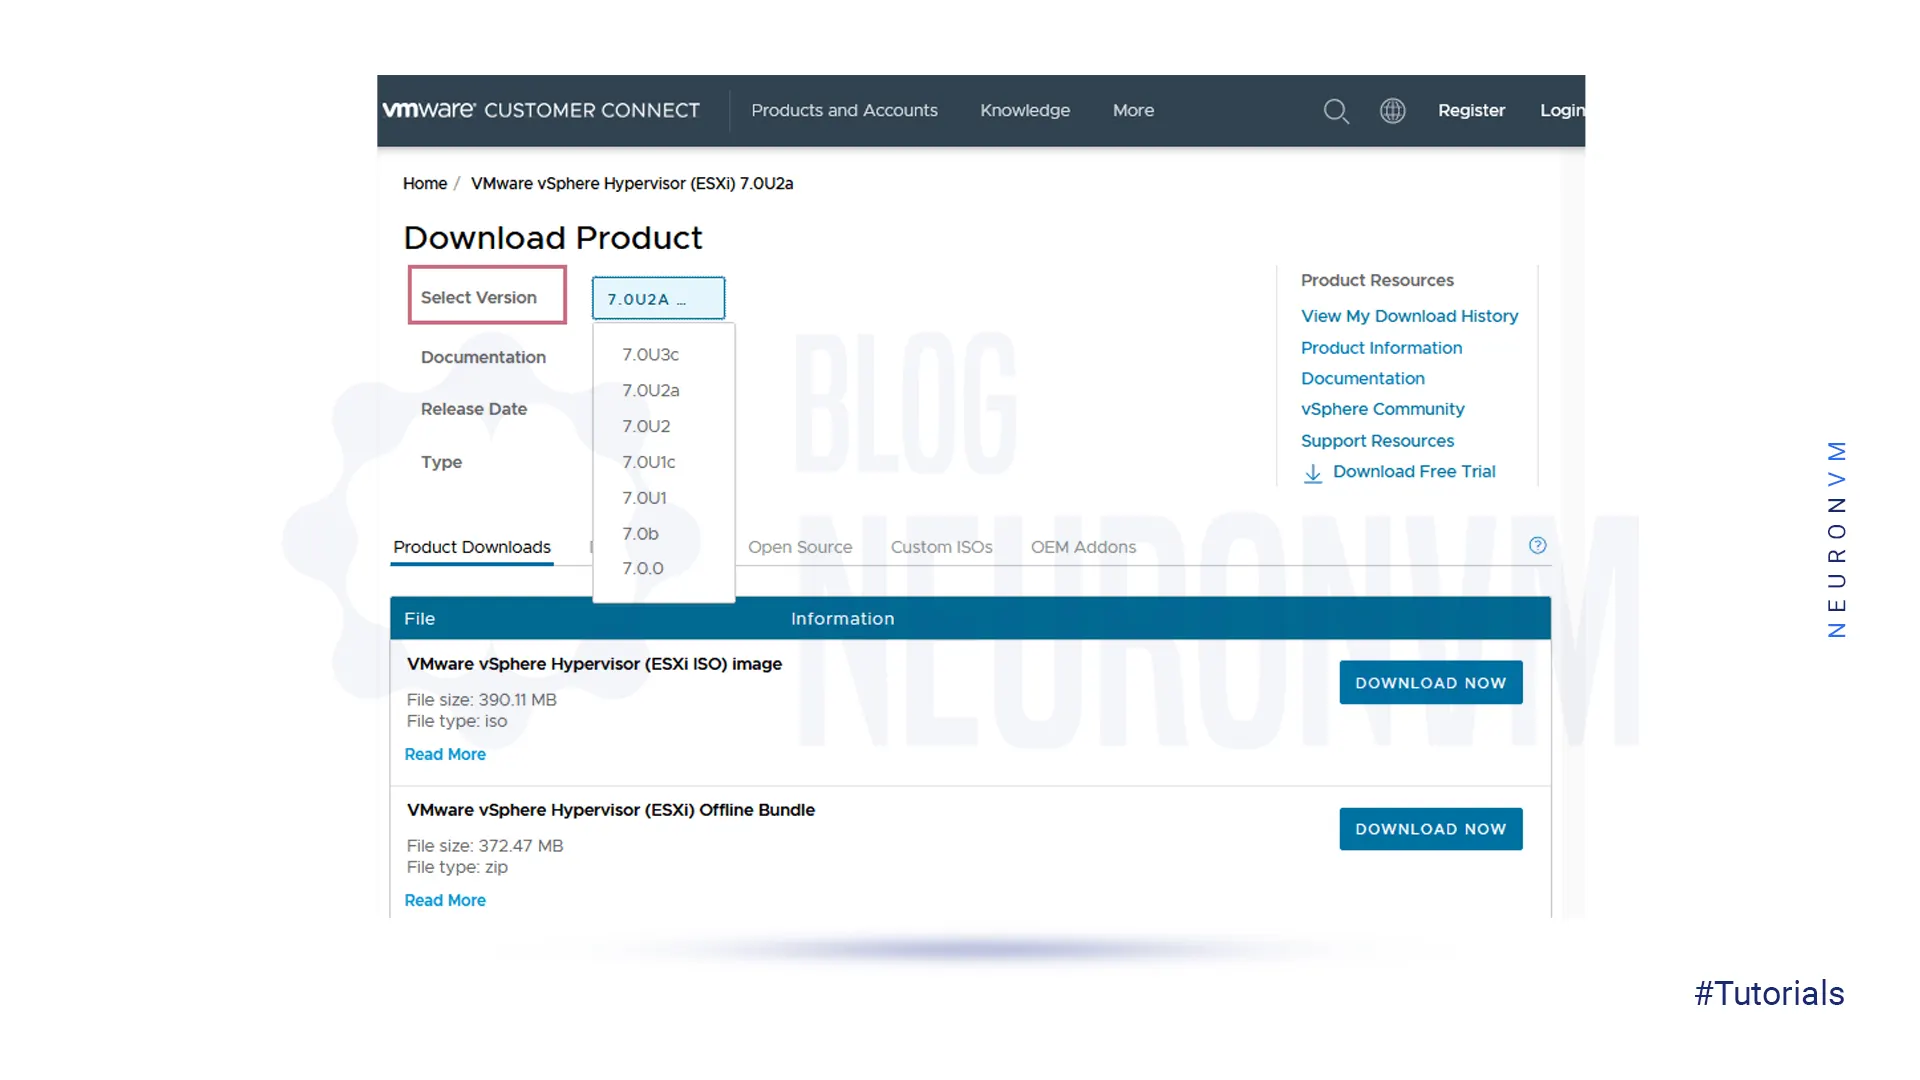
– Offline method: Downloading the offline bundle from the VMware website manually.
– Online method: Using VMware online repositories to download.
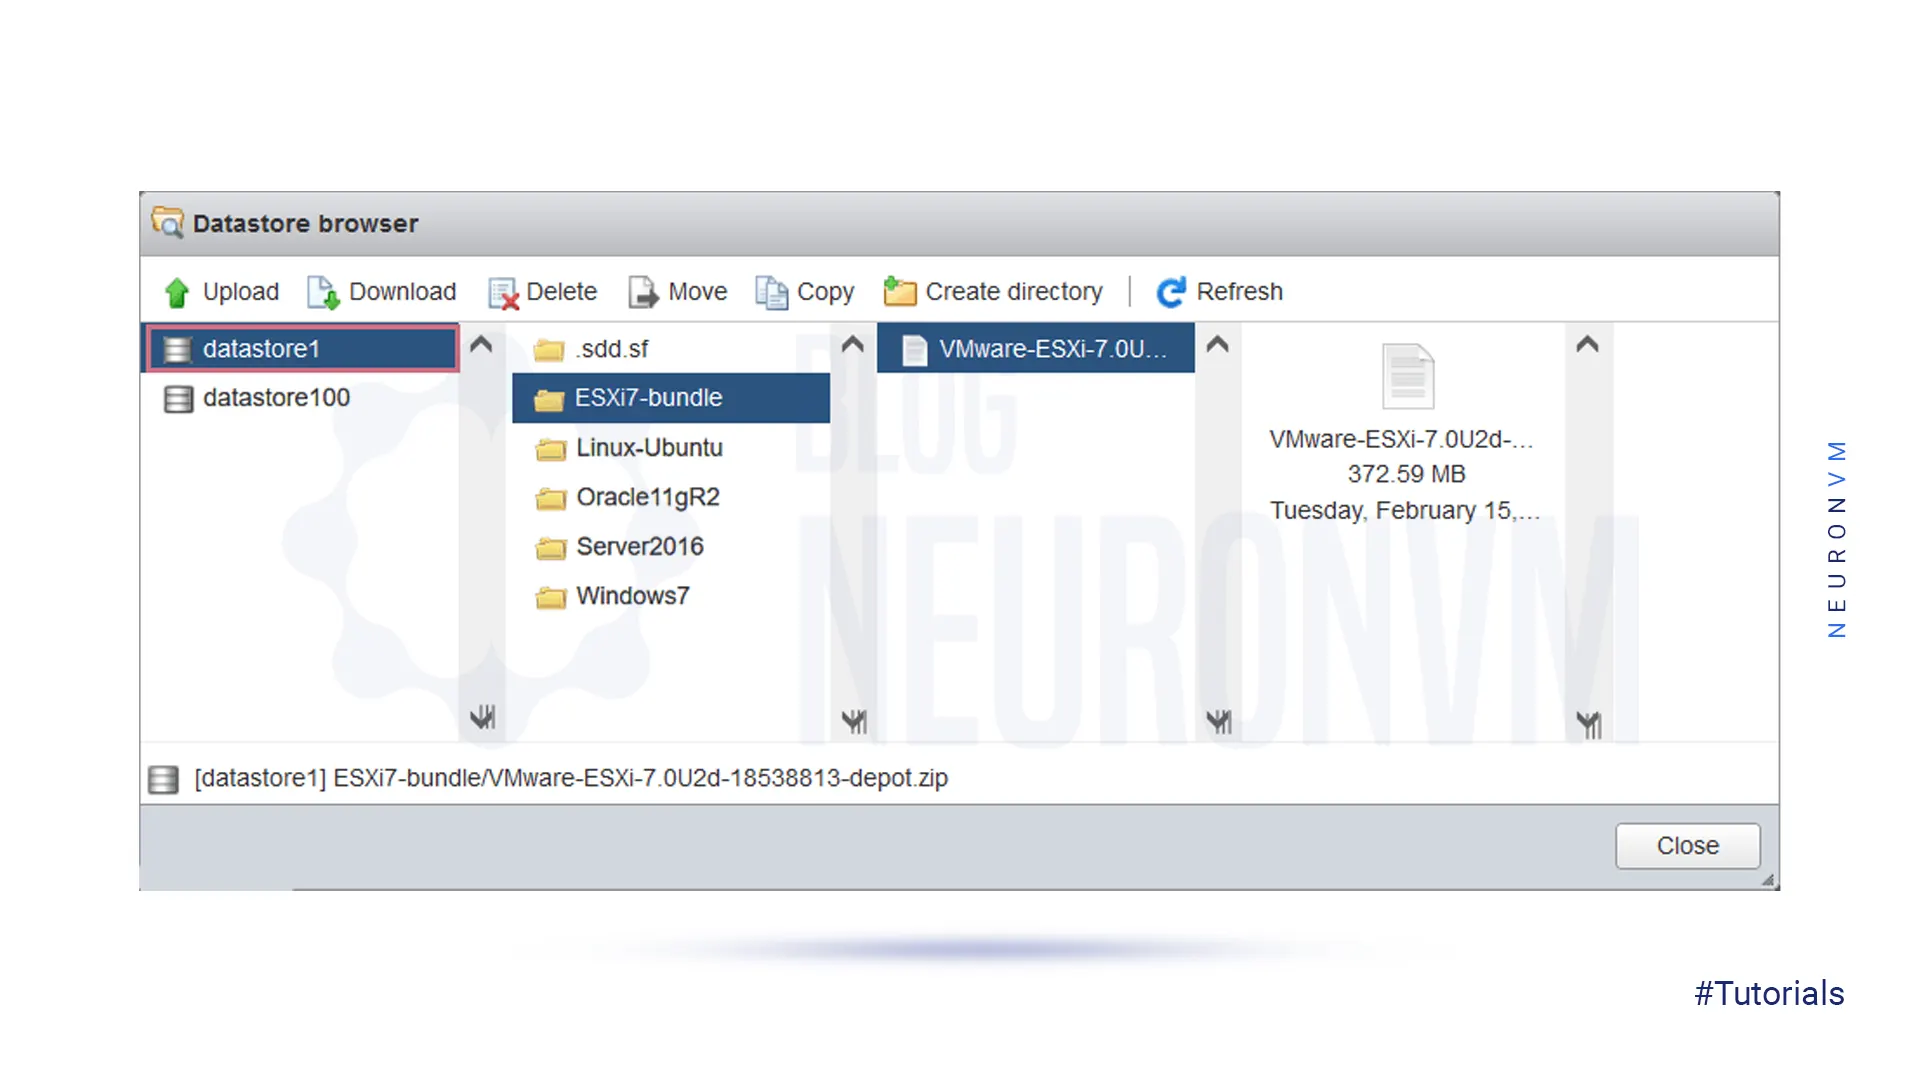
To start, make sure you download the offline bundle from the VMware website. You will find the zip file of the offline bundle along with the ESXi ISO installation image. Then select the suitable version from the drop-down list containing different versions.
In our example, we used the name VMware-ESXi-7.0U2d-18538813-depot.zip:
Here, you can upload the downloaded file to the ESXi datastore using either the VMware host client or an SFTP client. We will utilize the VMware host client for this task.
Go to storage -> datastores. Choose the one you want and click on the datastore browser:
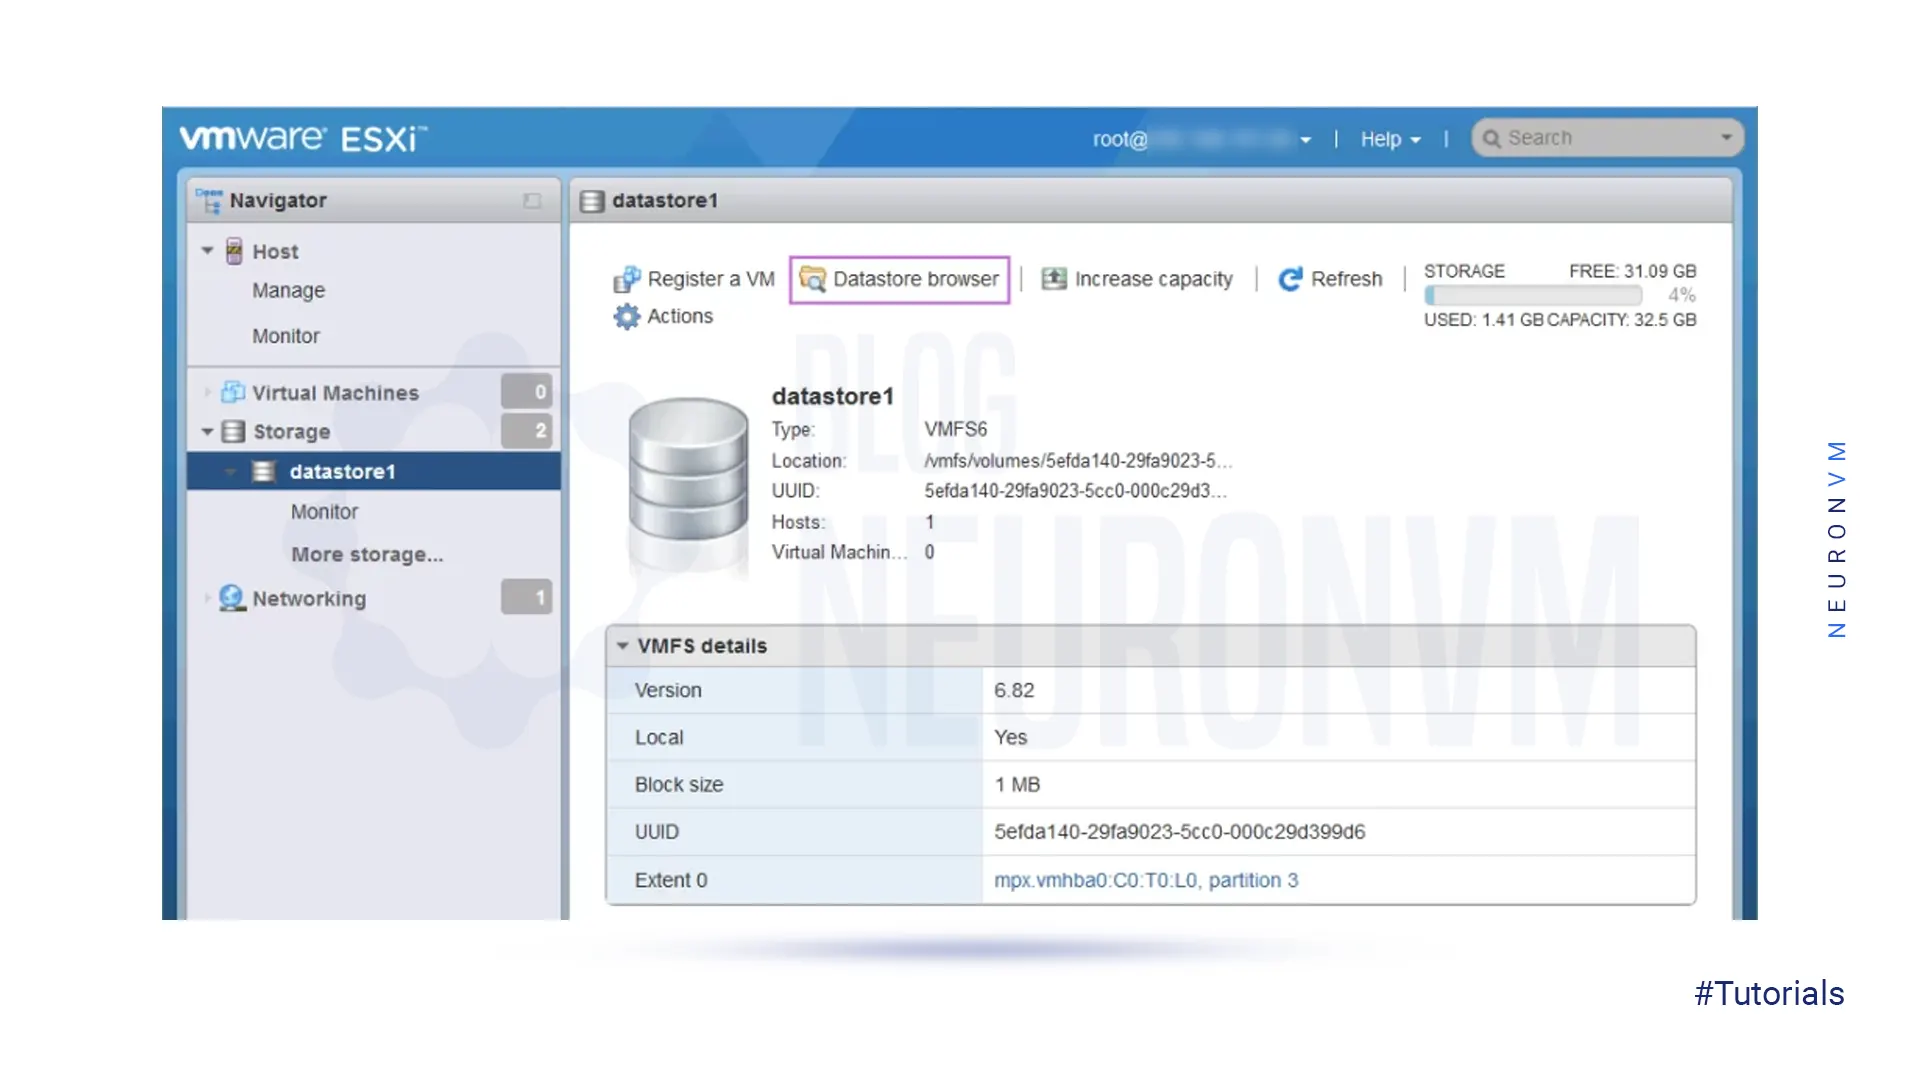
You should create a new file or select a directory to store bundle files. Here we created an ESXi7-bundle directory to keep our file.
It is time to upload and search for a zip bundle file and upload the file to the chosen directory in the data store:
Ensure that there is no virtual machine in the running state. To allow checking the current version of the ESXi file on your server use the vmware -v command.
Upgrade your ESXi version:
esxcli software profile update -p ESXi-7.0U2d-18538813-standard -d /vmfs/volumes/datastore1/ESXi7-bundle/VMware-ESXi-7.0U2d-18538813-depot.zip
You should wait to see the command output for the VMware -v command.
After the successful execution of the command, you will see a list of updated packages in the console output.
Reboot the ESXi host:
reboot
You should assign a serial number for your upgraded ESXi file. After upgrading, the ESXi file will operate in full-featured evaluation mode for 60 days.
During this time, you will need to input a valid serial number. Failure to do so within the 60-day window will result in limited performance.
In this method, first of all, you have to configure internet access to upgrade the ESXi host and place the host in maintenance mode manually.
You should use the command to list all current image profiles and contained packages:
esxcli software profile get
Use the command below to enter ESXi into maintenance mode:
vim-cmd /hostsvc/maintenance_mode_enter
Or you can use:
esxcli system maintenanceMode set –enable true
In the built-in firewall on the ESXi host, allow HTTP traffic by editing the setting part:
esxcli network firewall ruleset set -e true -r httpClient
The list of profiles provided by VMware in the VMware repository is as follows:
esxcli software sources profile list -d https://hostupdate.vmware.com/software/VUM/PRODUCTION/main/vmw-depot-index.xml | grep ESXi-7.0U2
Here, use this profile:
ESXi-7.0U2d-18538813-standard
Using the following command, you can check which packages are going to be installed:
esxcli software profile update -d https://hostupdate.vmware.com/software/VUM/PRODUCTION/main/vmw-depot-index.xml -p ESXi-7.0U2d-18538813-standard –dry-run
By using the related command run the updating process:
esxcli software profile update -d https://hostupdate.vmware.com/software/VUM/PRODUCTION/main/vmw-depot-index.xml -p ESXi-7.0U2d-18538813-standard
You should wait for a short time to finish the upgrade process.
If you want to prevent overwriting existing packages, configurations, and drivers, you should choose ESXCLI software profile update instead of ESXCLI profile to install.
Tip: The following error may occur if there is a persistent scratch partition.
If there are no issues with any of the processes running, restart the ESXi host to implement the changes:
reboot
Use the command below, to exit maintenance:
vim-cmd /hostsvc/maintenance_mode_enter
Or use:
esxcli system maintenanceMode set –enable false
In this section, we want to teach you the second method to upgrade VMware ESXi on a Dedicated server. To access vCenter, open the VMware vSphere client in your browser. You can now upgrade your ESXi host by using the IP address 192.168.xxx.xx.
Choose the host you need and check the current hypervisor version. Also, if you want to upgrade several ESXi hosts, you can use a cluster or data center:
1- There are two methods to open a lifecycle manager.
a- The first method is to click Home and you see the left pane (navigation pane). Click Lifecycle Manager.
b- Second, you can click the menu at the top of the vSphere client window and press Lifecycle Manager.
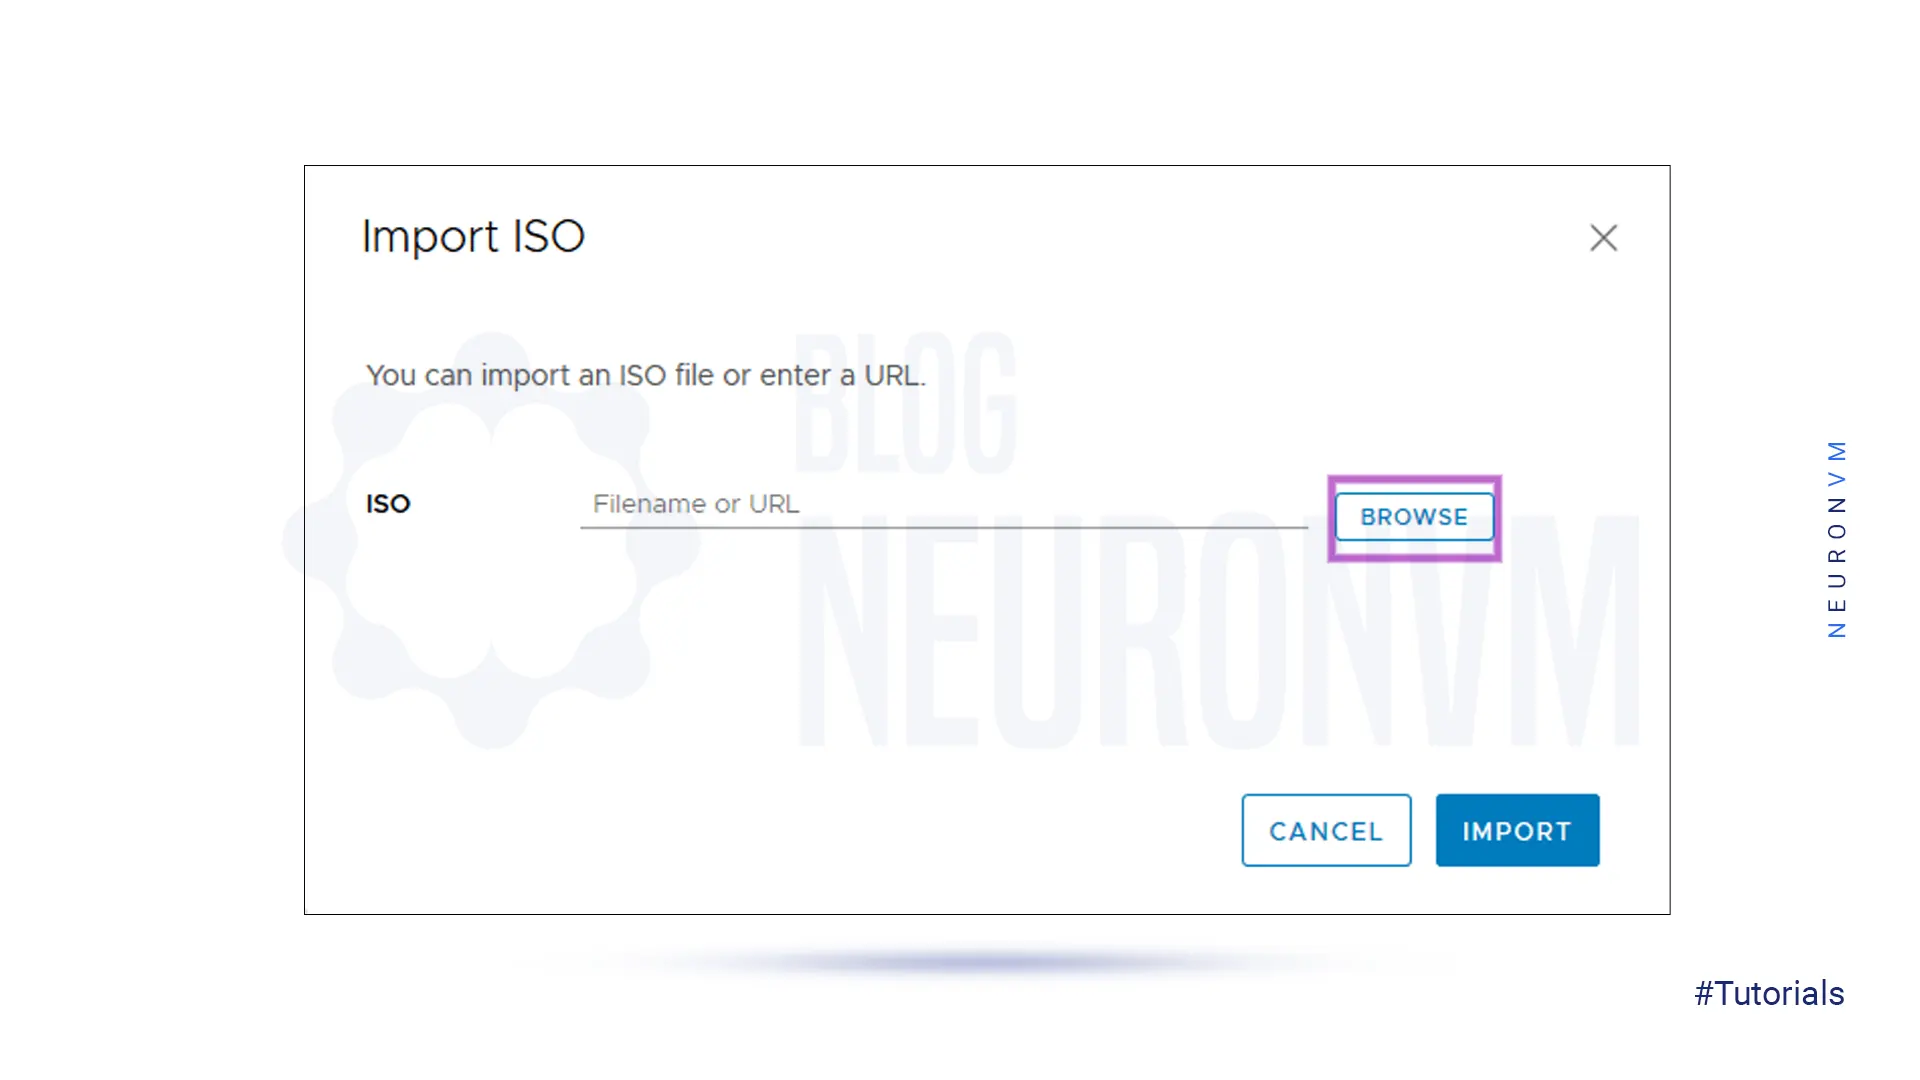
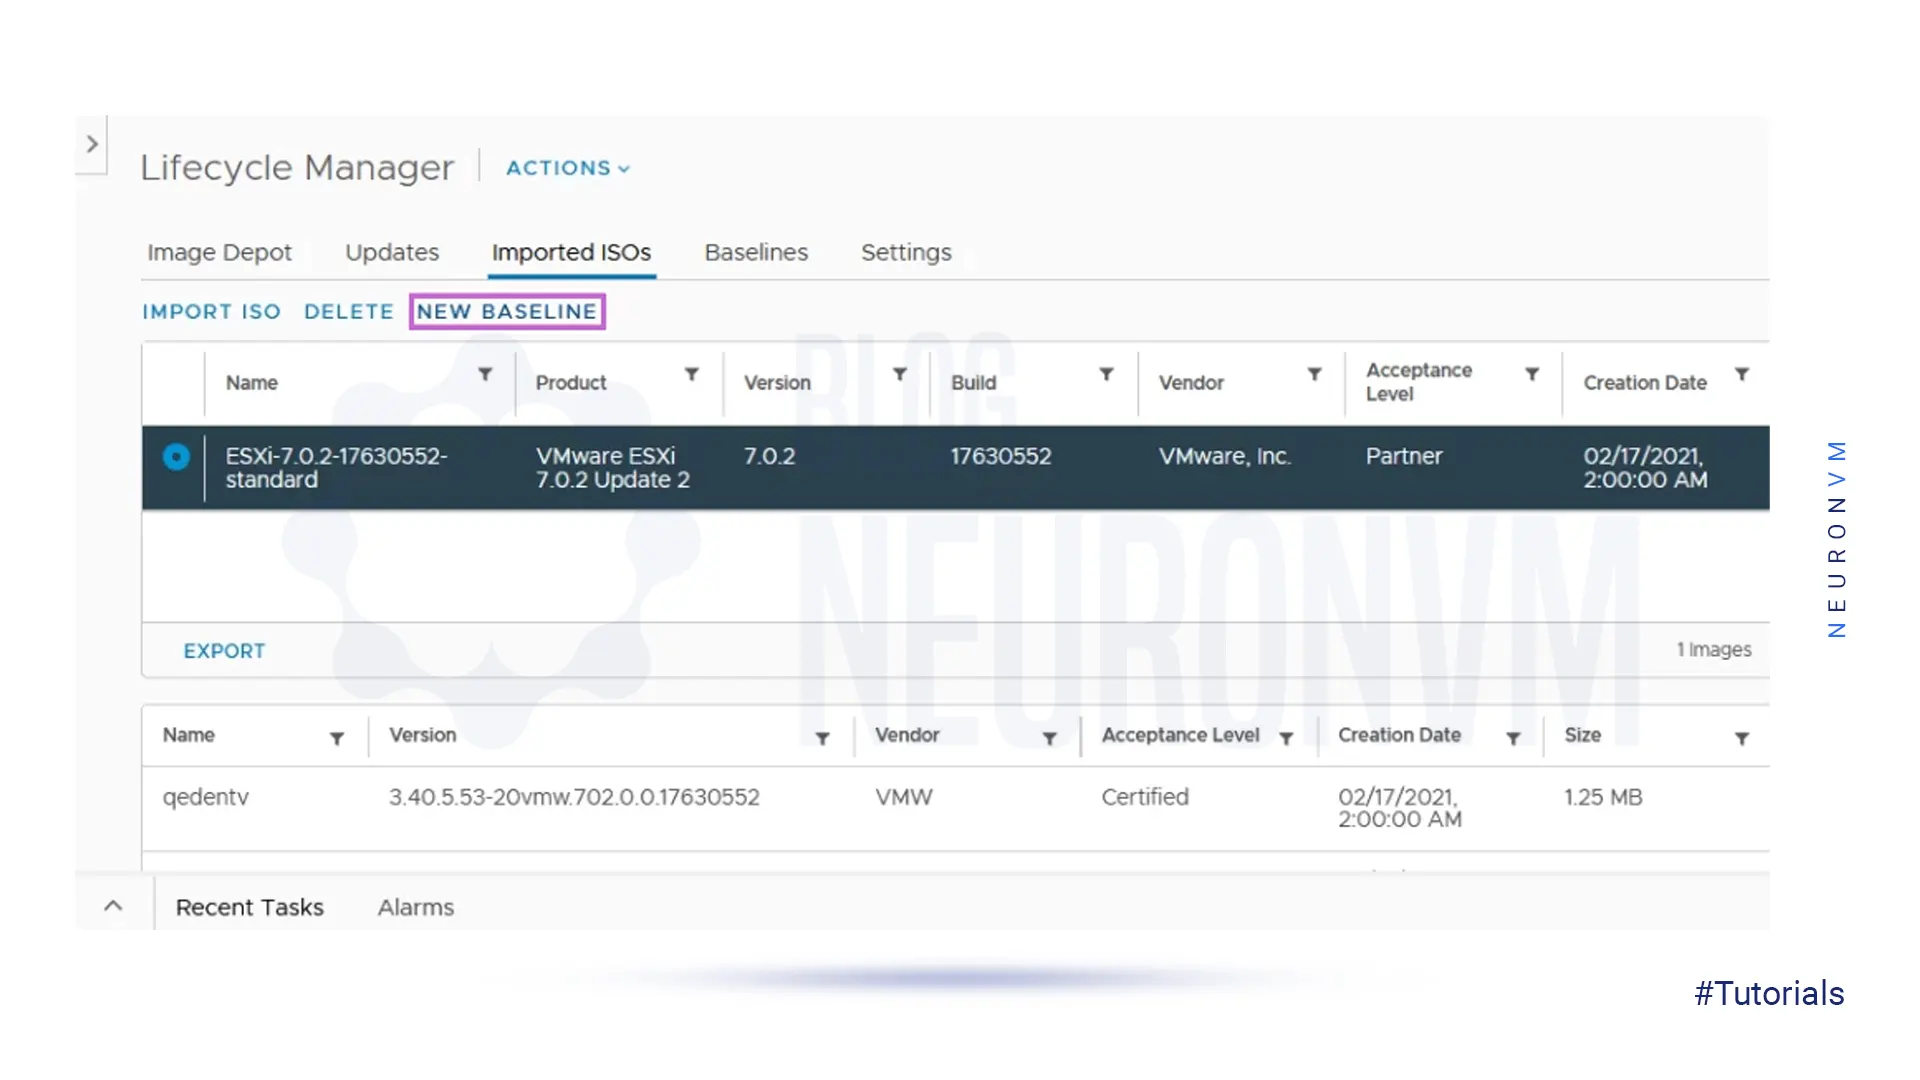
2- Now that you have opened the lifecycle manager in the vSphere client, you will see the Imported ISOs tab and click on Import ISO:

3- Press Browse and choose the ESXi 7 Update 2 installation ISO image file. As you registered, you can download the ESXi installation image from the VMware website.
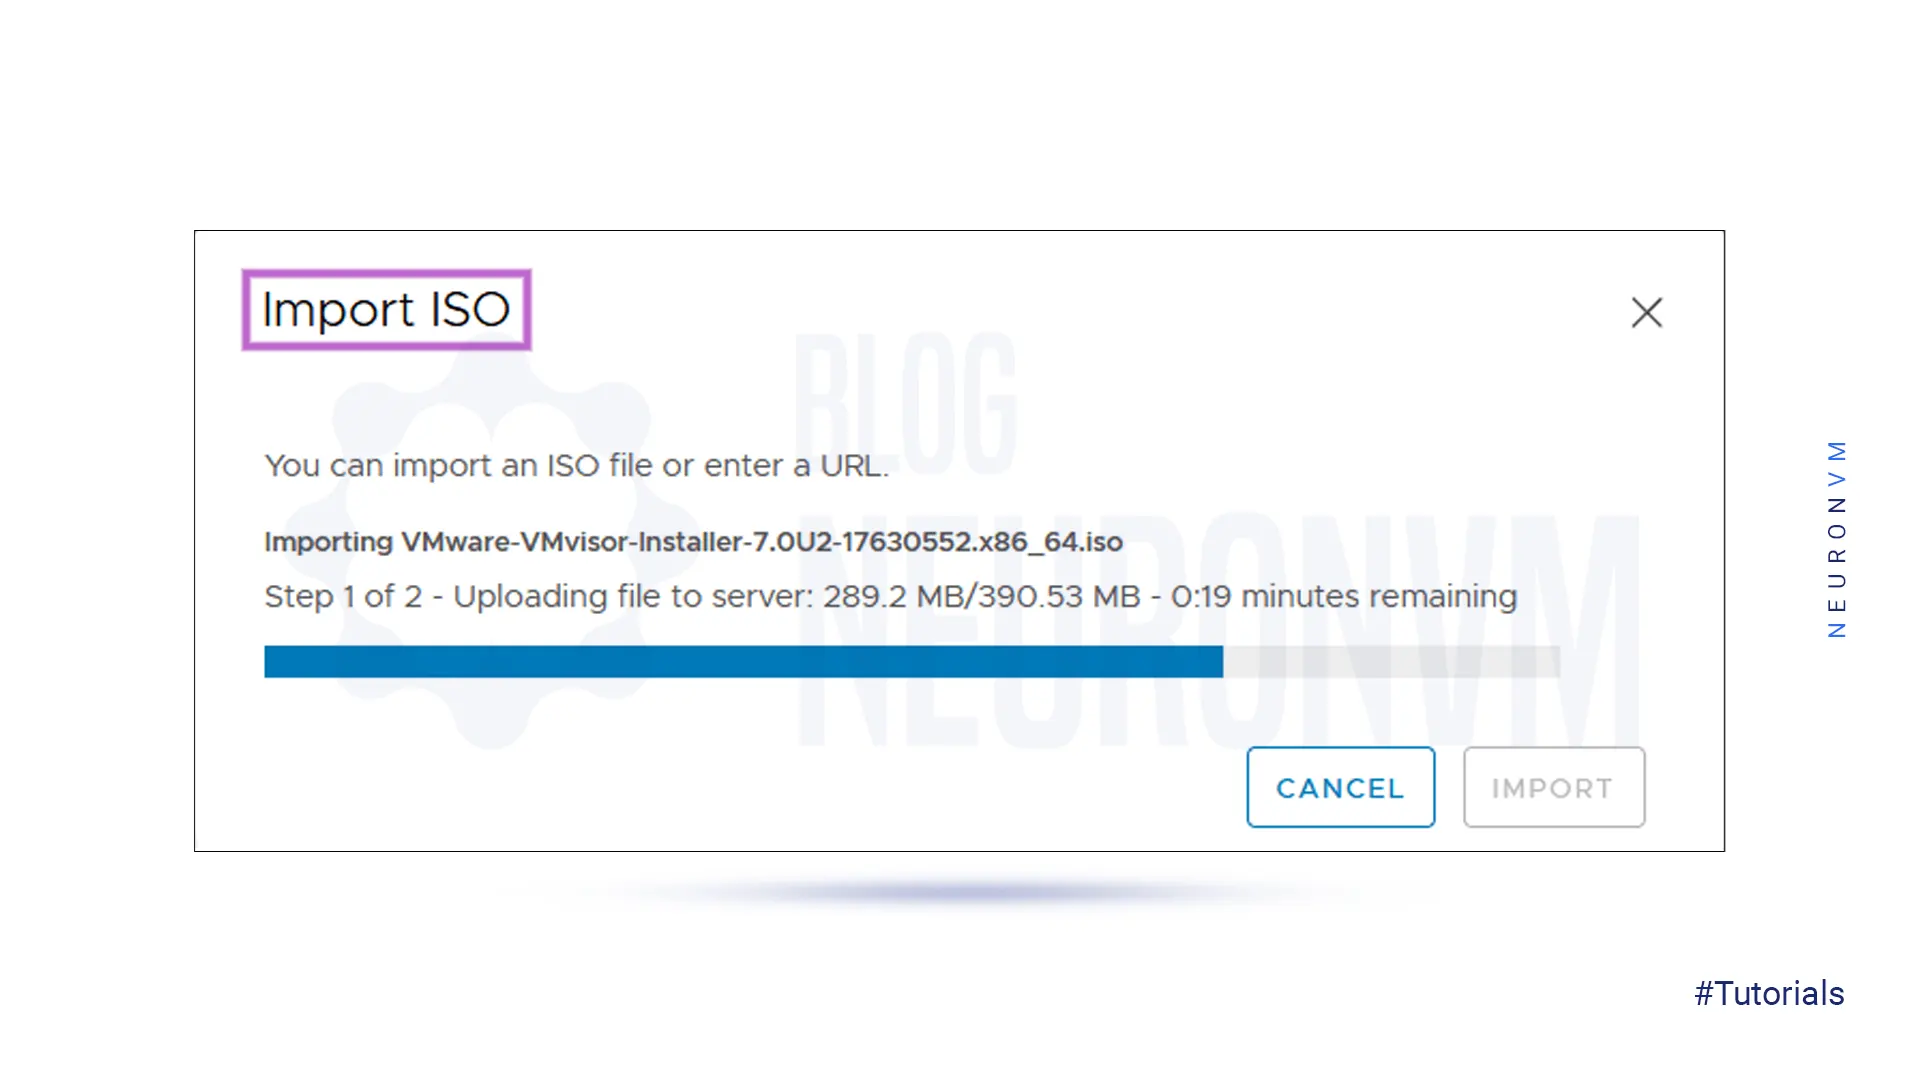
The importing process will start, as you have selected the ISO file:
Then you will see the ESXi 7 Update 2 installation ISO image in the imported ISOs tab:
4- To create a new baseline you should click NEW BASELINE:
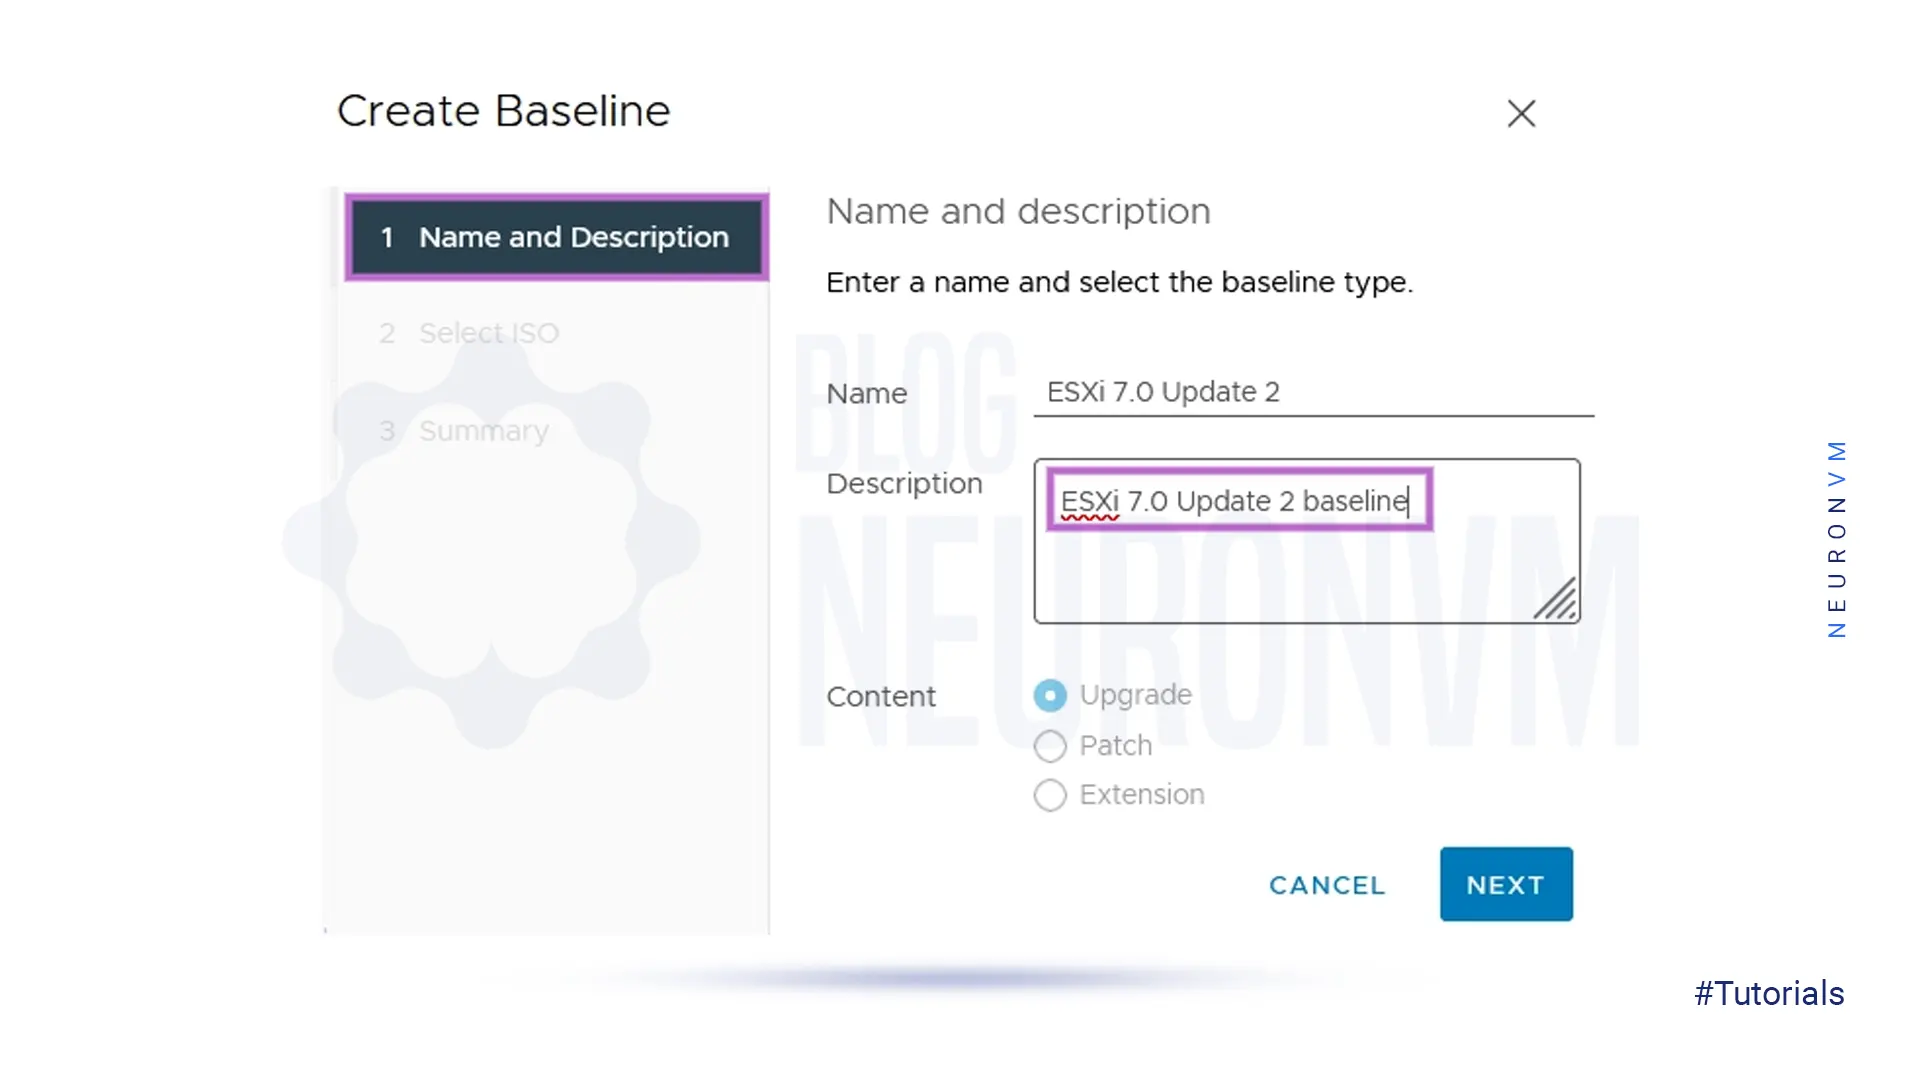
Here, you should enter your baseline Name and description:
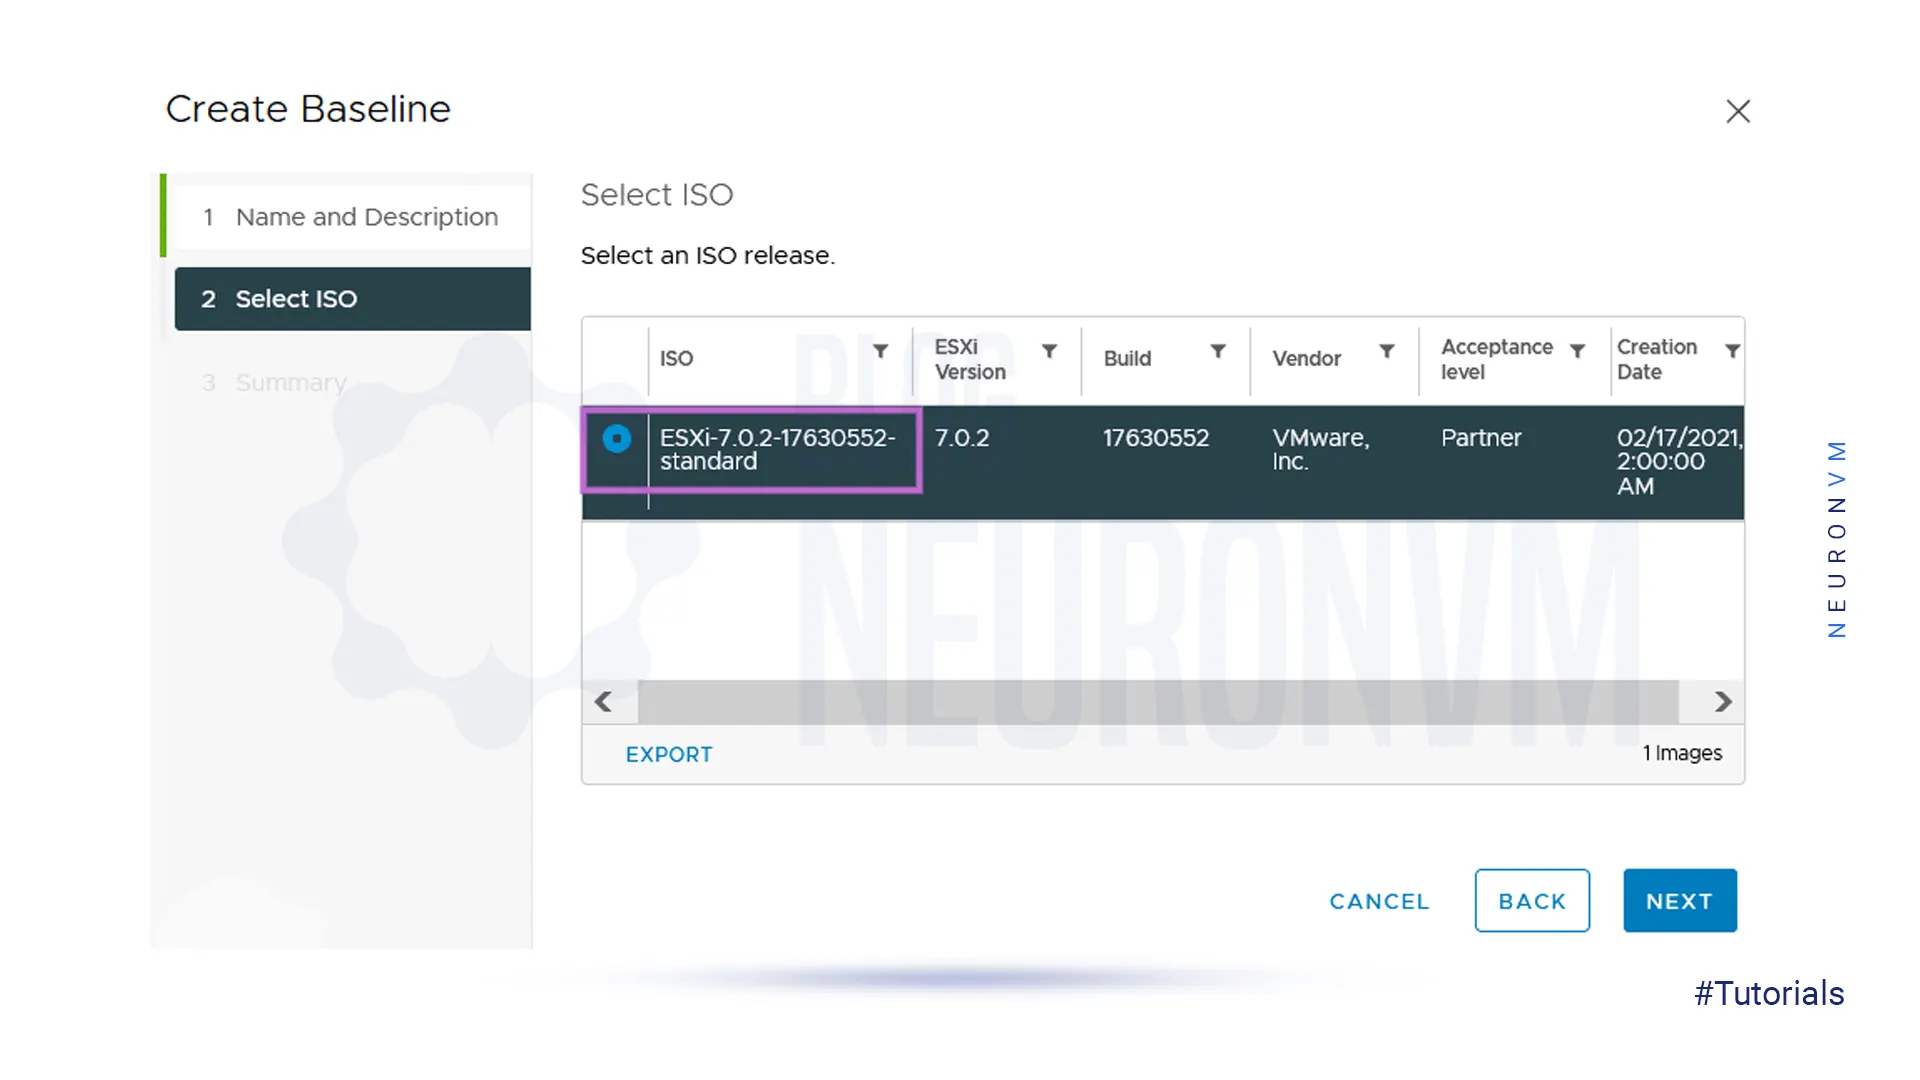
Now you should select the ESXi ISO image that you uploaded before. As you see in the following image, the name is based on the corresponding ESXi profile: (ESXi-7.0.2-17630552-standard)
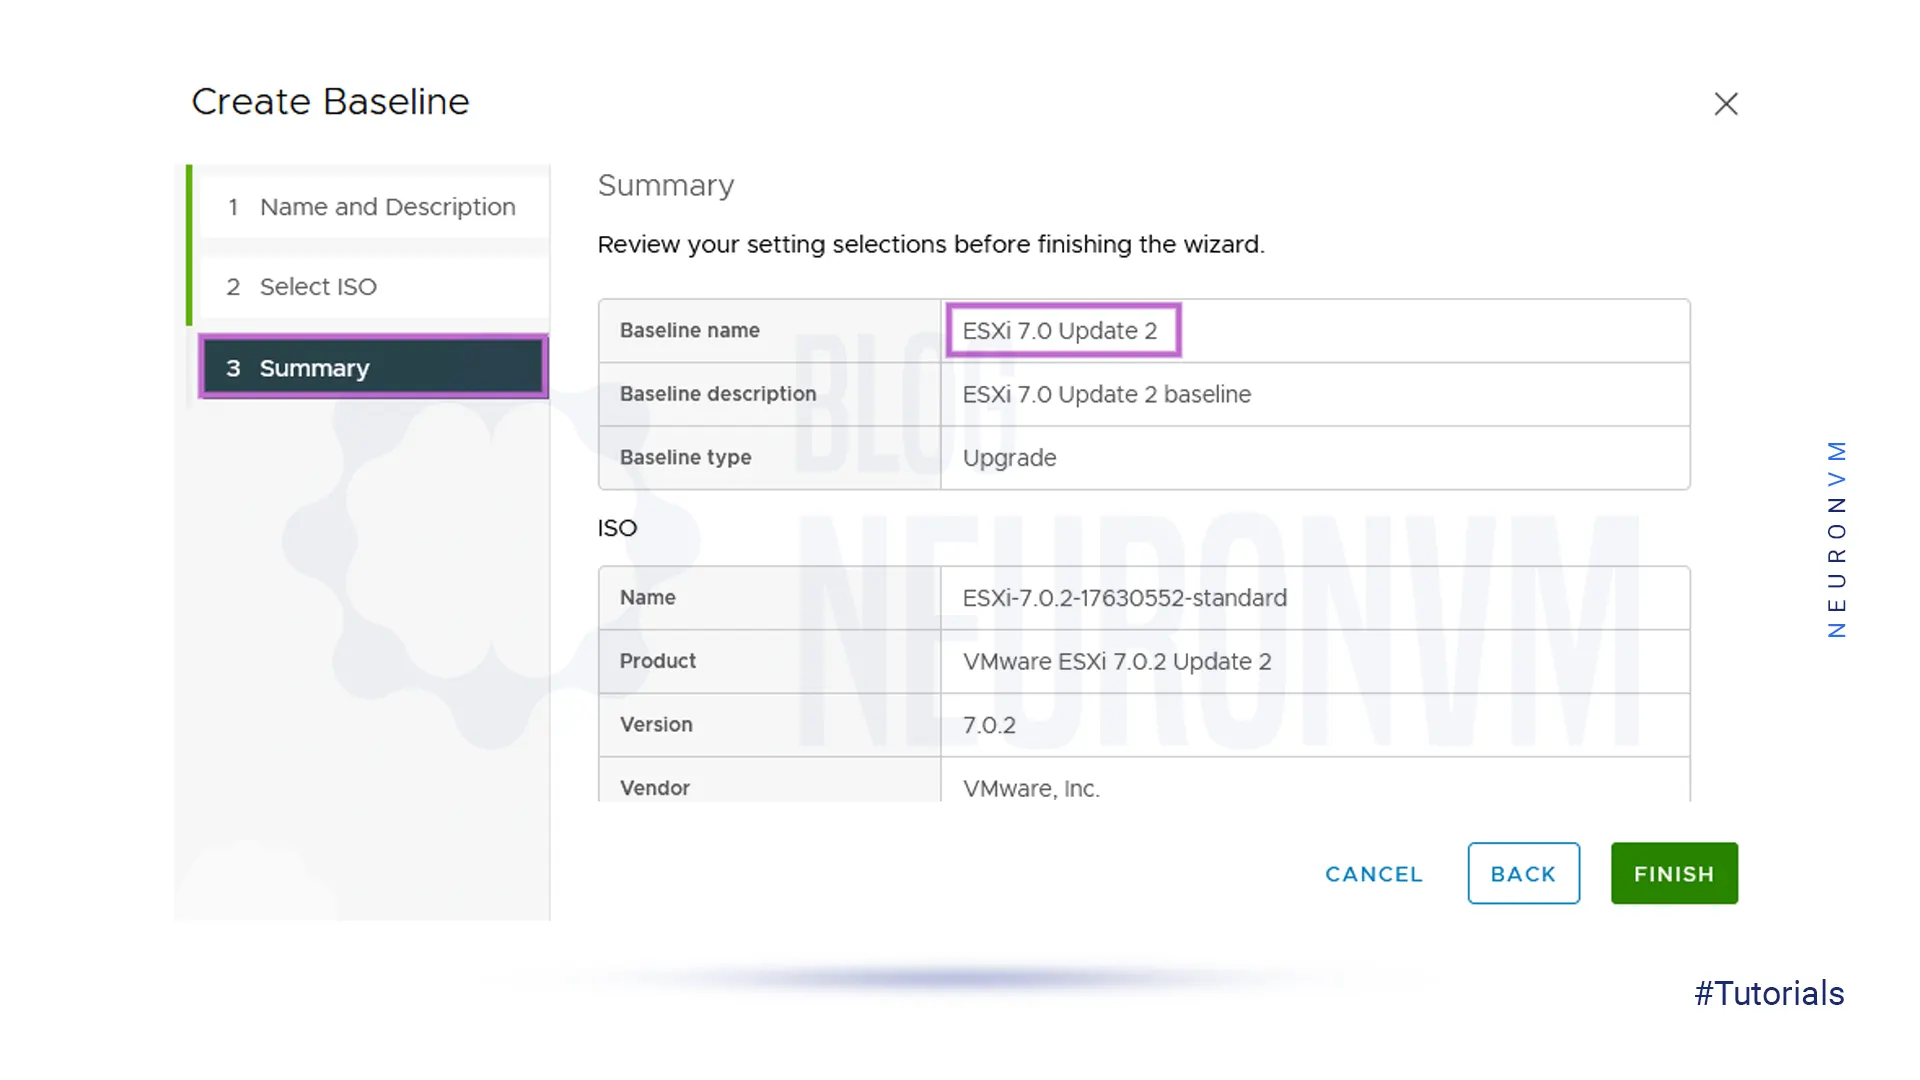
Here is the summary part. Before the creation of the baseline, review your selections:
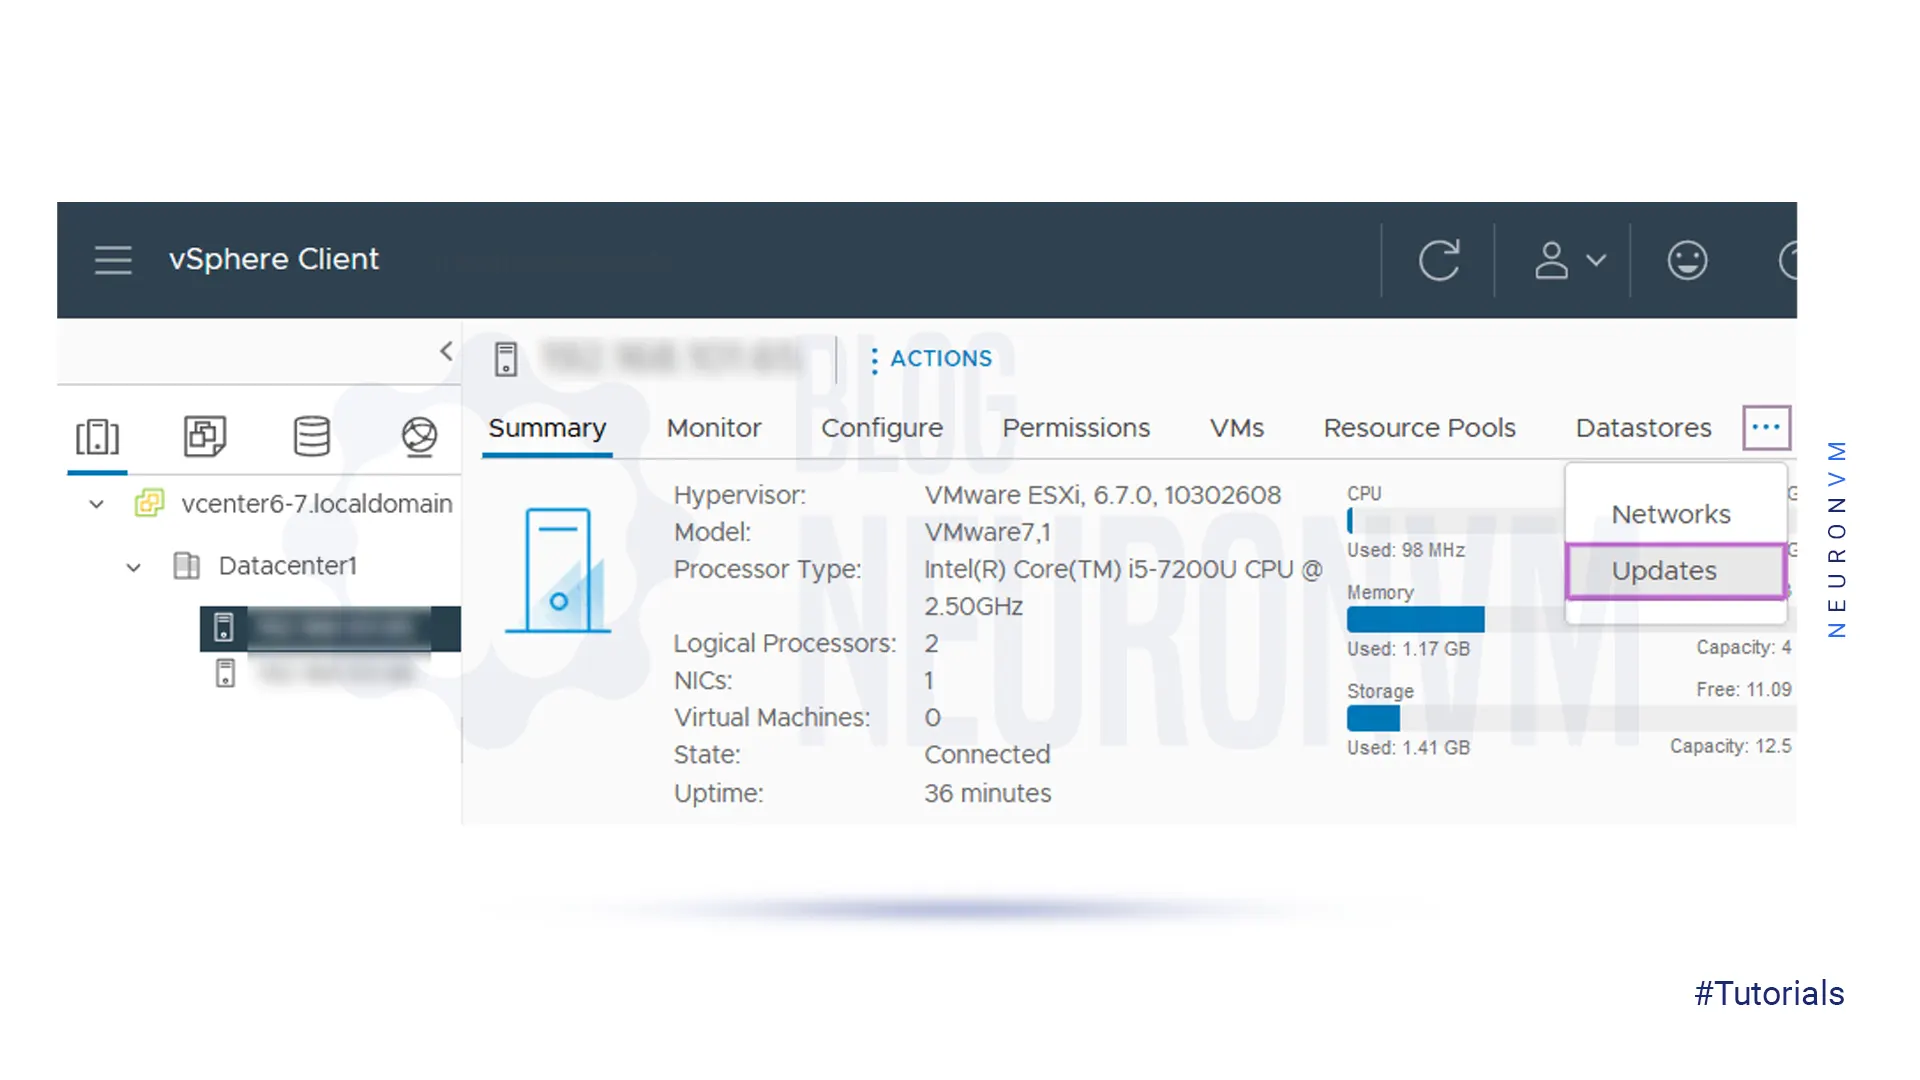
5- Go to the Hosts and Clusters screen and choose the ESXi host to update. Then in the top right side of the interface, click the Updates tab:
As you created the baseline you have to attach it to ESXi hosts.
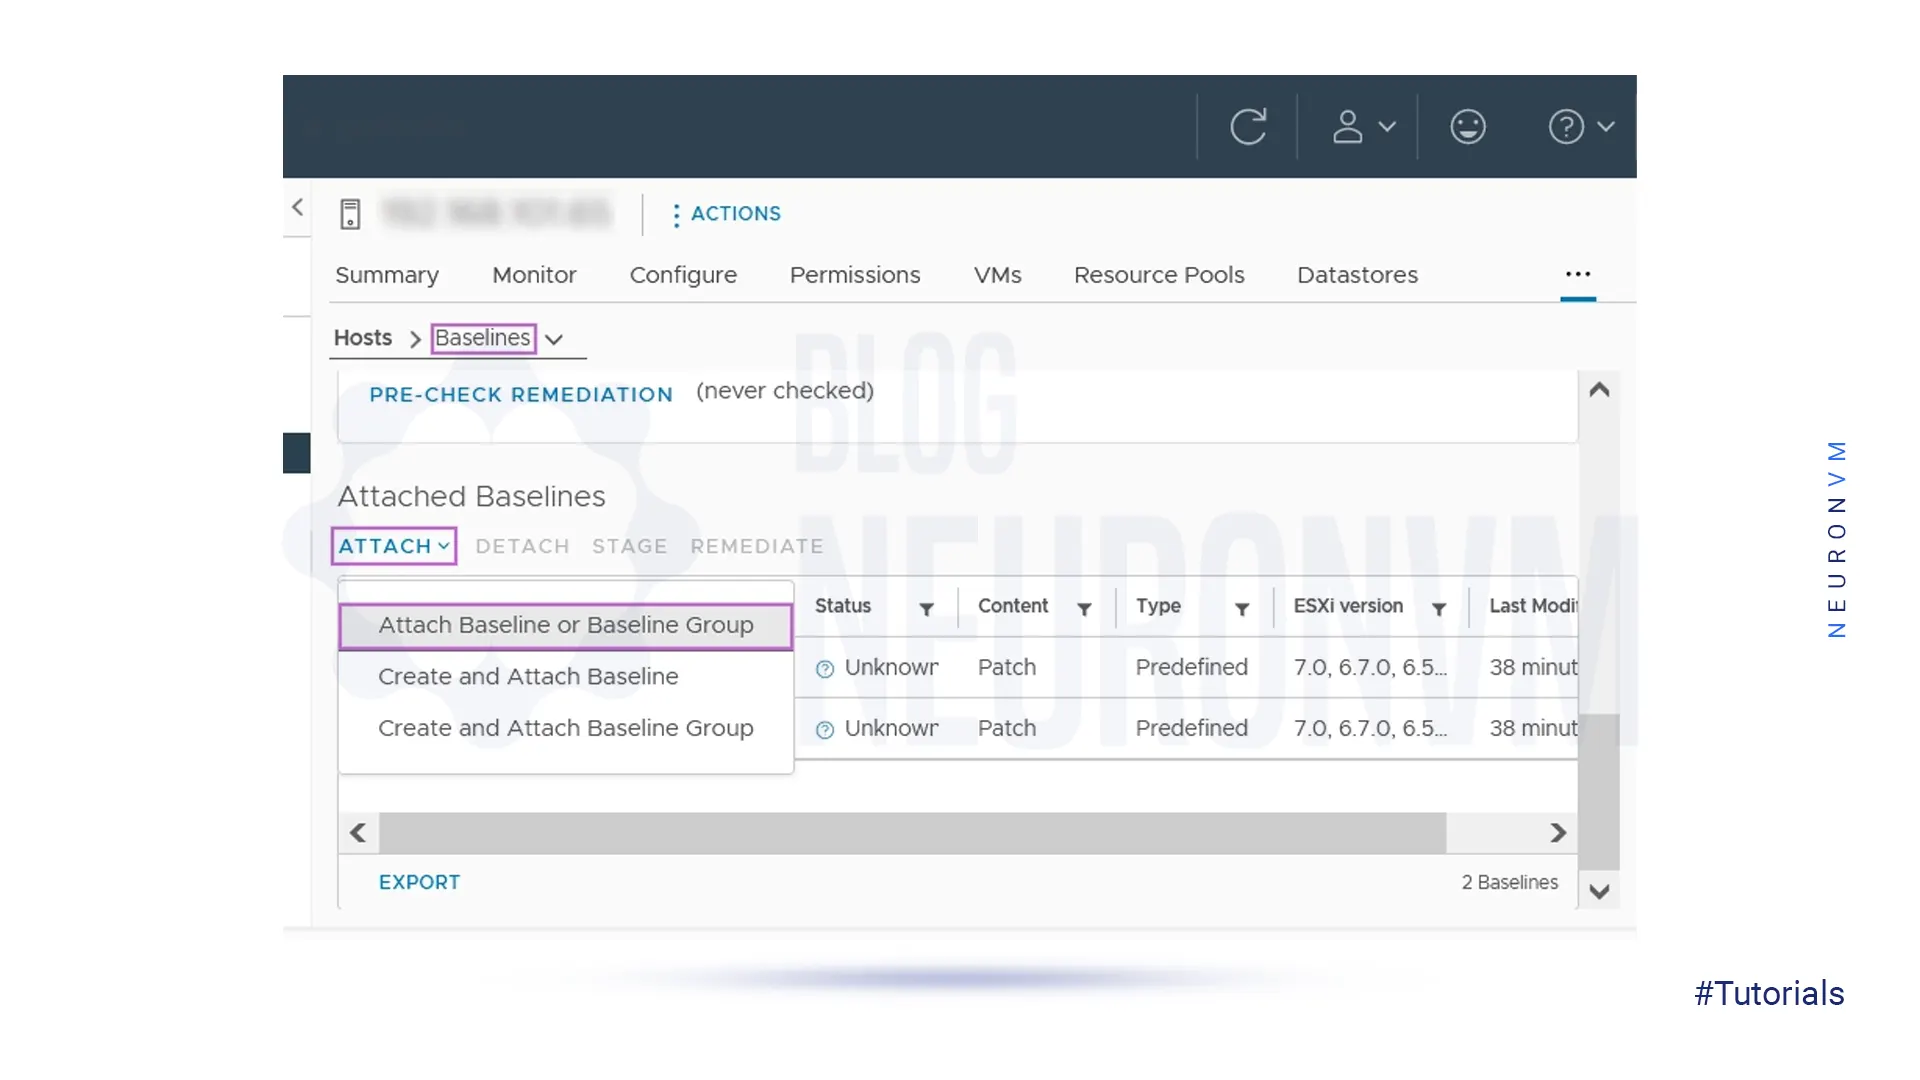
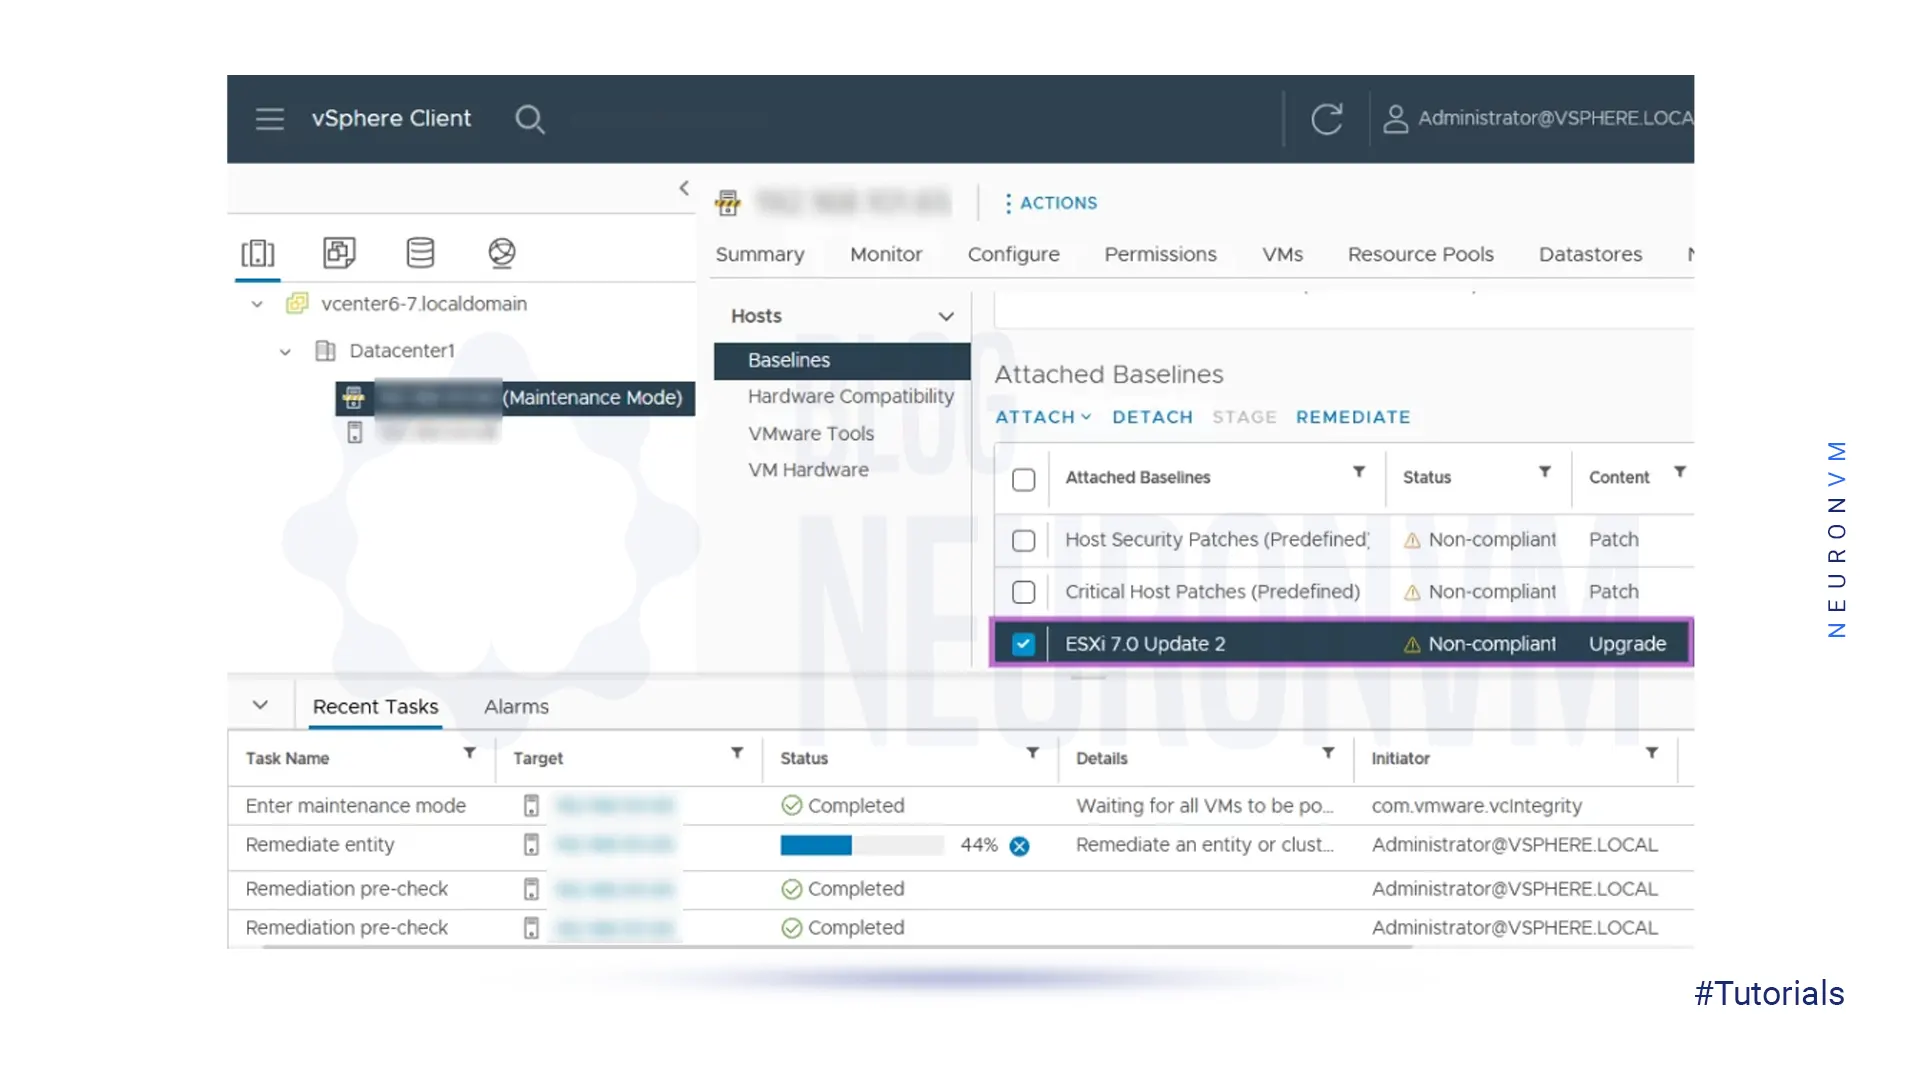
6- Click on baselines go down and find the Attached Baseline section then click Attach. When the menu opens, click on Attach Baseline or Baseline Group:
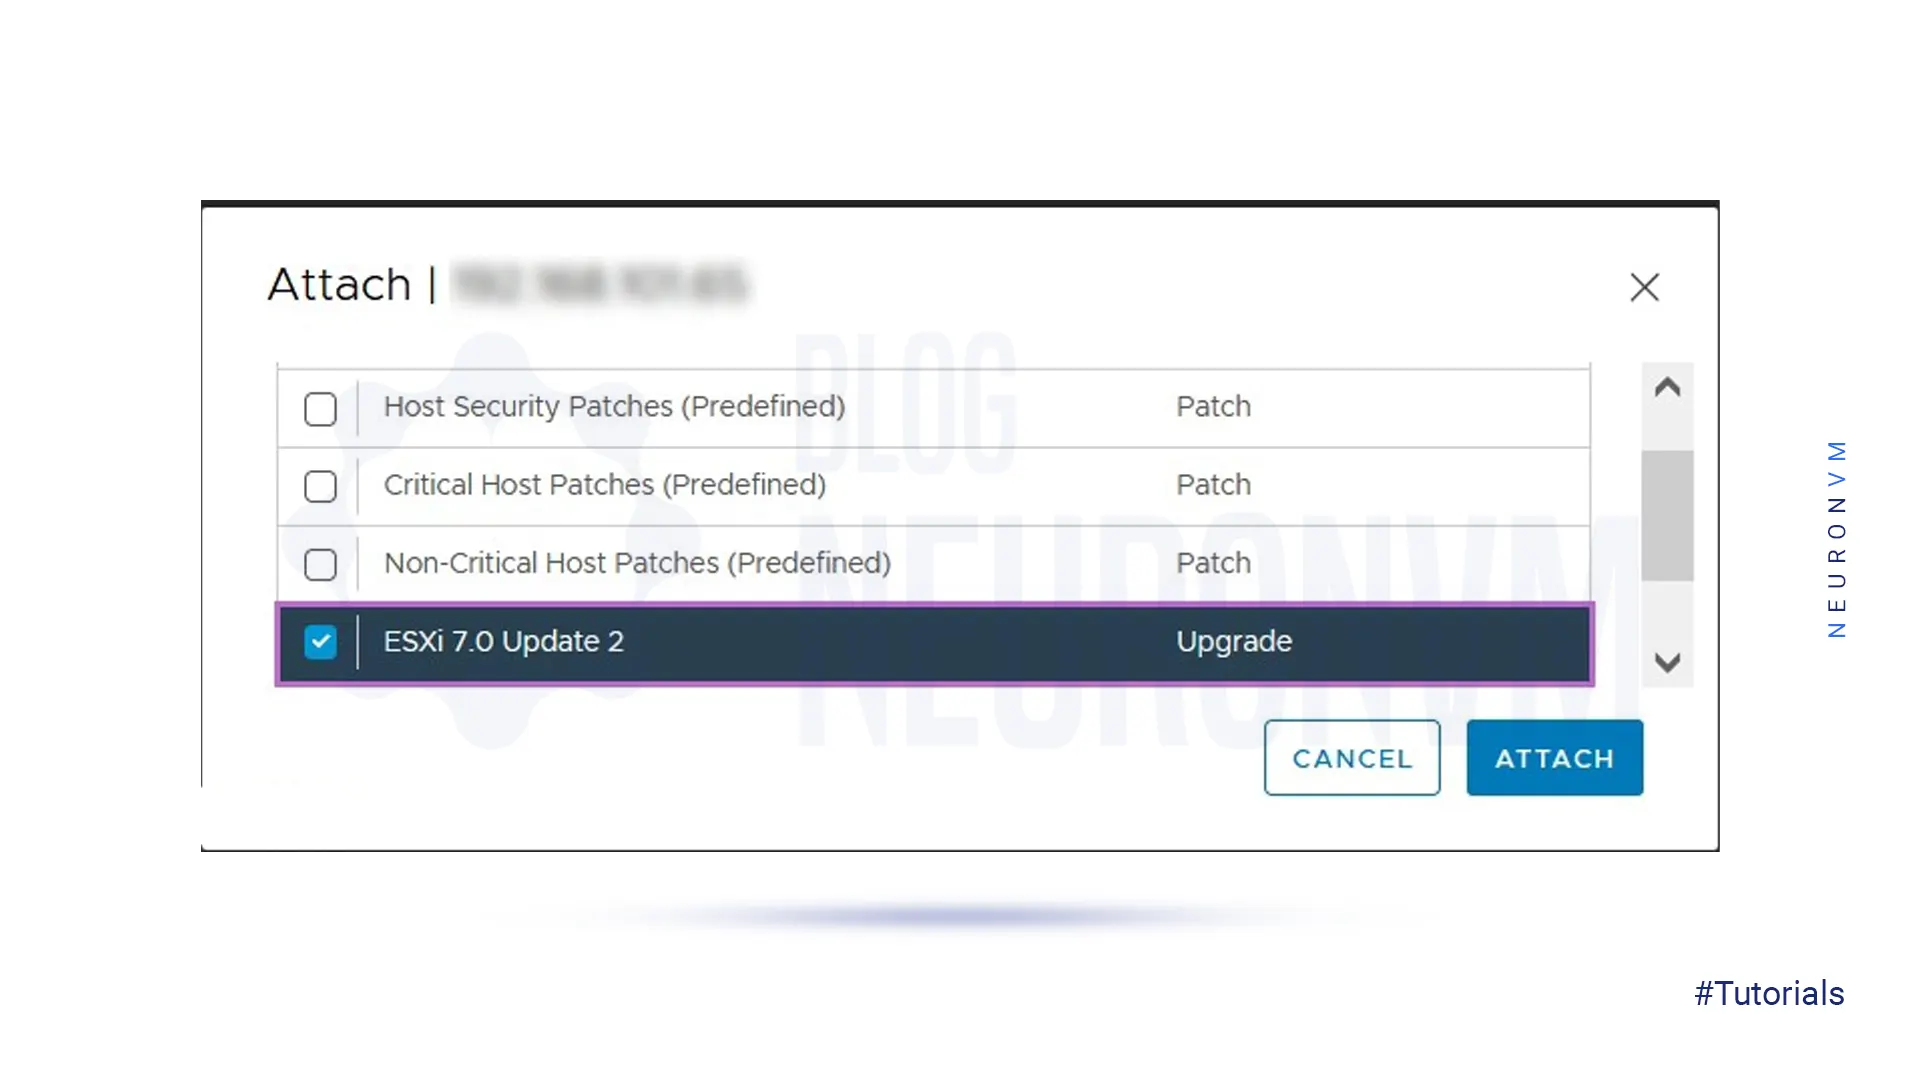
Choose the ESXi7.0 Update 2 baseline and click Attach. Remove other baselines by clicking Detach:
7- Now you should check compliance. The purpose of this step is to check if the ESXi host has already the update installed. Click check compliance:
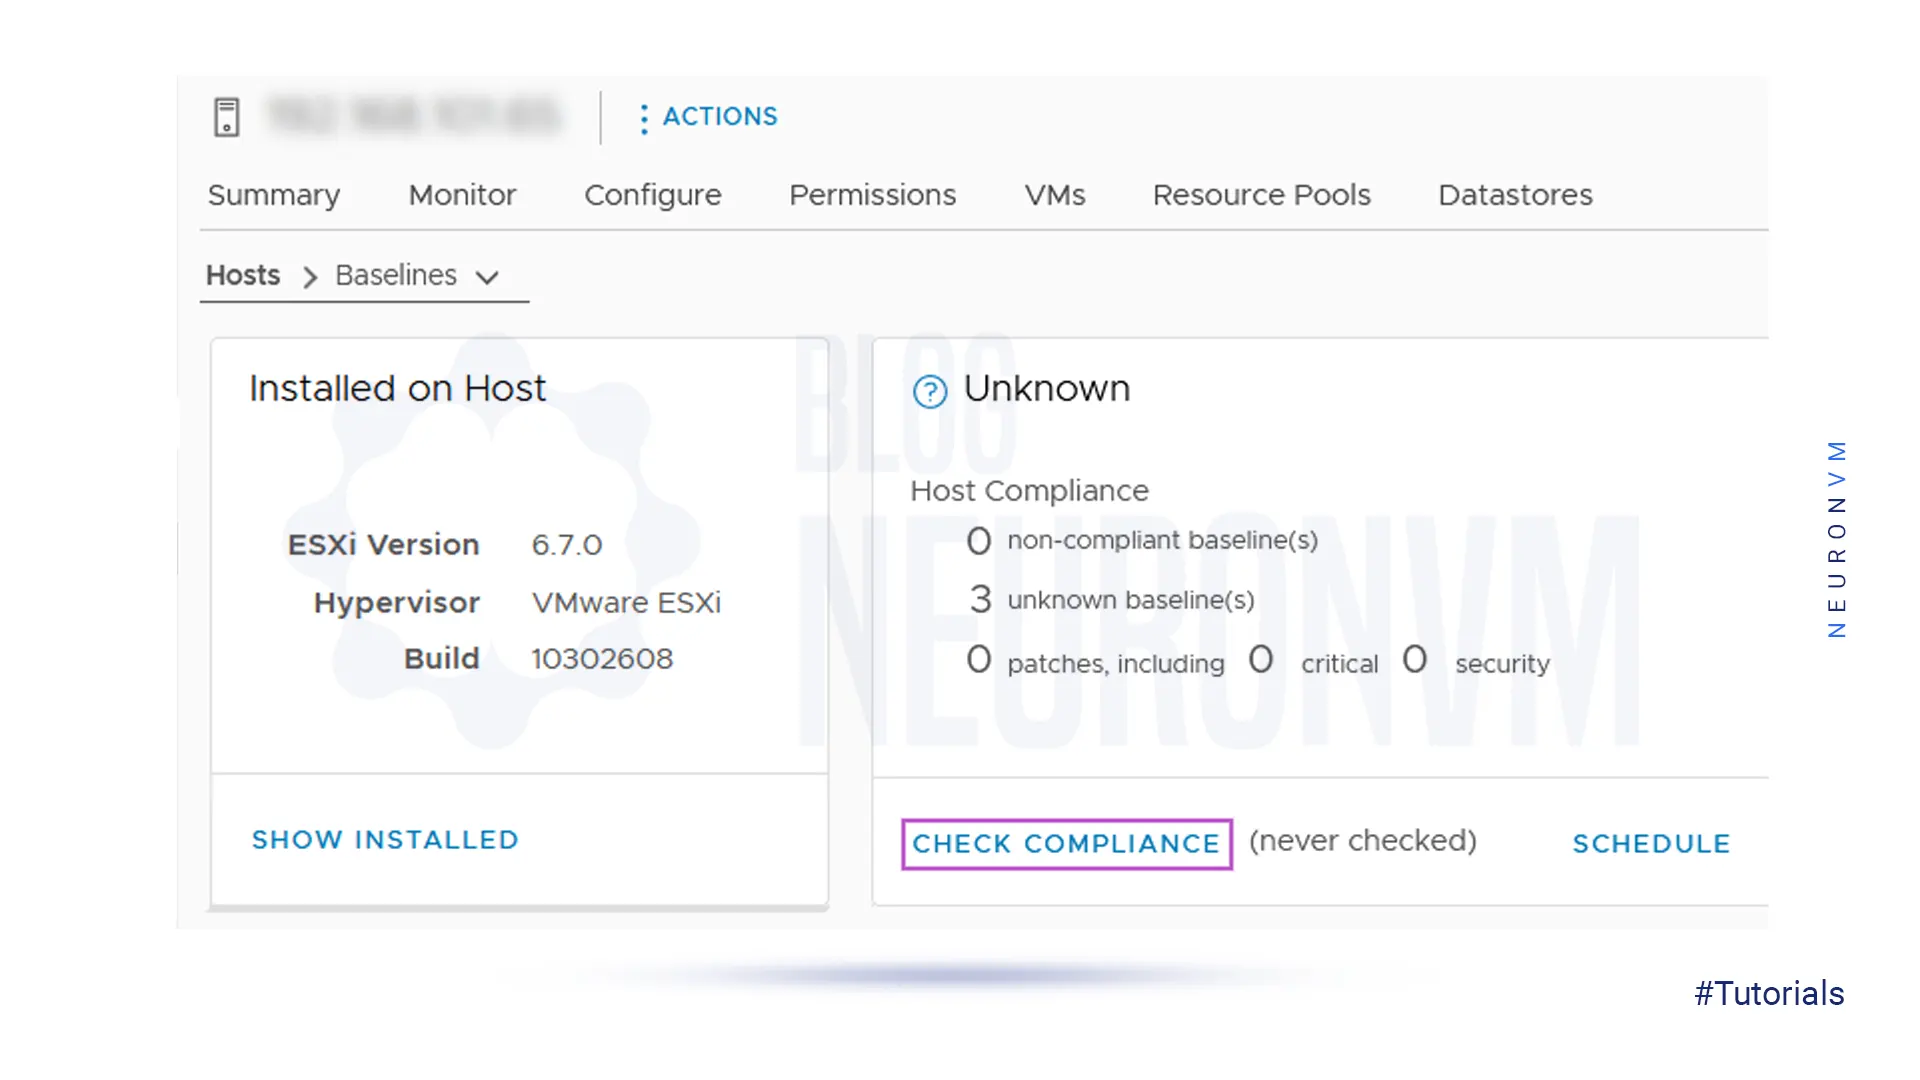
In the next image, you can see the result as non-compliant which means that you can install the needed update and upgrade the ESXi version:

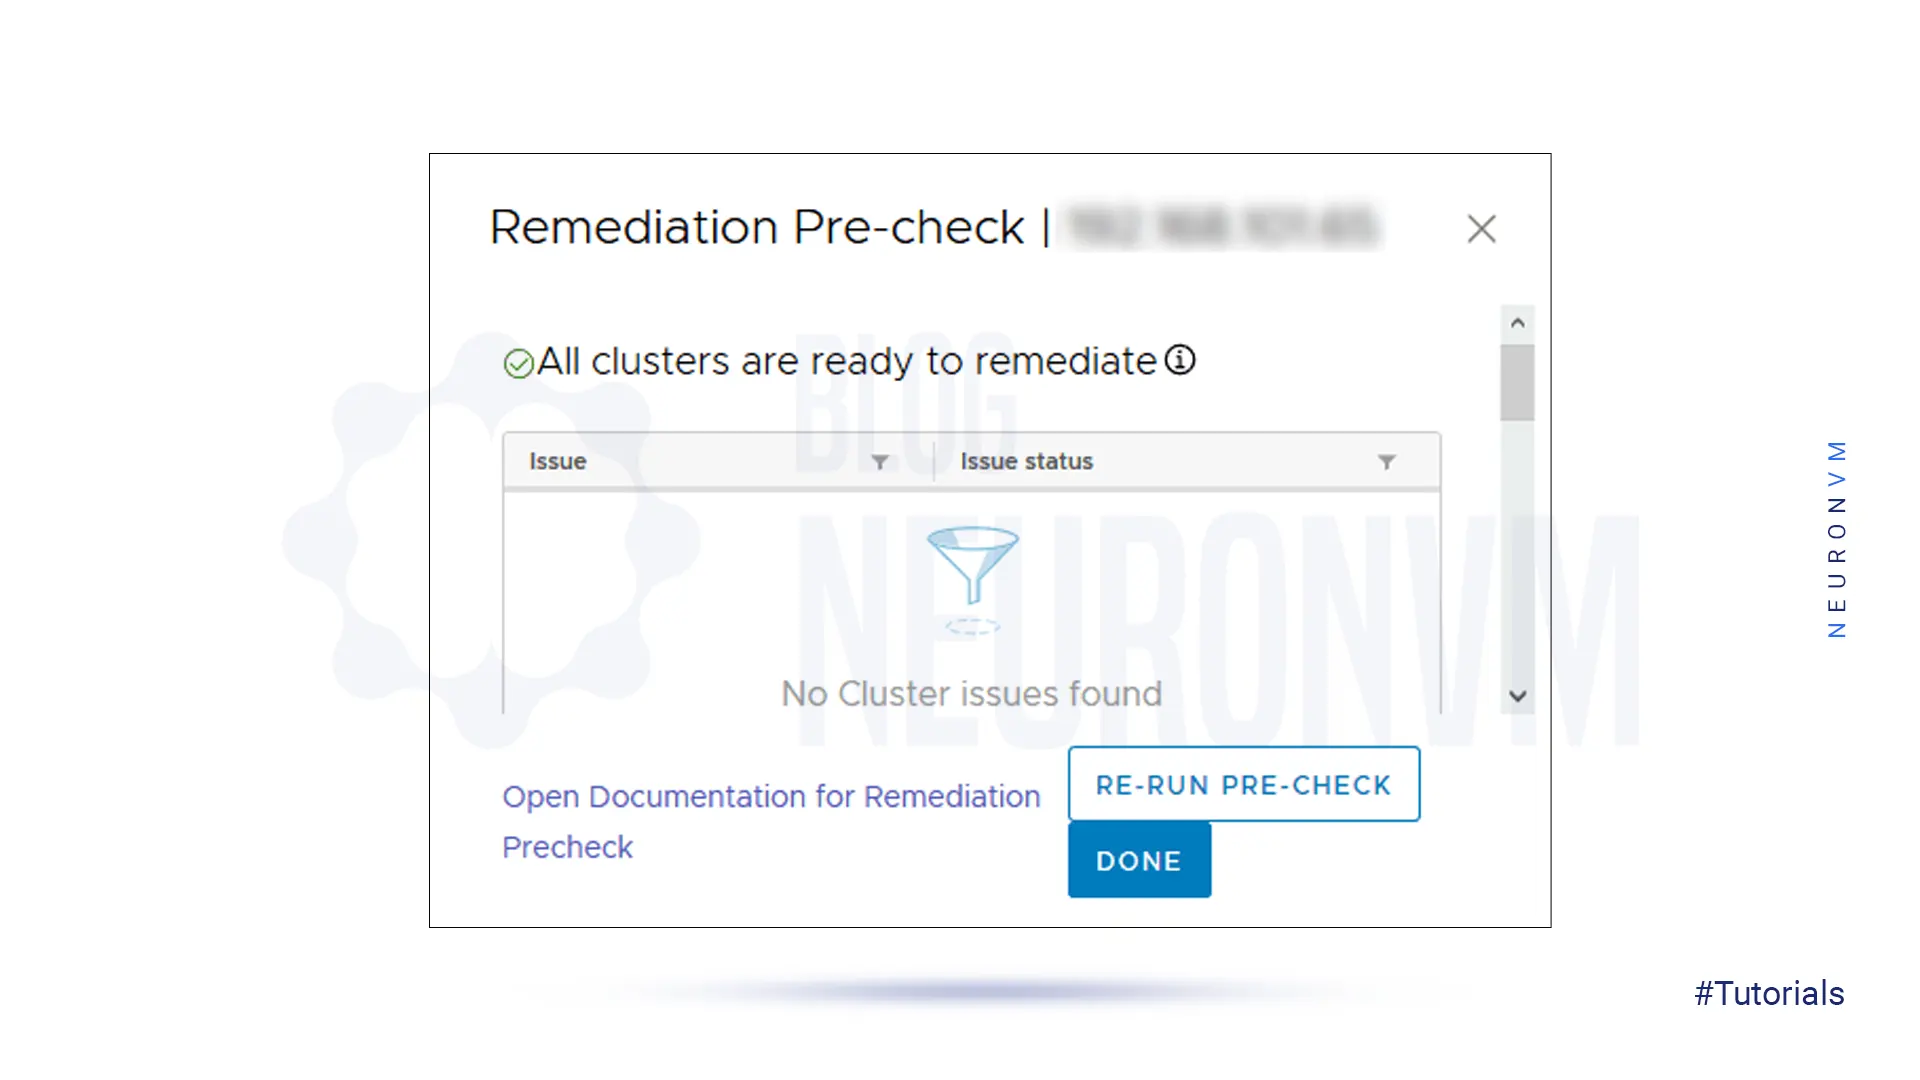
Now, it is time to pre-check remediation check for any compliance issues that may occur after installation updates:
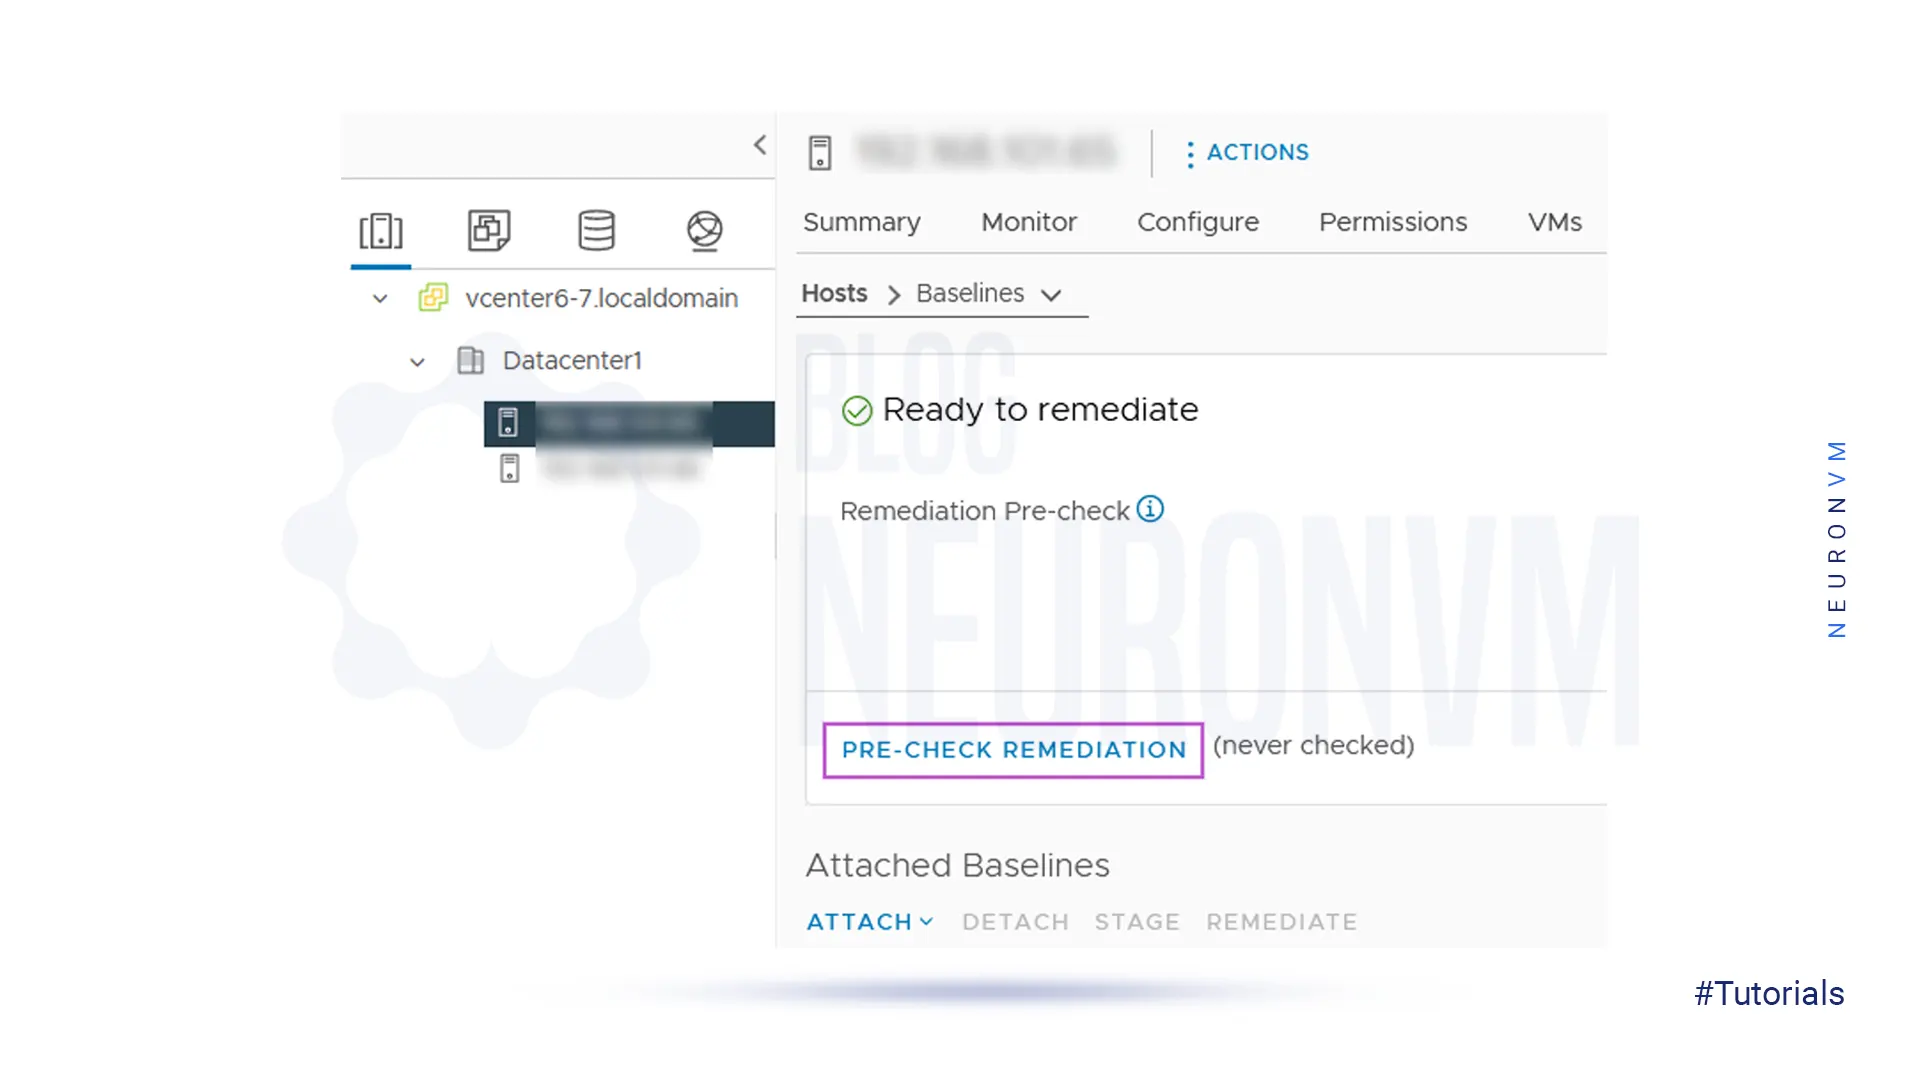
Here, you can press Done and go to upgrade the ESXi host:
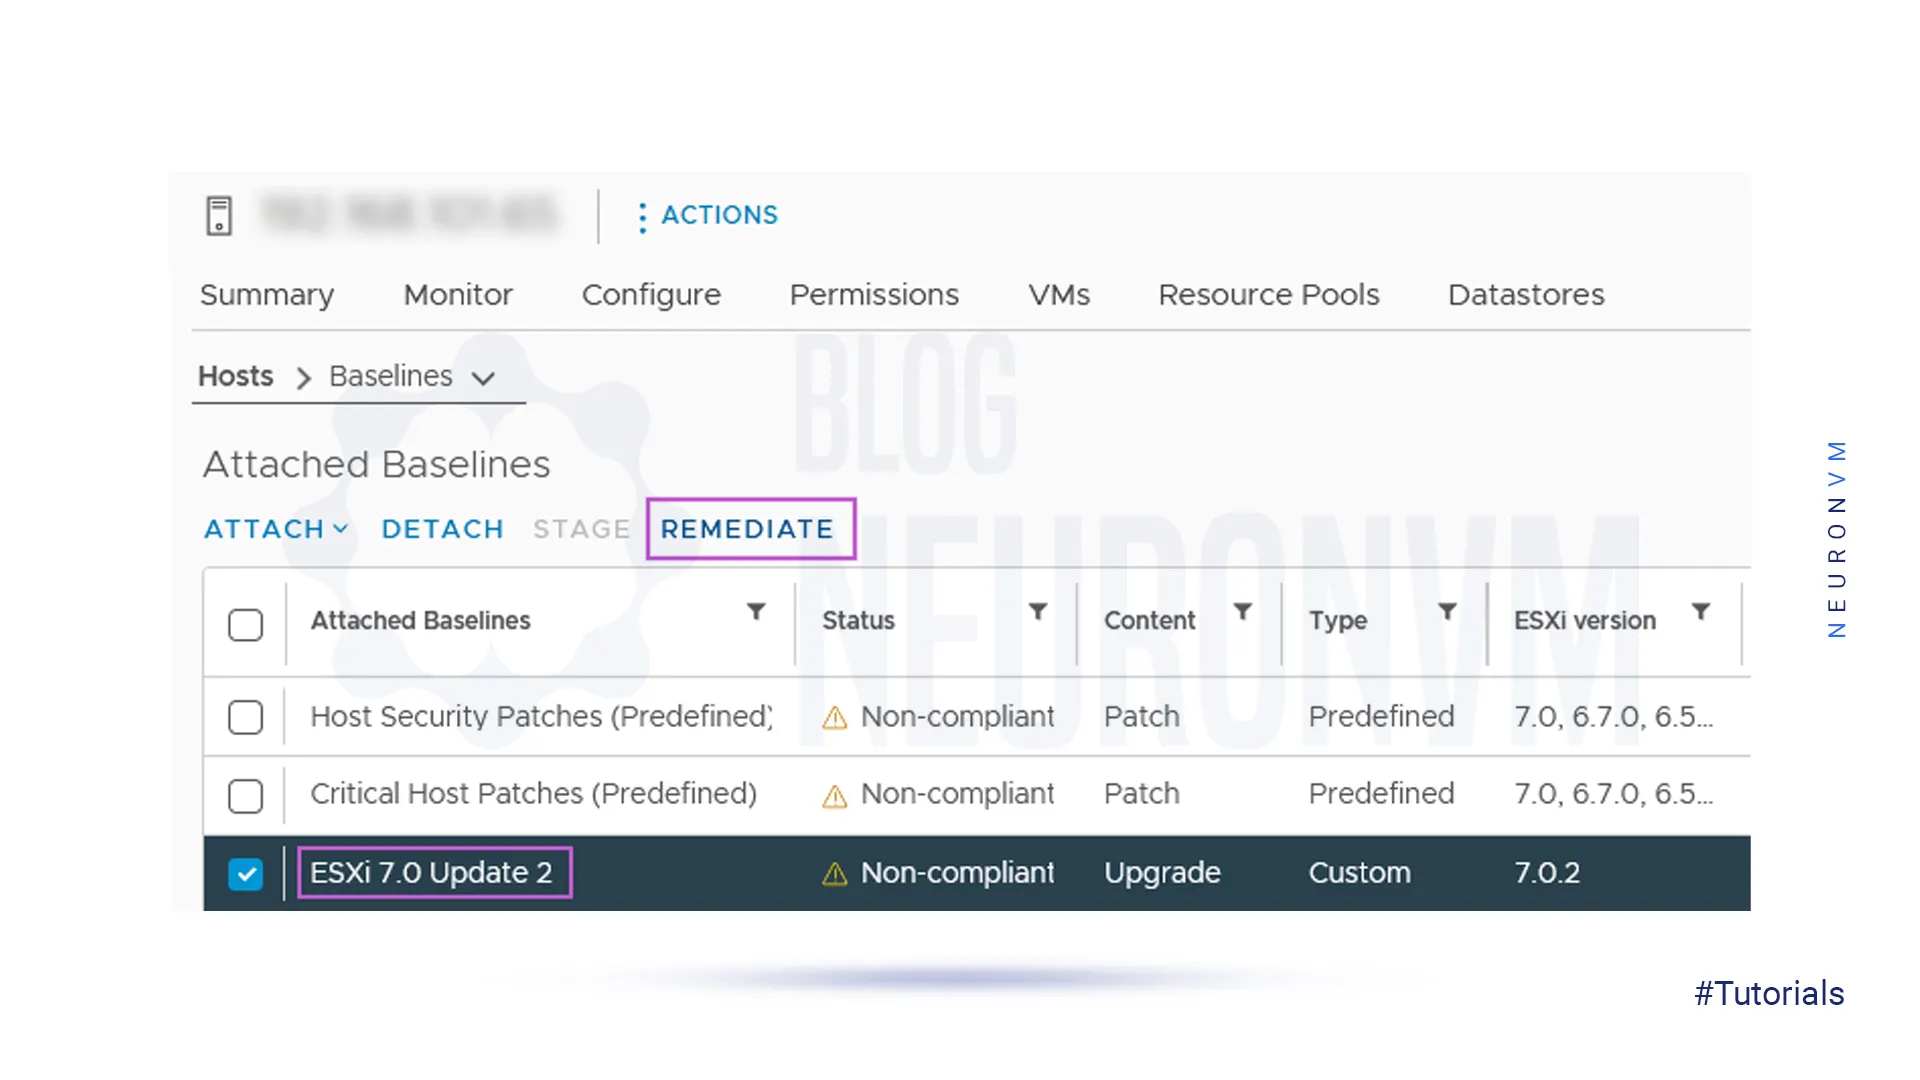
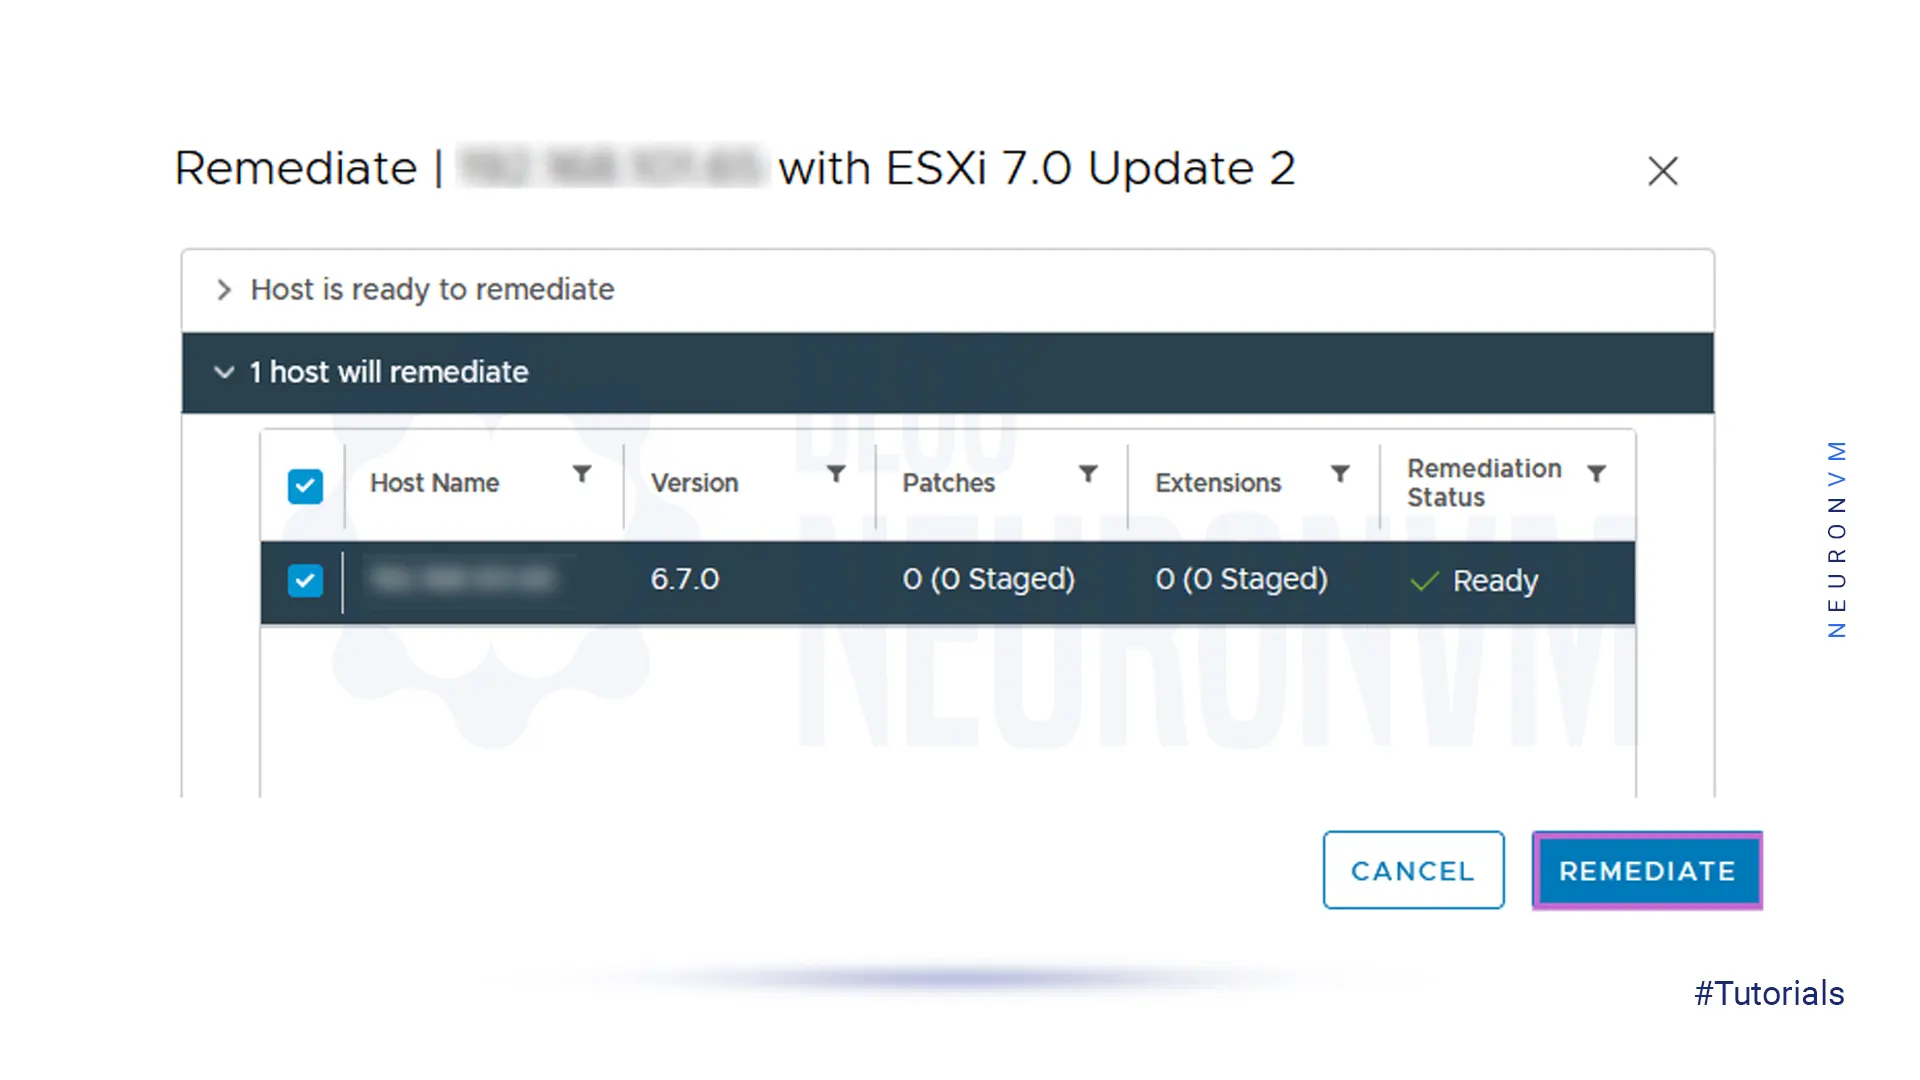
8- In the attached baseline section, select the ESXi 7.0 Update 2 baseline and click Remediate:
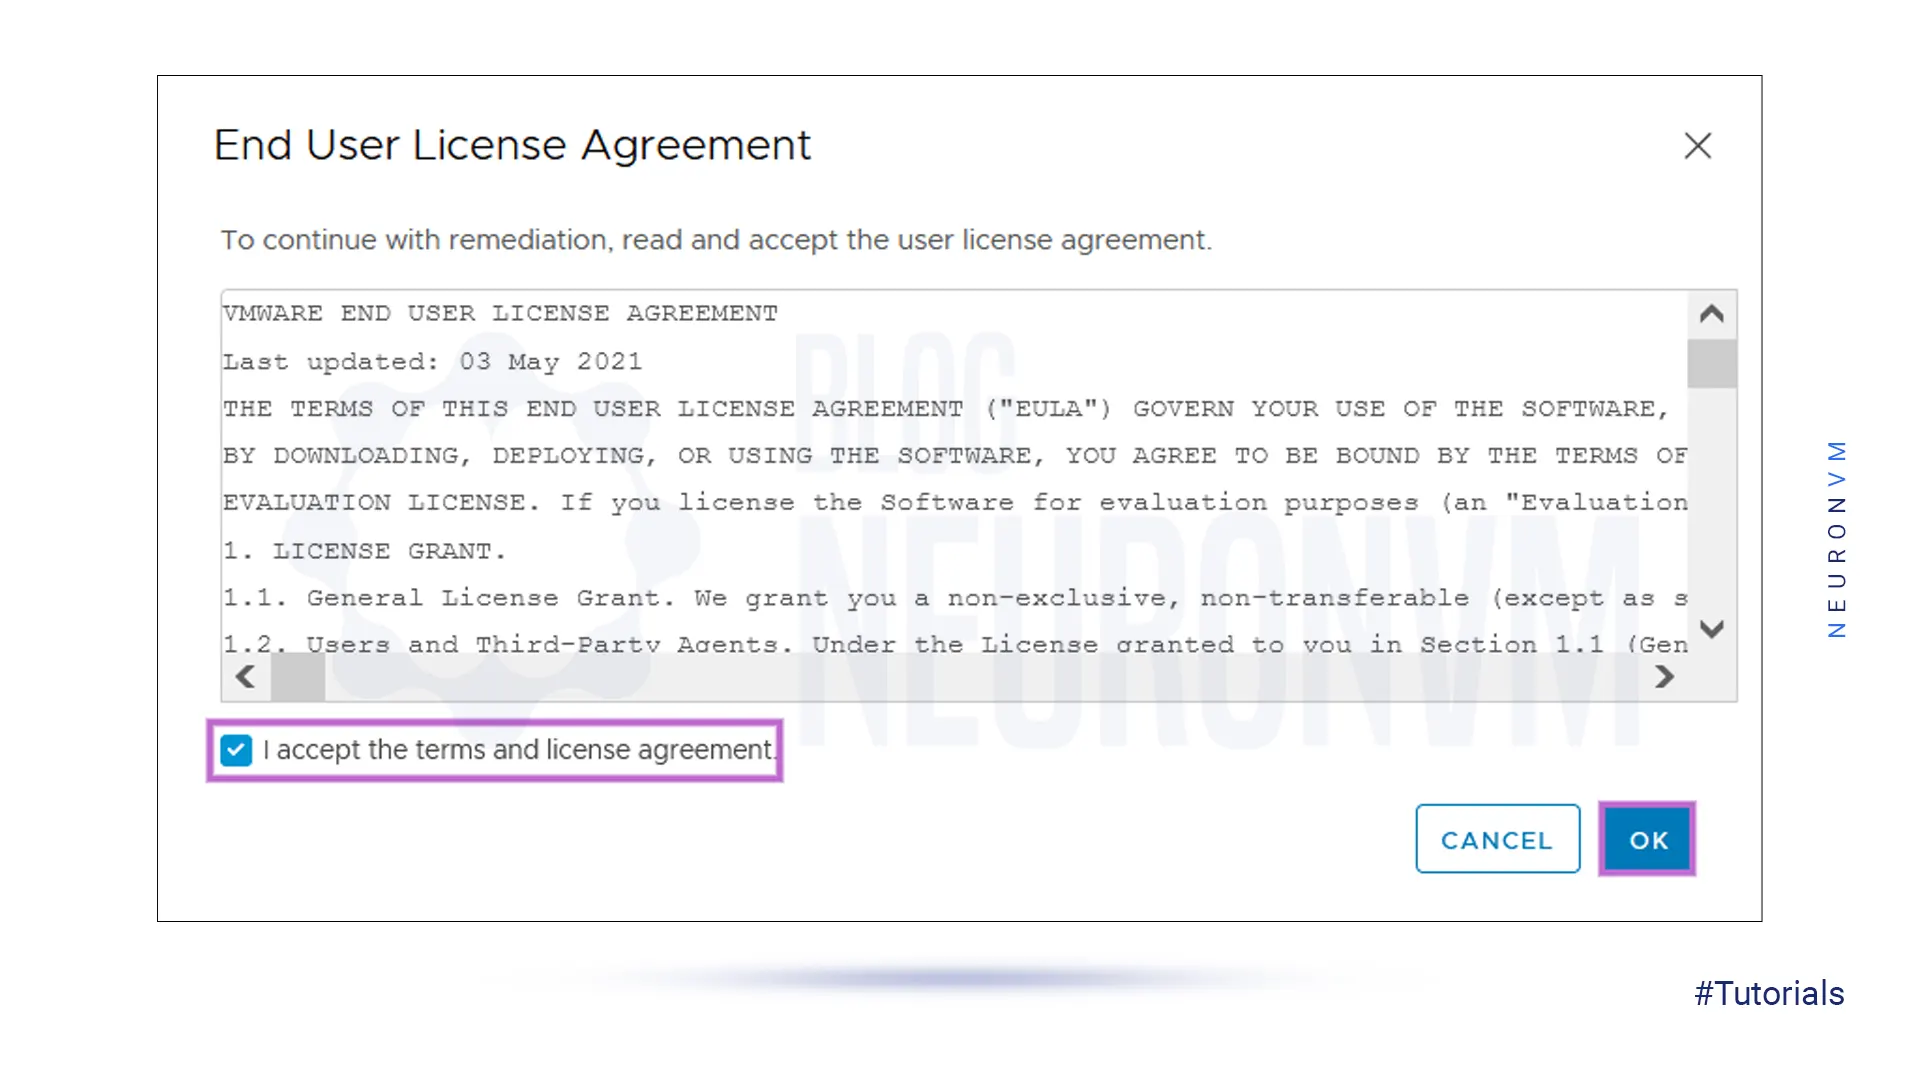
9- Here, you will encounter a pop-up screen select I accept the terms and license agreement then press OK:
10- Power off the virtual machines and then make sure that your host is selected and press Remediate:
Then you will see the ESXi upgrade progress in the Recent task toolbar at the bottom of the VMware vSphere client interface. It will automatically be entered into maintenance mode:
As you have finished, maintenance mode will be turned off for the host. The upgraded ESXi host is ready to work. Now you can select the ESXi host in the Hosts and Clusters view.
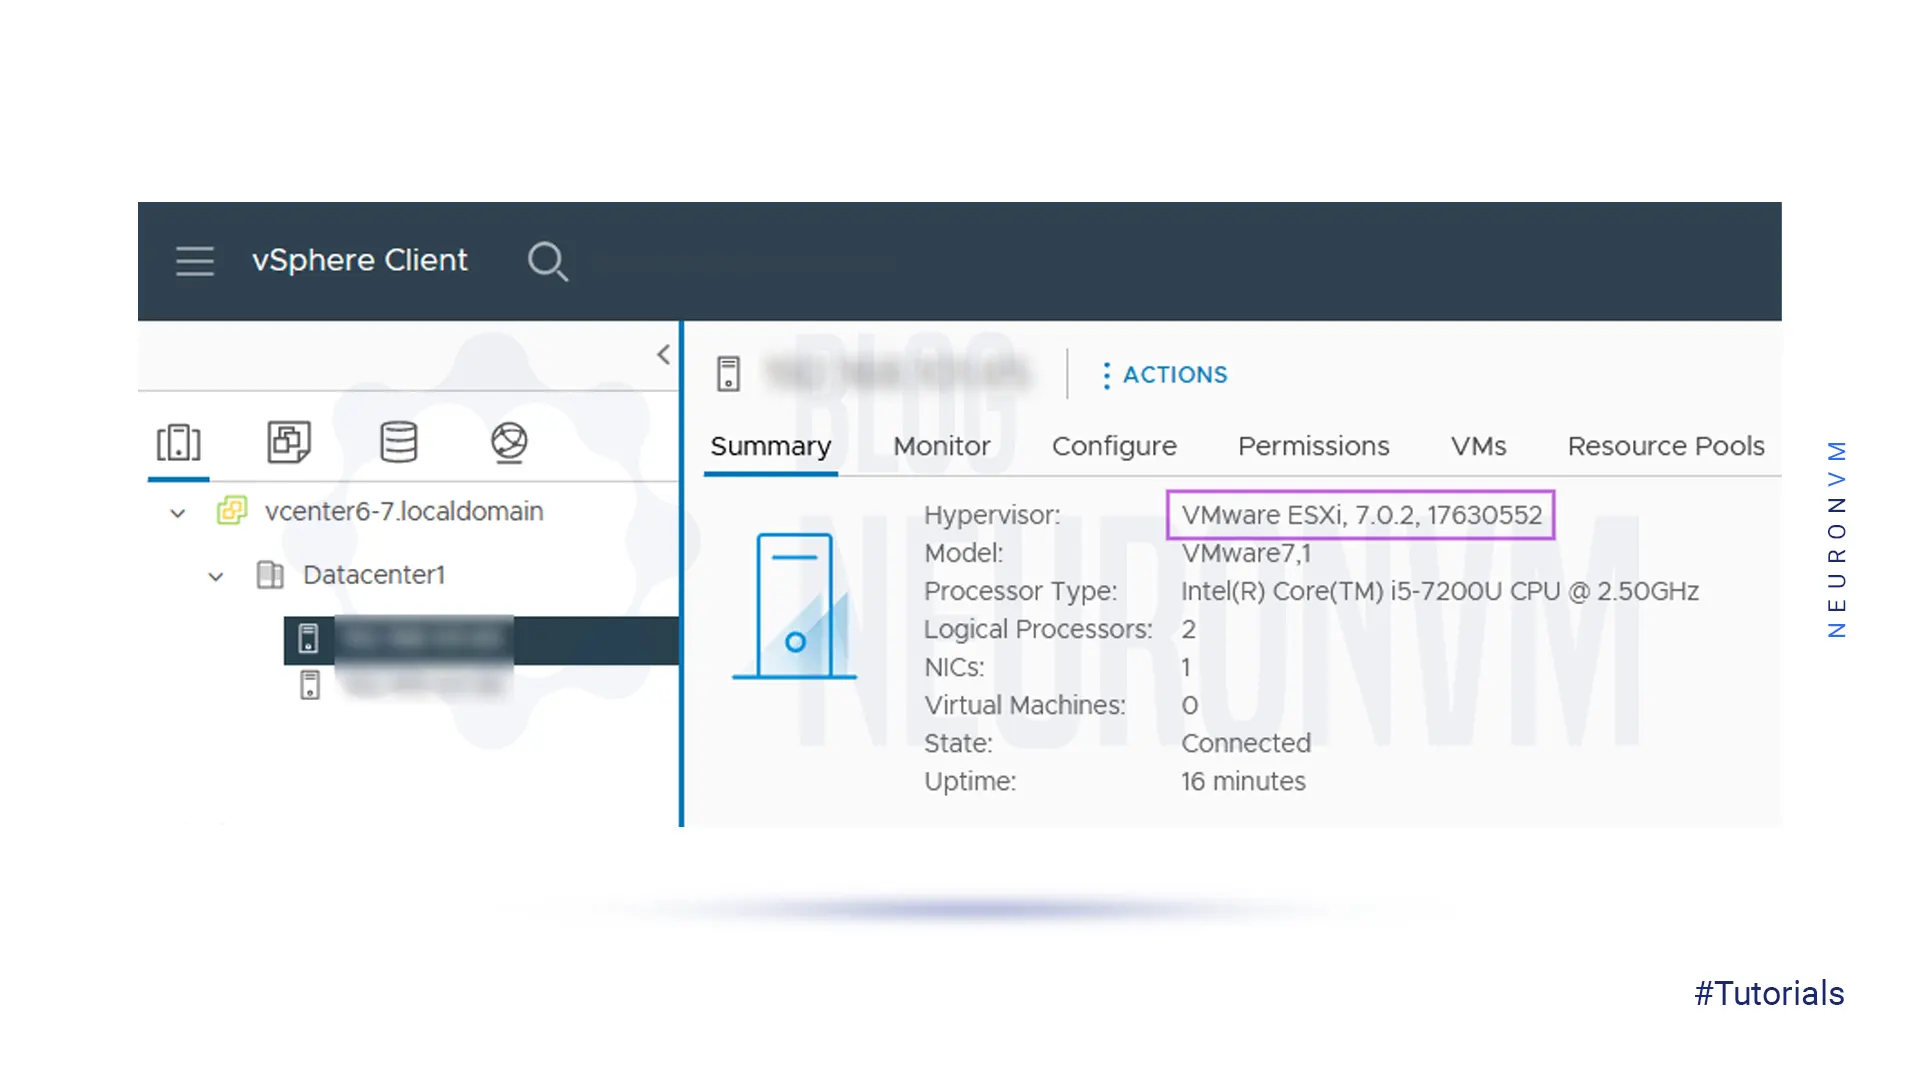
Check the version after the upgrade part:
If you find that the license has expired after upgrading, you must apply for the license for the upgraded version.
Using this guide, you learned how to upgrade VMware ESXi on a Dedicated server in two ways. You can use ESXCLI which is a command-line interface and vCenter to manage a large number of ESXi hosts by VMware lifecycle manager. We hope this article has helped you.
 Tags
Tags


After reading this article, you will fully learn how to install Metatrader on VPS. MetaTrader is a t...


 Tags
Tags

Varnish Cache can act as an intermediary between the server and users. In such a way that it receive...
Tags


